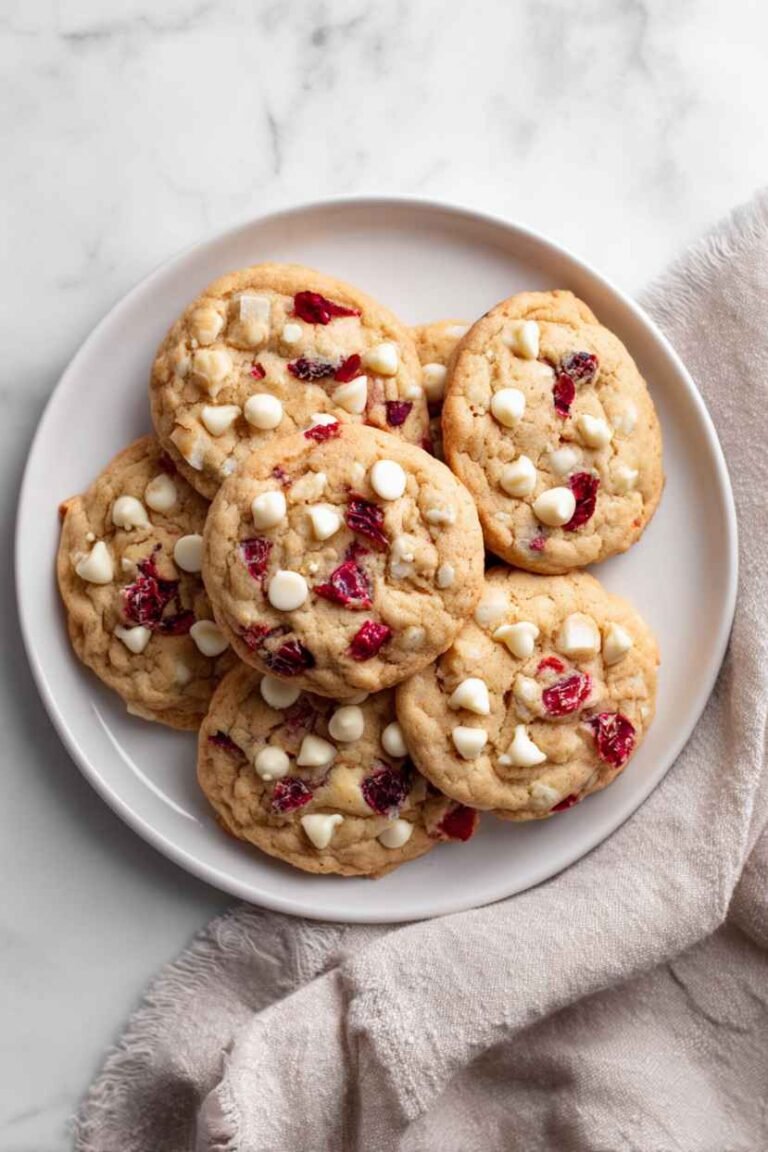
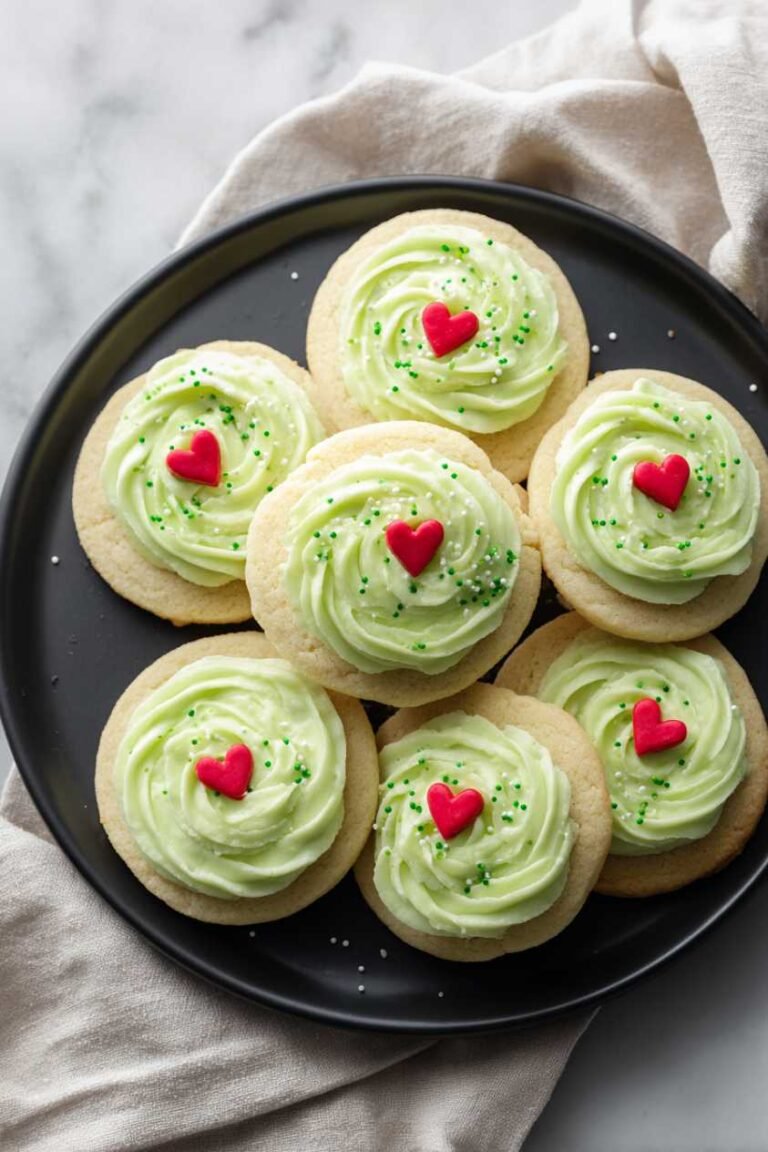
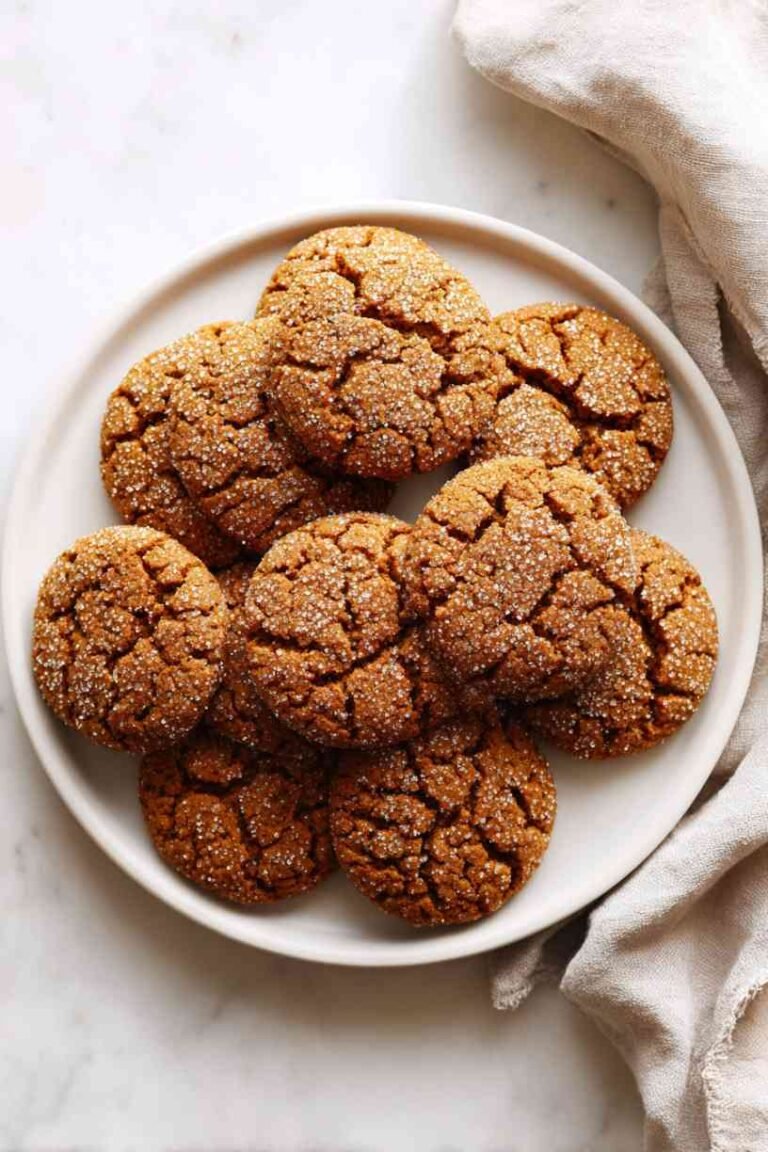
Listen, I love Crumbl cookies as much as the next person, but spending five dollars per cookie adds up really fast, especially when my family wants to try every flavor. That’s why I started making these Crumbl-style cookies at home, and honestly, they taste just as good – sometimes even better – than the real thing. These 10 delicious Crumbl-style cookie recipe ideas bring all those thick, bakery-style cookies with amazing toppings right into your own kitchen for a fraction of the cost.
The Cookies and Cream Milkshake Cookie is pure indulgence with crushed Oreos everywhere, while the Peanut Butter Cup Cookie satisfies every chocolate-peanut butter craving. The Chocolate Cake Cookie with Fudge Frosting is basically cake disguised as a cookie, and the Snickerdoodle Cupcake Cookie topped with cinnamon cream cheese frosting is absolutely divine. The Biscoff Cookie Butter Cookie is for all my cookie butter addicts, and the S’mores Crumbl Cookie brings campfire nostalgia to your kitchen. The stunning Red Velvet Cheesecake Cookie, bright Lemon Glaze Crumbl Cookie, and fudgy Brownie Batter Cookie are always crowd-pleasers. The Chilled Sugar Cookie with Almond Frosting is that viral favorite everyone goes crazy for, and the Birthday Cake Confetti Cookie makes every day feel like a celebration. The Cinnamon Roll Cookie tastes like breakfast and dessert combined, the Triple Chocolate Chip Cookie is for serious chocolate lovers, and the Key Lime Pie Crumbl Cookie is refreshingly tangy. The Pumpkin Chocolate Chip Cookie screams fall, the Oreo Crumble Cookie is cookies on cookies, the Salted Caramel Pretzel Cookie hits that sweet-salty spot perfectly, and the Strawberry Shortcake Cookie is like summer in cookie form.
Making these at home means you control the ingredients, save money, and can make your favorite flavors anytime you want. Trust me, once you try these, you’ll be hooked!
1. Cookies and Cream Milkshake Cookie
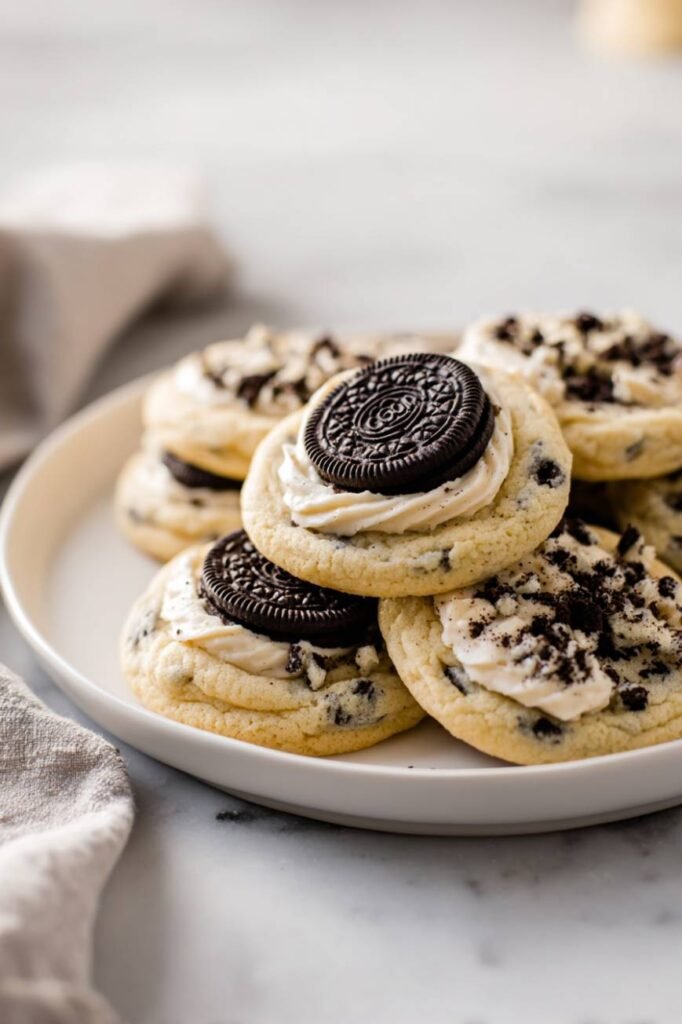
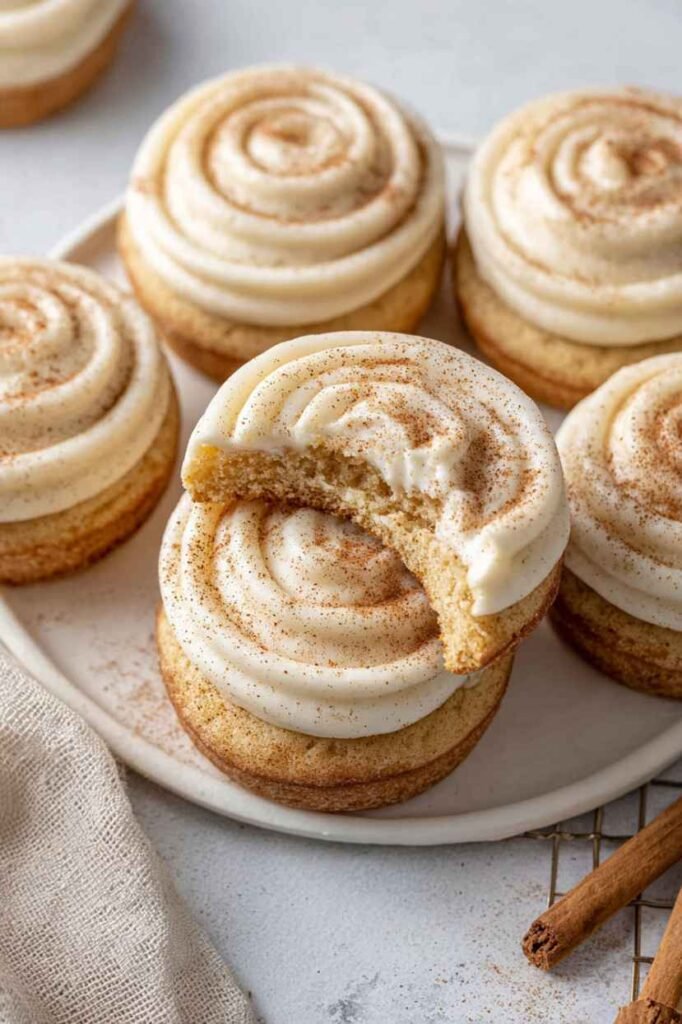
Cookies and cream milkshake cookie is an absolute showstopper that tastes exactly like drinking a creamy milkshake but in cookie form. The thick, soft cookie base is loaded with crushed Oreos and topped with the most incredible vanilla buttercream that melts in your mouth. I created this recipe after becoming obsessed with Crumbl cookies and wanting to recreate that bakery-quality texture at home. The secret is slightly underbaking the cookies so they stay thick and pillowy soft in the center. This has become the cookie everyone requests for birthdays and special occasions because it’s not just a cookie – it’s an experience that brings pure joy with every bite.
Ingredients
For the cookies:
- 2½ cups all-purpose flour
- 1 teaspoon baking soda
- 1 teaspoon cornstarch
- ½ teaspoon salt
- 1 cup unsalted butter, softened
- ¾ cup granulated sugar
- ¾ cup light brown sugar, packed
- 2 large eggs
- 2 teaspoons vanilla extract
- 1½ cups crushed Oreo cookies
- ½ cup white chocolate chips
For the frosting:
- 1 cup unsalted butter, softened
- 4 cups powdered sugar
- 3 tablespoons heavy cream
- 2 teaspoons vanilla extract
- Pinch of salt
- Whole Oreos for topping
Steps
Step 1: Preheat your oven to 350°F and line two large baking sheets with parchment paper. In a medium bowl, whisk together the flour, baking soda, cornstarch, and salt. The cornstarch is the secret ingredient that creates that signature Crumbl texture – thick, soft, and almost cake-like. Set aside. In a large bowl using an electric mixer, cream together the softened butter, granulated sugar, and brown sugar for three to four minutes until light and fluffy. The mixture should be pale and airy. This creaming process incorporates air that helps create thick cookies.
Step 2: Add the eggs one at a time, beating well after each addition. Add the vanilla extract and mix until combined. The mixture should be smooth and creamy. Gradually add the dry ingredients to the wet ingredients, mixing on low speed until just combined. Don’t overmix – overmixing develops gluten and makes cookies tough. Fold in the crushed Oreos and white chocolate chips using a spatula. The dough should be thick, chunky with cookie pieces, and smell amazing.
Step 3: Using a large cookie scoop (about ¼ cup), portion the dough into balls and place them on the prepared baking sheets, spacing them at least three inches apart. These cookies spread significantly, so don’t crowd them. Gently press each dough ball down slightly – they should be about one inch thick. This ensures they bake evenly and maintain that signature thick, soft center. The key to Crumbl-style cookies is making them large and thick.
Step 4: Bake for eleven to thirteen minutes until the edges are just set and lightly golden but the centers still look slightly underbaked. The cookies will look puffy and soft. This is exactly what you want – they’ll continue cooking as they cool and will set into that perfect soft texture. Let the cookies cool on the baking sheet for ten minutes, then transfer to a wire rack to cool completely. Resist the urge to eat them warm – they need to cool for the frosting.
Step 5: While the cookies cool, make the frosting. Beat the softened butter with an electric mixer for three minutes until light and fluffy. Gradually add the powdered sugar one cup at a time, beating well after each addition. Add the heavy cream, vanilla extract, and salt. Beat on high speed for three to four minutes until the frosting is light, fluffy, and spreadable. Once the cookies are completely cool, generously frost each cookie using an offset spatula or piping bag. Top each frosted cookie with a whole Oreo pressed gently into the frosting. The combination of soft cookie, creamy frosting, and crunchy Oreo is absolutely heavenly. These cookies and cream milkshake cookies are bakery-quality treats that taste like pure indulgence.
Prep Time: 25 minutes
Baking Time: 13 minutes per batch
Servings: 12 large cookies
2. Peanut Butter Cup Cookie
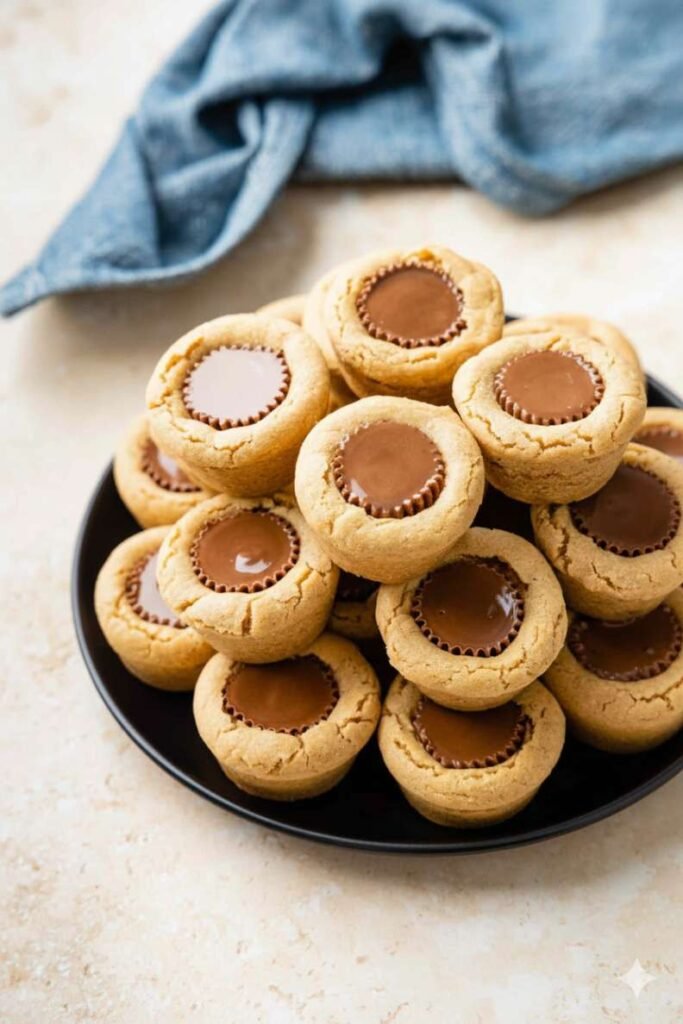
Peanut butter cup cookie is the ultimate dream for anyone who loves the classic combination of peanut butter and chocolate. These thick, soft cookies are loaded with chopped Reese’s cups and have this incredible peanut butter flavor that’s not too sweet but perfectly balanced. I developed this recipe because I wanted to capture that iconic candy in cookie form. The texture is what makes these special – they’re thick and chewy with chunks of peanut butter cups throughout that get melty and gooey when baked. This has become my most requested recipe from friends and family who can’t get enough of that sweet and salty peanut butter chocolate combination.
Ingredients
For the cookies:
- 2 cups all-purpose flour
- 1 teaspoon baking soda
- 1 teaspoon cornstarch
- ½ teaspoon salt
- ¾ cup unsalted butter, softened
- 1 cup creamy peanut butter
- ¾ cup light brown sugar, packed
- ½ cup granulated sugar
- 2 large eggs
- 2 teaspoons vanilla extract
- 2 cups chopped Reese’s peanut butter cups
- ½ cup chocolate chips
For topping:
- Extra Reese’s miniatures
- Flaky sea salt
Steps
Step 1: Preheat your oven to 350°F and line two baking sheets with parchment paper. In a medium bowl, whisk together the flour, baking soda, cornstarch, and salt. Set aside. In a large bowl using an electric mixer, beat together the softened butter and peanut butter for two minutes until smooth and creamy. The mixture should be well-combined with no lumps. Using natural peanut butter won’t work well here – you need the processed kind for the right texture and sweetness.
Step 2: Add the brown sugar and granulated sugar to the peanut butter mixture and beat for three minutes until light and fluffy. The sugars should be fully incorporated and the mixture should look slightly paler in color. Add the eggs one at a time, beating well after each addition. Add the vanilla extract and mix until combined. The batter should be smooth and smell incredible – like a peanut butter dream.
Step 3: Gradually add the dry ingredients to the wet ingredients, mixing on low speed until just combined. Don’t overmix or the cookies will be tough. The dough will be thick and slightly crumbly. Fold in the chopped Reese’s cups and chocolate chips using a spatula. The dough should be studded with candy pieces throughout. The combination of whole peanut butter and the chopped cups creates amazing texture.
Step 4: Using a large cookie scoop (about ¼ cup), portion the dough into balls and place them on the prepared baking sheets, spacing them three inches apart. Press each dough ball down slightly to about one inch thick. Press a few extra Reese’s miniatures on top of each cookie for visual appeal and extra peanut butter chocolate goodness. The candies on top will get slightly melty and create beautiful decoration.
Step 5: Bake for eleven to twelve minutes until the edges are set and lightly golden but the centers still look soft. Don’t overbake – these cookies continue cooking as they cool. Immediately after removing from the oven, sprinkle each cookie with a tiny pinch of flaky sea salt. The salt enhances the peanut butter flavor and balances the sweetness perfectly. Let the cookies cool on the baking sheet for ten minutes, then transfer to a wire rack to cool completely. These peanut butter cup cookies are thick, soft, and loaded with that irresistible peanut butter chocolate combination. They’re pure peanut butter heaven in cookie form.
Prep Time: 20 minutes
Baking Time: 12 minutes per batch
Servings: 14 large cookies
3. Chocolate Cake Cookie with Fudge Frosting

Chocolate cake cookie with fudge frosting is pure decadence that combines the best of chocolate cake and cookies into one incredible treat. The cookie base is rich, fudgy, and has that perfect cake-like texture while still being a cookie. I created this recipe when I wanted something more indulgent than a regular chocolate chip cookie but didn’t want to make a whole cake. The thick fudge frosting on top takes these from delicious to absolutely extraordinary. This has become my signature dessert for chocolate lovers because it delivers intense chocolate flavor in every single bite. It’s like eating the best chocolate cake but in handheld cookie form.
Ingredients
For the cookies:
- 1½ cups all-purpose flour
- ¾ cup Dutch-process cocoa powder
- 1 teaspoon baking soda
- 1 teaspoon cornstarch
- ½ teaspoon salt
- ¾ cup unsalted butter, softened
- 1 cup granulated sugar
- ½ cup light brown sugar, packed
- 2 large eggs
- 2 teaspoons vanilla extract
- 1 cup chocolate chips
For the fudge frosting:
- ½ cup unsalted butter
- ⅓ cup cocoa powder
- 3 cups powdered sugar
- ⅓ cup heavy cream
- 1 teaspoon vanilla extract
- Pinch of salt
- Chocolate shavings for topping
Steps
Step 1: Preheat your oven to 350°F and line two baking sheets with parchment paper. In a medium bowl, sift together the flour, cocoa powder, baking soda, cornstarch, and salt. Sifting is important for cocoa powder because it tends to clump – you want a smooth, lump-free mixture. Set aside. In a large bowl, cream the softened butter, granulated sugar, and brown sugar together for three to four minutes until light and fluffy. The mixture should be pale and airy despite the butter color.
Step 2: Add the eggs one at a time, beating well after each addition. Add the vanilla extract and mix until combined. The batter should be smooth and smell like chocolate heaven. Gradually add the dry ingredients to the wet ingredients, mixing on low speed until just combined. The dough will be thick, dark, and fudgy. Fold in the chocolate chips using a spatula. The extra chocolate chips add pockets of melty chocolate throughout the already chocolatey cookies.
Step 3: Using a large cookie scoop (about ¼ cup), portion the dough into balls and place them on the prepared baking sheets, spacing them three inches apart. These cookies spread quite a bit. Press each dough ball down slightly to about one inch thick. The dough will be soft and fudgy, which is perfect – that’s what creates the cake-like texture.
Step 4: Bake for eleven to thirteen minutes until the edges are set but the centers still look slightly underbaked and soft. The cookies will look puffy and may have some cracks on top. Let them cool on the baking sheet for ten minutes – they’ll continue to set as they cool. Transfer to a wire rack to cool completely before frosting. Frosting warm cookies will cause the frosting to melt and slide off.
Step 5: To make the fudge frosting, melt the butter in a medium saucepan over medium heat. Whisk in the cocoa powder until smooth and combined. Remove from heat and gradually whisk in the powdered sugar, alternating with the heavy cream. Add the vanilla extract and salt. Beat vigorously until the frosting is smooth, thick, and glossy. If it’s too thick, add more cream one tablespoon at a time. If too thin, add more powdered sugar. Once the cookies are completely cool, generously frost each one using an offset spatula. Top with chocolate shavings for an elegant finish. These chocolate cake cookies with fudge frosting are intensely chocolatey, rich, and absolutely irresistible. They’re the ultimate treat for serious chocolate lovers.
Prep Time: 25 minutes
Baking Time: 13 minutes per batch
Servings: 12 large cookies
4. Snickerdoodle Cupcake Cookie
Snickerdoodle cupcake cookie is the perfect combination of two beloved classics that creates something entirely new and magical. The cinnamon sugar cookie base is soft and pillowy, topped with the most incredible cinnamon cream cheese frosting. I developed this recipe because I wanted to elevate the classic snickerdoodle into something more special and bakery-worthy. The cream cheese frosting adds tanginess that perfectly balances the sweet cinnamon cookie. This has become my favorite cookie to make for fall gatherings and holidays because it captures all those warm, cozy cinnamon flavors we crave. It’s like eating a cupcake but in cookie form, which makes it even more fun.
Ingredients
For the cookies:
- 2¾ cups all-purpose flour
- 2 teaspoons cream of tartar
- 1 teaspoon baking soda
- 1 teaspoon cornstarch
- ½ teaspoon salt
- 1 cup unsalted butter, softened
- 1½ cups granulated sugar
- 2 large eggs
- 2 teaspoons vanilla extract
For rolling:
- ½ cup granulated sugar
- 2 tablespoons cinnamon
For the frosting:
- 8 oz cream cheese, softened
- ½ cup unsalted butter, softened
- 3½ cups powdered sugar
- 2 teaspoons cinnamon
- 1 teaspoon vanilla extract
- Pinch of salt
- Extra cinnamon for dusting
Steps
Step 1: Preheat your oven to 350°F and line two baking sheets with parchment paper. In a medium bowl, whisk together the flour, cream of tartar, baking soda, cornstarch, and salt. The cream of tartar is what gives snickerdoodles their signature tangy flavor and chewy texture. Set aside. In a large bowl, cream the softened butter and sugar together for three to four minutes until light and fluffy. The mixture should be pale and airy. This extra creaming time creates cookies with the perfect soft texture.
Step 2: Add the eggs one at a time, beating well after each addition. Add the vanilla extract and mix until combined. The mixture should be smooth and creamy. Gradually add the dry ingredients to the wet ingredients, mixing on low speed until just combined. The dough will be soft and slightly sticky but should hold together well. If the dough seems too soft, refrigerate for fifteen minutes to make it easier to handle.
Step 3: In a small bowl, mix together the ½ cup sugar and 2 tablespoons cinnamon for rolling. Using a large cookie scoop (about ¼ cup), portion the dough into balls and roll each one generously in the cinnamon sugar mixture, coating completely. The cinnamon sugar coating creates that signature snickerdoodle flavor and appearance. Place the coated dough balls on the prepared baking sheets, spacing them three inches apart. Press each ball down slightly to about one inch thick.
Step 4: Bake for eleven to thirteen minutes until the edges are set and lightly golden but the centers still look soft and slightly underbaked. The cookies will puff up and may develop some cracks, which is perfect. Let them cool on the baking sheet for ten minutes, then transfer to a wire rack to cool completely before frosting. The cookies will flatten slightly as they cool, creating that perfect thick, soft texture.
Step 5: To make the cinnamon cream cheese frosting, beat the softened cream cheese and butter together for three minutes until smooth and fluffy with no lumps. Gradually add the powdered sugar one cup at a time, beating well after each addition. Add the cinnamon, vanilla extract, and salt. Beat on high speed for three to four minutes until the frosting is light, fluffy, and creamy. Once the cookies are completely cool, generously frost each one using a piping bag or offset spatula. Dust the tops with a light sprinkle of cinnamon for decoration. These snickerdoodle cupcake cookies are soft, cinnamony, and topped with the most incredible cream cheese frosting. They’re like eating a cinnamon roll and snickerdoodle combined into one perfect treat.
Prep Time: 25 minutes
Baking Time: 13 minutes per batch
Servings: 14 large cookies
5. Biscoff Cookie Butter Cookie
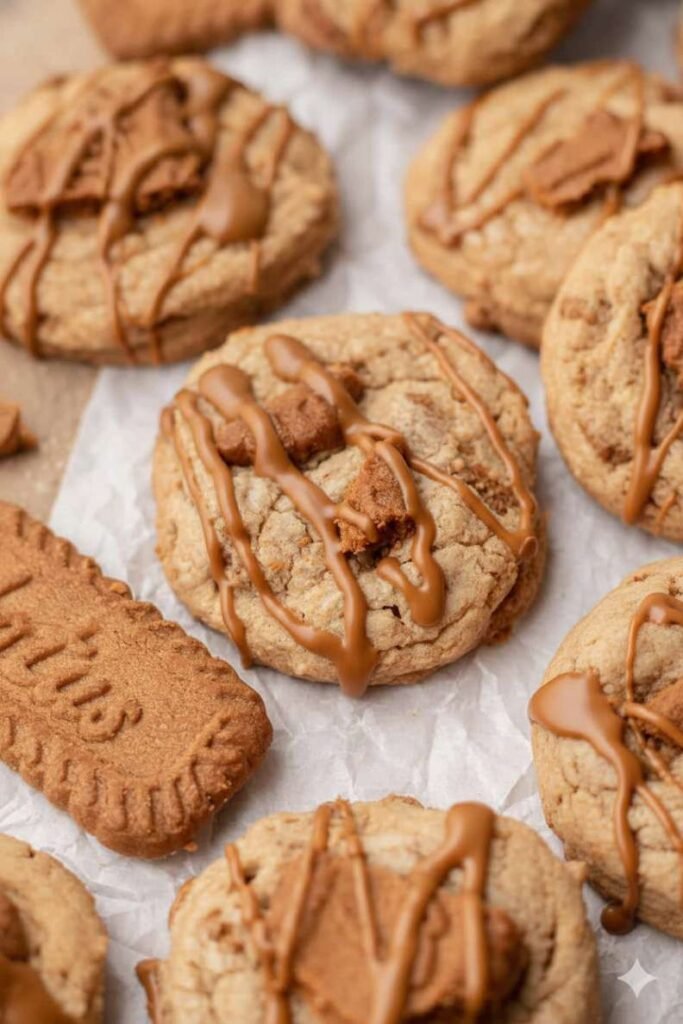
Biscoff cookie butter cookie is an absolute revelation for anyone who loves that addictive speculoos spread. The cookie base is infused with Biscoff cookie butter, creating this incredible caramelized, almost toffee-like flavor throughout. I became obsessed with this recipe after tasting Biscoff spread for the first time and wanting to incorporate it into everything. The cookies are topped with more cookie butter frosting and crushed Biscoff cookies for maximum flavor. This has become my most unique cookie recipe that always gets people asking for the recipe. The combination of cookie butter in the dough and frosting creates layers of that distinctive spiced, caramelized flavor.
Ingredients
For the cookies:
- 2 cups all-purpose flour
- 1 teaspoon baking soda
- 1 teaspoon cornstarch
- 1 teaspoon cinnamon
- ½ teaspoon salt
- ½ cup unsalted butter, softened
- ¾ cup Biscoff cookie butter
- ¾ cup light brown sugar, packed
- ½ cup granulated sugar
- 2 large eggs
- 2 teaspoons vanilla extract
- 1 cup crushed Biscoff cookies
For the frosting:
- ¾ cup Biscoff cookie butter
- ½ cup unsalted butter, softened
- 3 cups powdered sugar
- 2-3 tablespoons heavy cream
- ½ teaspoon vanilla extract
- Whole Biscoff cookies for topping
Steps
Step 1: Preheat your oven to 350°F and line two baking sheets with parchment paper. In a medium bowl, whisk together the flour, baking soda, cornstarch, cinnamon, and salt. The cinnamon enhances the spiced flavor of the Biscoff. Set aside. In a large bowl, beat together the softened butter and Biscoff cookie butter for two minutes until smooth and creamy. The mixture should be completely combined with no streaks. The cookie butter adds incredible flavor and also affects the texture, making the cookies extra soft.
Step 2: Add the brown sugar and granulated sugar to the butter mixture and beat for three minutes until light and fluffy. Add the eggs one at a time, beating well after each addition. Add the vanilla extract and mix until combined. The batter should be smooth and smell amazing – like caramelized cookies. Gradually add the dry ingredients to the wet ingredients, mixing on low speed until just combined. Fold in the crushed Biscoff cookies using a spatula. The cookie pieces add texture and extra flavor.
Step 3: Using a large cookie scoop (about ¼ cup), portion the dough into balls and place them on the prepared baking sheets, spacing them three inches apart. Press each dough ball down slightly to about one inch thick. The dough will be soft and spreadable, which is normal because of the cookie butter. Don’t worry if they seem softer than regular cookie dough – they’ll bake up perfectly.
Step 4: Bake for eleven to twelve minutes until the edges are set and lightly golden but the centers still look soft. These cookies spread quite a bit as they bake, creating a thin, crispy edge with a soft center. Let them cool on the baking sheet for ten minutes – they’ll firm up as they cool. Transfer to a wire rack to cool completely before frosting.
Step 5: To make the Biscoff frosting, beat the cookie butter and softened butter together for two minutes until smooth and creamy. Gradually add the powdered sugar one cup at a time, beating well after each addition. Add the heavy cream and vanilla extract. Beat on high speed for three minutes until the frosting is light and fluffy. If it seems too thick, add more cream one tablespoon at a time. Once the cookies are completely cool, generously frost each one. Top with a whole Biscoff cookie pressed gently into the frosting. These Biscoff cookie butter cookies are uniquely delicious with that distinctive caramelized, spiced flavor throughout. They’re perfect for anyone who’s obsessed with cookie butter.
Prep Time: 25 minutes
Baking Time: 12 minutes per batch
Servings: 13 large cookies
6. S’mores Crumbl Cookie
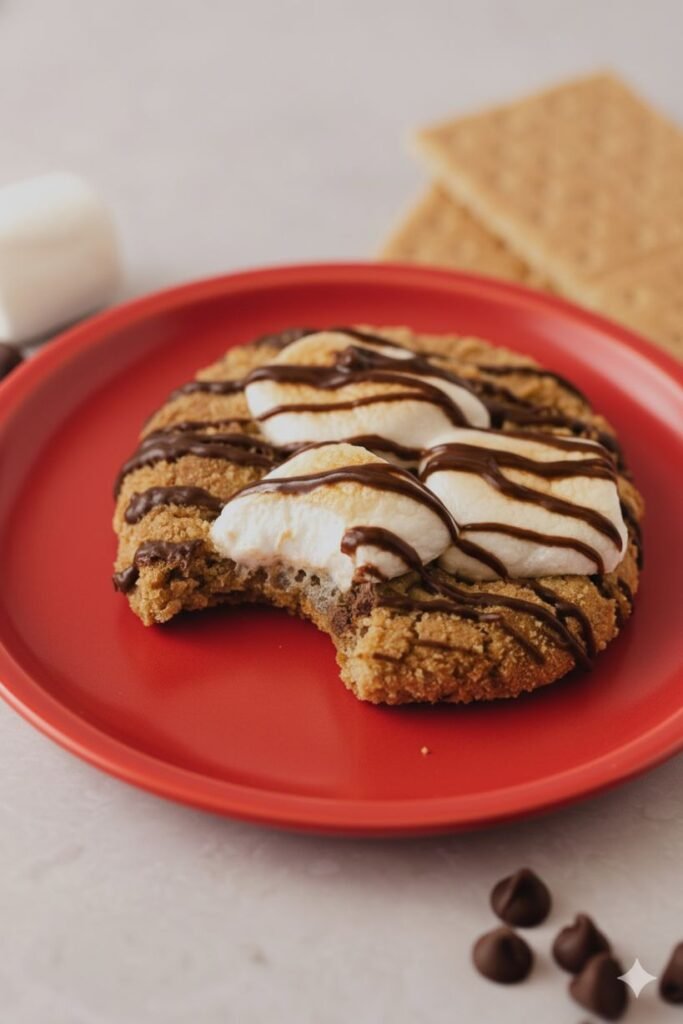
S’mores Crumbl cookie captures all the magic of campfire s’mores in one incredible cookie that you can enjoy year-round. The graham cracker cookie base is topped with melty chocolate and toasted marshmallow frosting that tastes exactly like the real thing. I developed this recipe because I wanted s’mores flavor without needing a campfire. The cookie itself has crushed graham crackers mixed in, and the frosting is made with actual marshmallow that gets torched for that authentic toasted flavor. This has become my summer signature cookie that brings back all those nostalgic campfire memories. It’s fun, delicious, and always a crowd-pleaser.
Ingredients
For the cookies:
- 2 cups all-purpose flour
- 1 cup graham cracker crumbs
- 1 teaspoon baking soda
- 1 teaspoon cornstarch
- ½ teaspoon salt
- 1 cup unsalted butter, softened
- ¾ cup light brown sugar, packed
- ½ cup granulated sugar
- 2 large eggs
- 2 teaspoons vanilla extract
- 1 cup chocolate chips
- ½ cup mini chocolate chips
For the topping:
- 1 cup marshmallow fluff
- ½ cup unsalted butter, softened
- 2 cups powdered sugar
- 1 teaspoon vanilla extract
- Chocolate pieces for garnish
- Mini marshmallows
Steps
Step 1: Preheat your oven to 350°F and line two baking sheets with parchment paper. In a medium bowl, whisk together the flour, graham cracker crumbs, baking soda, cornstarch, and salt. The graham cracker crumbs add that essential s’mores flavor right into the cookie base. Set aside. In a large bowl, cream the softened butter, brown sugar, and granulated sugar together for three to four minutes until light and fluffy. The mixture should be pale and airy.
Step 2: Add the eggs one at a time, beating well after each addition. Add the vanilla extract and mix until combined. The batter should be smooth and smell like sweet vanilla and graham crackers. Gradually add the dry ingredients to the wet ingredients, mixing on low speed until just combined. The graham cracker crumbs give the dough a slightly different texture than regular cookies. Fold in both sizes of chocolate chips using a spatula. The combination of regular and mini chips ensures chocolate in every bite.
Step 3: Using a large cookie scoop (about ¼ cup), portion the dough into balls and place them on the prepared baking sheets, spacing them three inches apart. Press each dough ball down slightly to about one inch thick. The dough will have a slightly sandy texture from the graham crackers, which is exactly what you want. This creates that authentic graham cracker flavor and texture.
Step 4: Bake for eleven to thirteen minutes until the edges are golden brown and the centers still look slightly soft. The cookies should smell like toasted graham crackers and chocolate. Let them cool on the baking sheet for ten minutes, then transfer to a wire rack to cool completely. As they cool, the chocolate chips will set and the cookies will firm up to the perfect texture.
Step 5: To make the marshmallow frosting, beat the softened butter and marshmallow fluff together for two minutes until smooth and combined. Gradually add the powdered sugar, beating until fluffy. Add the vanilla extract and beat on high for three minutes until light and airy. The frosting should be thick and spreadable. Once the cookies are completely cool, generously frost each one. Press chocolate pieces and mini marshmallows into the frosting. Using a kitchen torch, carefully toast the marshmallows until golden brown and slightly charred. If you don’t have a torch, you can broil them briefly, watching very carefully. These s’mores Crumbl cookies are fun, nostalgic, and taste exactly like campfire s’mores. The toasted marshmallow topping takes them over the top.
Prep Time: 25 minutes
Baking Time: 13 minutes per batch
Servings: 12 large cookies
7. Red Velvet Cheesecake Cookie
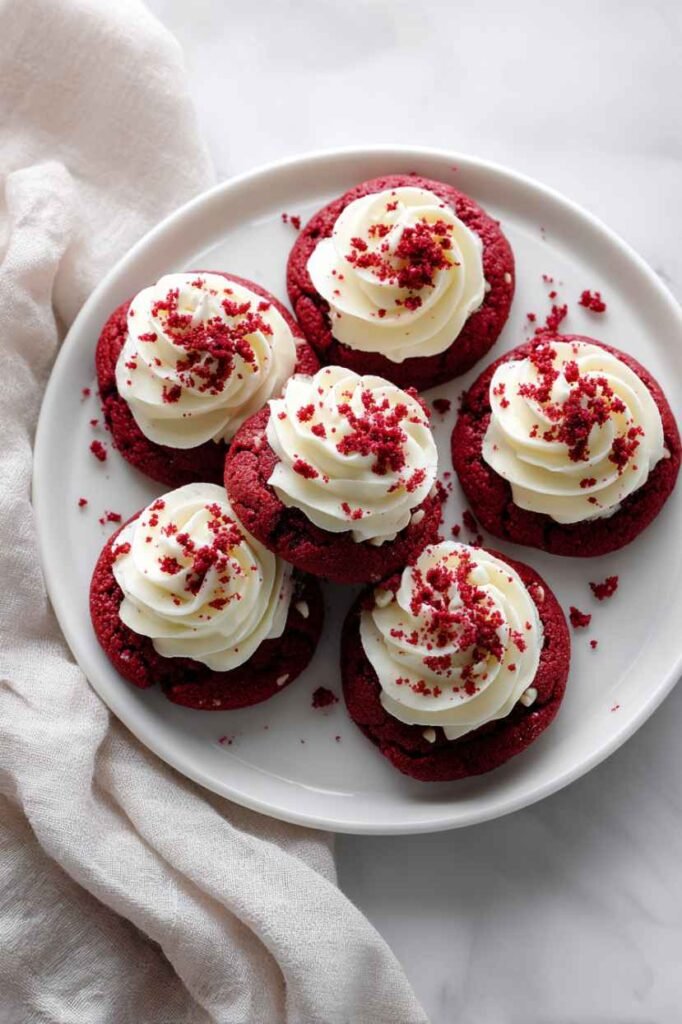
Red velvet cheesecake cookie is the ultimate indulgent treat that combines two beloved desserts into one stunning cookie. The rich red velvet cookie base has that signature cocoa flavor and gorgeous red color, topped with tangy cream cheese frosting. I created this recipe for Valentine’s Day but it became so popular that I make it year-round now. The combination of the slightly chocolatey red velvet with the tangy cream cheese frosting is absolutely perfect. This has become my go-to impressive cookie when I want to wow people. The dramatic red color and creamy white frosting make these as beautiful as they are delicious.
Ingredients
For the cookies:
- 2 cups all-purpose flour
- 2 tablespoons cocoa powder
- 1 teaspoon baking soda
- 1 teaspoon cornstarch
- ½ teaspoon salt
- ¾ cup unsalted butter, softened
- 1 cup granulated sugar
- ½ cup light brown sugar, packed
- 2 large eggs
- 2 tablespoons red food coloring
- 2 teaspoons vanilla extract
- 1 teaspoon white vinegar
- 1 cup white chocolate chips
For the cream cheese frosting:
- 8 oz cream cheese, softened
- ½ cup unsalted butter, softened
- 4 cups powdered sugar
- 2 teaspoons vanilla extract
- Pinch of salt
- Red velvet cake crumbs for garnish
Steps
Step 1: Preheat your oven to 350°F and line two baking sheets with parchment paper. In a medium bowl, whisk together the flour, cocoa powder, baking soda, cornstarch, and salt. The small amount of cocoa powder gives red velvet its subtle chocolate flavor without making it a chocolate cookie. Set aside. In a large bowl, cream the softened butter, granulated sugar, and brown sugar together for three to four minutes until light and fluffy.
Step 2: Add the eggs one at a time, beating well after each addition. Add the red food coloring, vanilla extract, and white vinegar. The vinegar reacts with the baking soda to create the classic red velvet texture and enhances the red color. Mix until the batter is smooth and a vibrant red color. Don’t be shy with the food coloring – you want that gorgeous red velvet color. Gradually add the dry ingredients to the wet ingredients, mixing on low speed until just combined. Fold in the white chocolate chips using a spatula.
Step 3: Using a large cookie scoop (about ¼ cup), portion the dough into balls and place them on the prepared baking sheets, spacing them three inches apart. Press each dough ball down slightly to about one inch thick. The dough should be a beautiful deep red color. These cookies spread as they bake, creating that perfect thick but wide cookie shape.
Step 4: Bake for eleven to twelve minutes until the edges are set but the centers still look soft. Don’t overbake or they’ll lose that soft, cake-like texture that makes red velvet special. Let them cool on the baking sheet for ten minutes, then transfer to a wire rack to cool completely before frosting. The cookies need to be completely cool or the cream cheese frosting will melt.
Step 5: To make the cream cheese frosting, beat the softened cream cheese and butter together for three minutes until smooth and creamy with no lumps. It’s important that both are at room temperature for the smoothest frosting. Gradually add the powdered sugar one cup at a time, beating well after each addition. Add the vanilla extract and salt. Beat on high speed for three to four minutes until the frosting is light, fluffy, and perfectly spreadable. Once the cookies are completely cool, generously frost each one using a piping bag or offset spatula. Sprinkle with red velvet cake crumbs for decoration. These red velvet cheesecake cookies are stunning, delicious, and perfect for any special occasion. The combination of red velvet and cream cheese frosting is absolutely heavenly.
Prep Time: 25 minutes
Baking Time: 12 minutes per batch
Servings: 13 large cookies
8. Lemon Glaze Crumbl Cookie
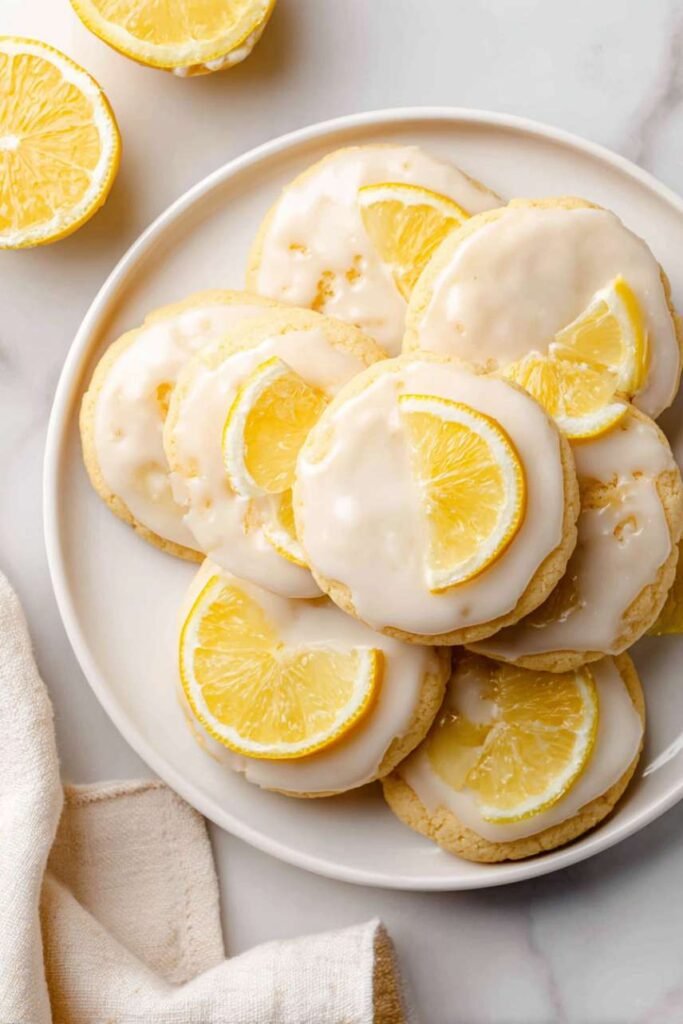
Lemon glaze Crumbl cookie is bright, refreshing, and tastes like sunshine in cookie form. The soft, tender lemon cookie is topped with a sweet and tangy lemon glaze that’s absolutely addictive. I developed this recipe when I wanted something lighter and more refreshing than chocolate-heavy cookies. The combination of lemon zest in the cookie and lemon juice in the glaze creates layers of citrus flavor that’s not too sour but perfectly balanced. This has become my favorite spring and summer cookie because it’s light, bright, and not overly heavy. The glaze adds a beautiful shine and extra burst of lemon flavor that makes these irresistible.
Ingredients
For the cookies:
- 2½ cups all-purpose flour
- 1 teaspoon baking powder
- ½ teaspoon baking soda
- 1 teaspoon cornstarch
- ½ teaspoon salt
- ¾ cup unsalted butter, softened
- 1 cup granulated sugar
- 2 large eggs
- Zest of 3 lemons
- 2 tablespoons fresh lemon juice
- 1 teaspoon vanilla extract
- ½ teaspoon lemon extract
For the glaze:
- 3 cups powdered sugar
- ¼ cup fresh lemon juice
- 2 tablespoons melted butter
- 1 teaspoon lemon zest
- Yellow food coloring (optional)
- Lemon slices for garnish
Steps
Step 1: Preheat your oven to 350°F and line two baking sheets with parchment paper. In a medium bowl, whisk together the flour, baking powder, baking soda, cornstarch, and salt. The combination of baking powder and baking soda creates the perfect texture. Set aside. In a large bowl, cream the softened butter and sugar together for three to four minutes until light and fluffy. The mixture should be pale and airy. Add the lemon zest and beat for another minute – this helps release the lemon oils and distribute the flavor.
Step 2: Add the eggs one at a time, beating well after each addition. Add the lemon juice, vanilla extract, and lemon extract. Mix until combined. The batter will look slightly curdled from the lemon juice, which is completely normal. The acid in the lemon juice reacts with the dairy. Gradually add the dry ingredients to the wet ingredients, mixing on low speed until just combined. The dough should be soft, slightly sticky, and smell bright and lemony.
Step 3: Using a large cookie scoop (about ¼ cup), portion the dough into balls and place them on the prepared baking sheets, spacing them three inches apart. Press each dough ball down slightly to about one inch thick. The dough will be softer than typical cookie dough because of the lemon juice, which is perfect – it creates a tender, cake-like texture.
Step 4: Bake for eleven to thirteen minutes until the edges are just set and very lightly golden – don’t let them brown too much or they’ll lose that light, delicate quality. The centers should still look slightly soft. Let the cookies cool on the baking sheet for ten minutes, then transfer to a wire rack to cool completely. Place the wire rack over a baking sheet to catch drips from the glaze.
Step 5: To make the lemon glaze, whisk together the powdered sugar, lemon juice, melted butter, and lemon zest in a medium bowl until smooth and pourable. If you want a more vibrant yellow color, add a drop or two of yellow food coloring. The glaze should be thick but pourable – if it’s too thick, add more lemon juice one teaspoon at a time. If too thin, add more powdered sugar. Once the cookies are completely cool, spoon the glaze generously over each cookie, letting it drip down the sides. Top with a thin lemon slice if desired. Let the glaze set for about thirty minutes before serving. These lemon glaze Crumbl cookies are bright, refreshing, and absolutely delicious. They’re perfect when you want something sweet but not too heavy.
Prep Time: 25 minutes
Baking Time: 13 minutes per batch
Servings: 12 large cookies
9. Brownie Batter Cookie
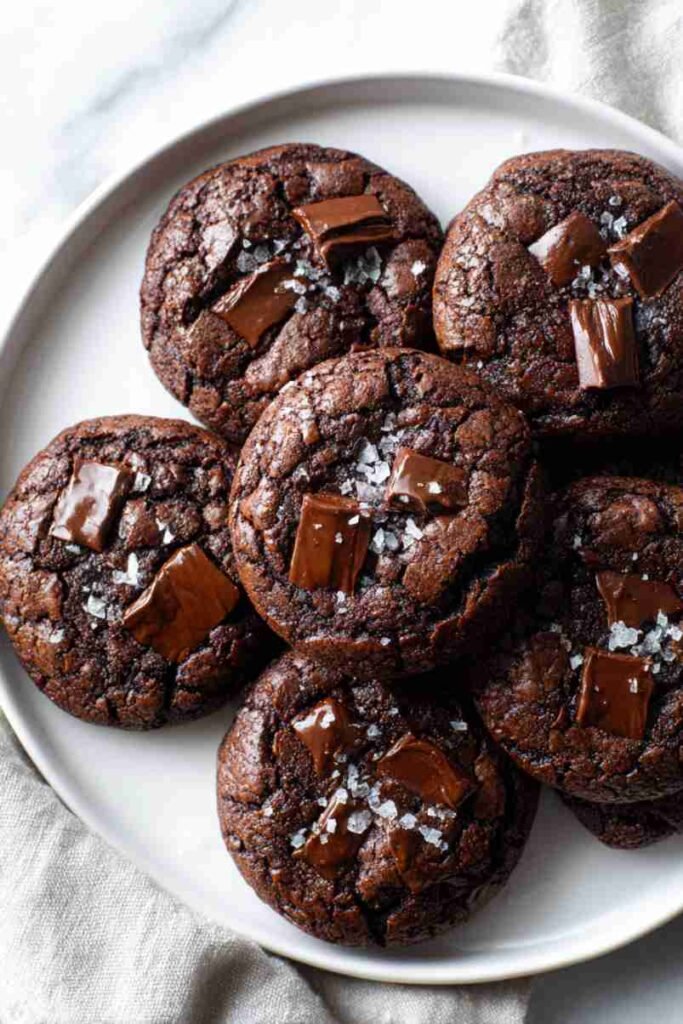
Brownie batter cookie is intensely chocolatey and fudgy with that incredible texture that’s somewhere between a cookie and a brownie. The edges get slightly crispy while the centers stay incredibly soft and fudgy, just like eating raw brownie batter but safely baked. I created this recipe for serious chocolate lovers who can never decide between brownies and cookies. The secret is using both cocoa powder and melted chocolate, which creates depth of flavor and that signature fudgy texture. This has become my most decadent cookie recipe that chocolate addicts go crazy for. Every bite is rich, fudgy, and intensely chocolatey.
Ingredients
For the cookies:
- 1½ cups all-purpose flour
- ¾ cup Dutch-process cocoa powder
- 1 teaspoon baking soda
- 1 teaspoon cornstarch
- ½ teaspoon salt
- 8 oz dark chocolate, chopped
- ¾ cup unsalted butter
- 1¼ cups granulated sugar
- ½ cup light brown sugar, packed
- 3 large eggs
- 2 teaspoons vanilla extract
- 1½ cups chocolate chunks
- Flaky sea salt for topping
Steps
Step 1: Preheat your oven to 350°F and line two baking sheets with parchment paper. In a medium bowl, sift together the flour, cocoa powder, baking soda, cornstarch, and salt. Sifting is crucial for cocoa powder to prevent lumps. Set aside. In a heatproof bowl set over simmering water (double boiler method), melt the chopped dark chocolate and butter together, stirring until smooth and completely melted. Remove from heat and let cool for five minutes. The chocolate mixture should be warm but not hot.
Step 2: Add the granulated sugar and brown sugar to the melted chocolate mixture, whisking until smooth and combined. The mixture will be thick and glossy. Add the eggs one at a time, whisking well after each addition. Add the vanilla extract and whisk until the batter is smooth and shiny. The batter should look like brownie batter at this point – thick, dark, and incredibly chocolatey.
Step 3: Gradually add the dry ingredients to the wet ingredients, folding gently with a spatula until just combined. Don’t overmix – you want to maintain that fudgy texture. Fold in the chocolate chunks, reserving some for pressing into the tops. The dough will be very thick and fudgy, more like brownie batter than traditional cookie dough. This is exactly what creates that incredible texture.
Step 4: Using a large cookie scoop (about ¼ cup), portion the dough into balls and place them on the prepared baking sheets, spacing them three inches apart. Press additional chocolate chunks into the top of each dough ball for that bakery-style look. The dough balls should be thick and fudgy. Press each one down very slightly – they don’t spread much during baking.
Step 5: Bake for eleven to twelve minutes until the edges are just set but the centers still look underbaked and soft. These cookies will look very soft and may even seem undone, but they’ll set as they cool. Immediately after removing from the oven, sprinkle each cookie with a pinch of flaky sea salt. The salt enhances the chocolate flavor and balances the sweetness. Let the cookies cool on the baking sheet for fifteen minutes – they need this time to set properly. They’ll firm up on the outside while staying incredibly fudgy inside. These brownie batter cookies are the ultimate chocolate indulgence with that perfect fudgy texture. They’re like eating the best brownie in cookie form.
Prep Time: 20 minutes
Baking Time: 12 minutes per batch
Servings: 13 large cookies
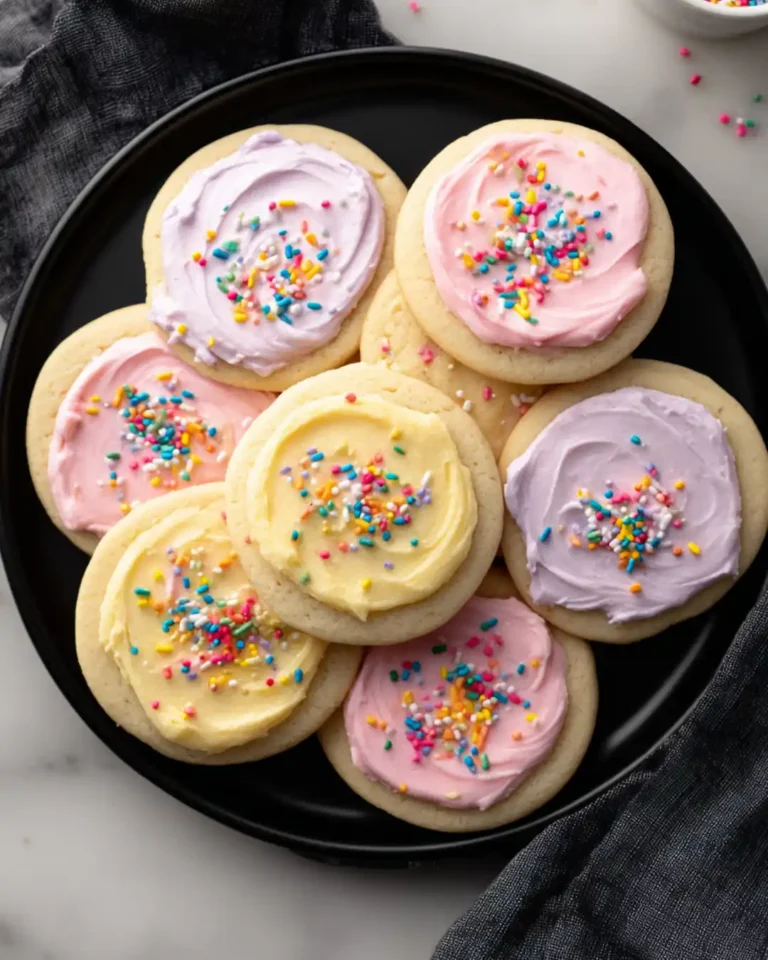
10. Chilled Sugar Cookie with Almond Frosting
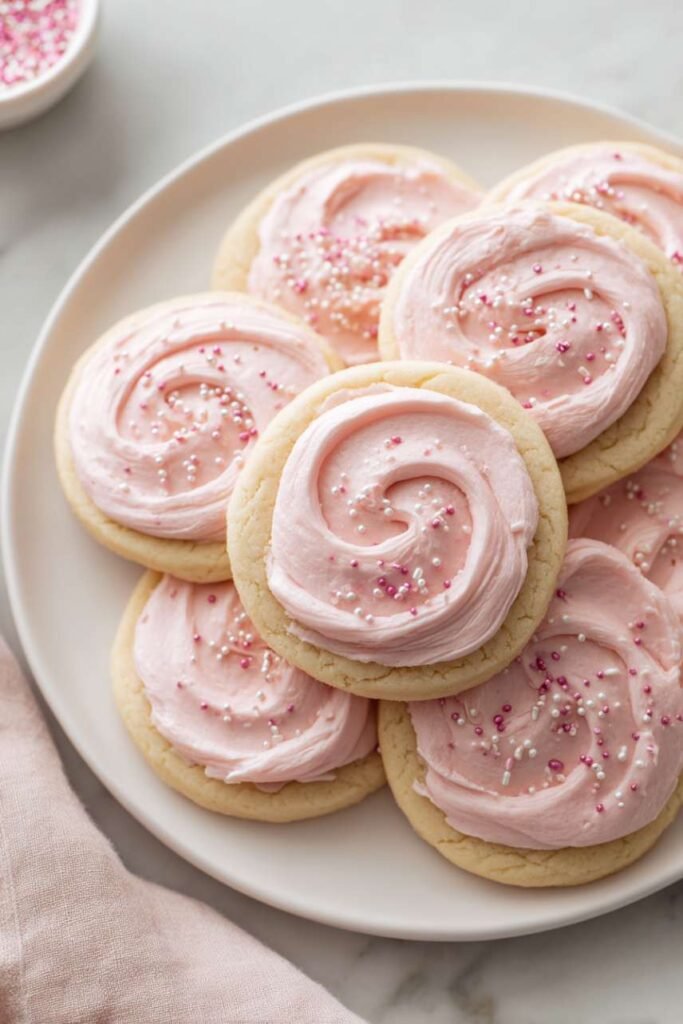
Chilled sugar cookie with almond frosting is a Crumbl classic that’s simple, elegant, and absolutely delicious when served cold. The soft, vanilla sugar cookie paired with sweet almond frosting creates this perfect balance that’s not too sweet but incredibly satisfying. I love how this cookie proves that simple flavors done right can be just as impressive as complex recipes. The key is serving these cookies chilled, which makes the frosting set perfectly and the cookie incredibly refreshing. This has become my go-to cookie for people who don’t want intense flavors but still want something special and bakery-quality.
Ingredients
For the cookies:
- 3 cups all-purpose flour
- 1 teaspoon baking powder
- ½ teaspoon baking soda
- 1 teaspoon cornstarch
- ½ teaspoon salt
- 1 cup unsalted butter, softened
- 1½ cups granulated sugar
- 2 large eggs
- 2 teaspoons vanilla extract
- ½ teaspoon almond extract
For the almond frosting:
- 1 cup unsalted butter, softened
- 4 cups powdered sugar
- 3 tablespoons heavy cream
- 1½ teaspoons almond extract
- ½ teaspoon vanilla extract
- Pinch of salt
- Pink food coloring (optional)
- Sprinkles for decoration
Steps
Step 1: Preheat your oven to 350°F and line two baking sheets with parchment paper. In a medium bowl, whisk together the flour, baking powder, baking soda, cornstarch, and salt. The cornstarch creates that signature soft, almost cake-like texture. Set aside. In a large bowl, cream the softened butter and sugar together for four minutes until very light and fluffy. The mixture should be pale and airy – this extra creaming time is what creates those thick, soft cookies.
Step 2: Add the eggs one at a time, beating well after each addition. Add the vanilla extract and almond extract. The almond extract adds subtle flavor that complements the almond frosting perfectly. Mix until smooth and combined. Gradually add the dry ingredients to the wet ingredients, mixing on low speed until just combined. The dough should be soft, smooth, and slightly sticky.
Step 3: Using a large cookie scoop (about ¼ cup), portion the dough into balls and place them on the prepared baking sheets, spacing them three inches apart. Press each dough ball down to about one inch thick. These cookies spread quite a bit, so make sure they’re well-spaced. The dough should be smooth and even.
Step 4: Bake for eleven to thirteen minutes until the edges are just set and very lightly golden – you want them barely colored for that soft, tender texture. The centers should still look slightly underbaked. Let the cookies cool on the baking sheet for ten minutes, then transfer to a wire rack to cool completely. Don’t frost them until they’re completely cool.
Step 5: To make the almond frosting, beat the softened butter with an electric mixer for three minutes until light and fluffy. Gradually add the powdered sugar one cup at a time, beating well after each addition. Add the heavy cream, almond extract, vanilla extract, and salt. Beat on high speed for four minutes until the frosting is incredibly light and fluffy. If you want pink frosting, add a drop or two of pink food coloring. Once the cookies are completely cool, generously frost each one using an offset spatula or piping bag. Top with sprinkles if desired. Place the frosted cookies in the refrigerator for at least two hours before serving – serving them chilled is what makes these special. The cold temperature makes the frosting set perfectly and the cookie incredibly refreshing. These chilled sugar cookies with almond frosting are simple, elegant, and absolutely delicious. The almond flavor is subtle but distinctive, making these perfect for anyone who loves classic flavors.
Prep Time: 25 minutes
Baking Time: 13 minutes per batch
Chilling Time: 2 hours
Servings: 14 large cookies