So I don’t know when fridge magnets became something I actually cared about, but here we are. I think it started when I noticed that my fridge was covered in random takeout menus, old birthday party invitations held up with those terrible flat promotional magnets from real estate agents, and honestly it was just a mess. And then I saw someone online making the cutest little clay magnets and I thought – I can do that. I went out, bought a small pack of polymer clay, and that was basically the end of my free time for a weekend.
Clay magnets are genuinely one of those crafts that look impressive but are actually really forgiving for beginners. You don’t need special equipment, you don’t need artistic talent, and you definitely don’t need to spend a lot of money. A basic pack of polymer clay costs just a few dollars, small disc magnets are cheap to buy in bulk online, and everything else you probably already have at home – toothpicks, butter knives, cookie cutters, nail polish, whatever. The barrier to starting is basically zero.
What makes these so satisfying is that you end up with something actually useful and pretty. Your fridge goes from cluttered and random to this little curated display of things you actually made. They make incredible gifts too – a little set of custom clay magnets in someone’s favorite colors or shaped like something they love feels so personal and thoughtful. People are always surprised when you tell them you made them.
You can go in so many directions with clay magnets – food shapes, abstract, seasonal, floral, celestial, minimalist, maximalist. Whatever your style is, there’s a version of this craft that fits. These ten ideas will give you a solid starting point and honestly, once you start you probably won’t stop at just one set.
1. Mini Fruit Slices
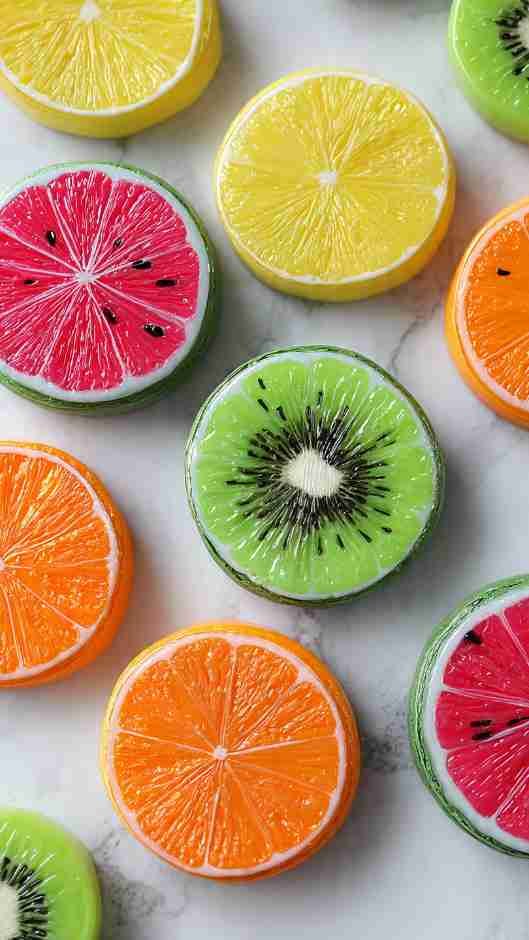
These are the ones that got me into clay crafting in the first place because they look so impressive and they’re actually really simple to make. You basically roll out a small circle of clay in the right fruit color, press in little triangular sections with a toothpick to look like citrus segments, add a thin white ring around the edge, and that’s your lemon or orange slice. Watermelon ones are just as easy with red clay, white border, and tiny black seed dots. They look adorable clustered together on the fridge and every single person who visits will comment on them.
What It Is: Small flat clay discs shaped and painted to look like cross-section slices of fruit – citrus, watermelon, kiwi, and strawberry work especially well.
Supplies and Budget: Polymer clay in multiple colors ($8–12), disc magnets ($5 for a pack), toothpick, craft glue, gloss varnish ($4). Total: $17–$21
Quick How-To: Roll clay into a flat circle. Use a toothpick to press in segment lines. Bake per clay instructions (usually 275°F for 15 minutes). Glue magnet to back when fully cooled. Seal with gloss varnish.
DIY Tip: Mix a tiny bit of white clay into your main fruit color before you start – it makes the color look more natural and less like plastic when it bakes.
2. Tiny Floral Bouquets

These take a little more patience than the fruit slices but the result is so worth it. You make tiny individual flower petals and leaves, then layer and press them together to build up a little bouquet shape. Roses are the most popular but simple five-petal flowers are actually easier and just as pretty. The trick is rolling the clay very thin so the petals don’t end up too chunky. You can do them in all one color for an elegant monochrome look, or mix colors for something more garden-like. A set of these on the fridge looks genuinely like a little piece of art.
What It Is: Small sculpted clay magnets shaped like mini flower bouquets, with individual petals and leaves built up in layers.
Supplies and Budget: Polymer clay in floral and green shades ($8–12), disc magnets ($5), toothpick, small roller or smooth bottle, craft glue ($3). Total: $16–$20
Quick How-To: Roll tiny flat ovals for petals, pinch one end to a point. Layer 5–6 petals around a small center ball. Add tiny flattened leaf shapes. Press gently together, bake, cool, then glue magnet on back.
DIY Tip: Work with small amounts of clay at a time and keep your hands cool – warm hands make the clay too soft and the petals won’t hold their shape while you’re assembling.
3. Abstract Terrazzo Style
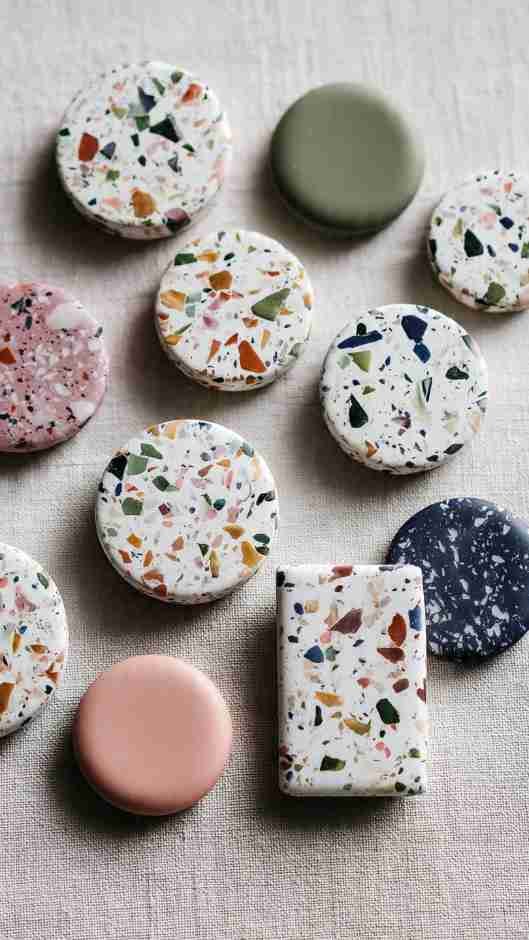
If you’re not into making detailed shapes, this one is perfect for you because the whole look is based on randomness. You take small bits of clay in different colors, roll them into tiny irregular pieces, then press them all into a base slab of white or neutral clay. When you slice it and bake it, you get these gorgeous terrazzo-patterned pieces that look very trendy and designer. No two will ever look exactly the same which is part of what makes them so beautiful. They look especially good in a color palette that matches your kitchen.
What It Is: Flat clay magnets with a terrazzo pattern made by embedding tiny colorful clay pieces into a white or neutral clay base before baking.
Supplies and Budget: Polymer clay in white plus 4–5 accent colors ($10–14), disc magnets ($5), blade or knife for cutting, craft glue ($3). Total: $18–$22
Quick How-To: Roll tiny irregular pieces in various colors. Press them randomly into a rolled-out white clay slab. Roll gently to press them in flush. Cut into squares, circles, or irregular shapes. Bake, cool, glue magnets on back.
DIY Tip: Don’t over-roll after pressing in the color pieces or they’ll blend and lose the clean terrazzo look – just one gentle pass with the roller to press them flush is enough.
4. Food Shaped Minis – Tiny Sushi, Pizza, and Tacos
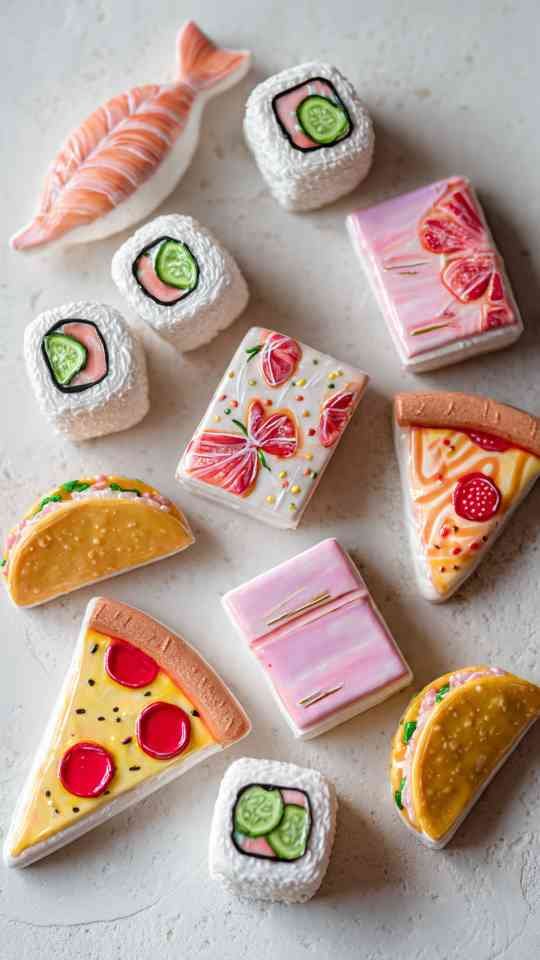
These are so fun to make because you’re basically sculpting tiny food and it feels ridiculous in the best way. Tiny sushi rolls are honestly the easiest – little white rice cylinders wrapped in a strip of black clay with a colored filling pressed on top. Mini pizza slices take a bit more detail with the sauce, cheese, and toppings but they’re not complicated. Taco shapes are super quick. These are perfect if you want something playful and funny for your kitchen, and they make the most amazing gift for a foodie friend. Kids also absolutely love helping make these ones.
What It Is: Tiny sculpted polymer clay magnets shaped like miniature versions of popular foods – sushi, pizza slices, tacos, burgers, and donuts all work great.
Supplies and Budget: Polymer clay in many colors ($12–16), disc magnets ($5), toothpick for texture, craft glue, gloss varnish ($4). Total: $21–$25
Quick How-To: Look up reference images of your chosen food. Build shapes in layers – base shape first, then add details on top. Use a toothpick to add texture like rice grains or sesame seeds. Bake, cool, seal, glue magnet.
DIY Tip: Gloss varnish on food magnets makes them look more realistic and “fresh” – matte finish works for some foods but glossy really sells the food illusion on things like sushi and donuts.
5. Moon and Star Celestial Set
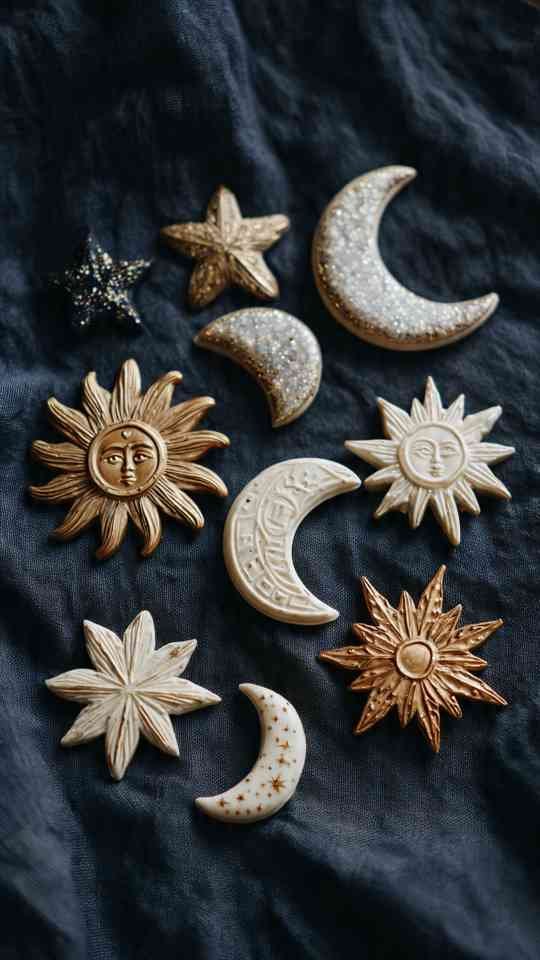
Celestial themes are everywhere right now and honestly they translate perfectly to clay magnets. You can use small cookie cutters to cut out crescent moon and star shapes, or freehand them if you’re feeling confident. The classic look is a matte or metallic gold finish, but you can also do them in deep navy or black with gold painted edges, or white with iridescent shimmer powder dusted on top. A full little set of moons, stars, and suns looks so beautiful together on the fridge and works with a ton of different kitchen styles from boho to modern.
What It Is: A coordinated set of clay magnets in celestial shapes – crescent moons, stars, suns, and planets – finished in metallic or matte tones.
Supplies and Budget: White or gold polymer clay ($8–10), small cookie cutters or craft knife ($5–8), gold acrylic paint or mica powder ($6–8), disc magnets ($5), craft glue. Total: $24–$31
Quick How-To: Roll clay to even thickness. Use cutters or a knife to cut shapes. Smooth edges with fingertip. Bake and cool. Paint with gold acrylic or brush on mica powder while still slightly warm. Glue magnets.
DIY Tip: Mica powder gives a much more beautiful metallic finish than acrylic gold paint – brush it on right after the clay comes out of the oven while it’s still warm and it adheres perfectly.
6. Pressed Flower and Leaf Botanicals
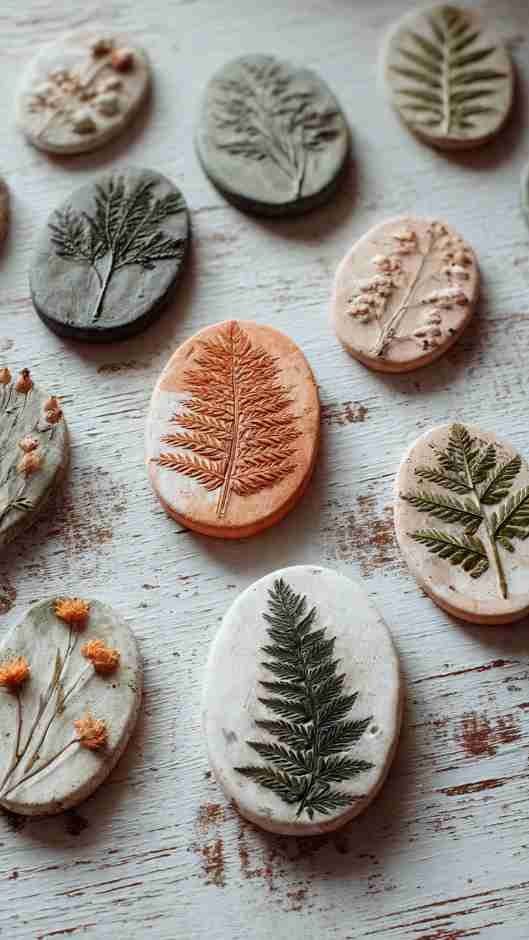
This idea combines two crafts in one because you’re pressing real flowers or leaves into the clay surface before baking to leave a beautiful imprint. You collect small flowers, fern fronds, herb leaves – whatever you can find in your garden or even from produce at the grocery store – press them firmly into rolled clay, then peel them away. What’s left is this incredibly delicate, detailed botanical print baked right into the surface. Finish them in earthy tones or leave them natural clay color. They look handcrafted in the best, most thoughtful way.
What It Is: Clay magnets with real botanical impressions – pressed flowers, leaves, and herbs are pressed into the raw clay surface before baking to leave detailed natural imprints.
Supplies and Budget: White or terracotta polymer clay ($8–10), fresh or dried small flowers and leaves (free from garden), disc magnets ($5), craft glue, matte varnish ($4). Total: $17–$19
Quick How-To: Roll clay flat. Press a small flower or leaf firmly into the surface, then carefully peel it away. Cut around the impression into a circle or organic shape. Bake, cool, seal with matte varnish. Glue magnet on back.
DIY Tip: Slightly dried flowers press better than fully fresh ones – leave them between book pages for just a few hours before using so they’re pliable but not releasing moisture into the clay.
7. Letter and Word Magnets

These are the grown-up version of those plastic letter magnets we all had as kids, except actually cute and personalized. You can stamp letters into clay tiles using alphabet stamps, or freehand words with a toothpick for a more handwritten feel. Make tiles that spell out words you love, your family’s initials, little phrases, or just single letters in a font you find beautiful. They’re functional because you can rearrange them to leave little notes, and they look so much better than anything you’d buy. Clay tiles in a neutral or terracotta color with stamped letters look especially sophisticated.
What It Is: Small square or rectangular clay tiles with letters, initials, or short words pressed or stamped into the surface, used as individual letter fridge magnets.
Supplies and Budget: Neutral or terracotta polymer clay ($8–10), alphabet stamp set ($8–12), acrylic paint to highlight letters ($5), disc magnets ($5), craft glue. Total: $26–$32
Quick How-To: Roll clay into even flat tiles. Press letter stamps firmly and evenly. Bake and cool. Brush a thin layer of dark acrylic paint over the surface and quickly wipe off – paint stays in the stamped grooves and highlights the letters. Glue magnets on back.
DIY Tip: The paint-wipe technique (called antiquing) is the secret that makes stamped letters pop – without it the impression can be hard to see, with it the letters look crisp and defined.
8. Tiny Cactus and Succulent Shapes
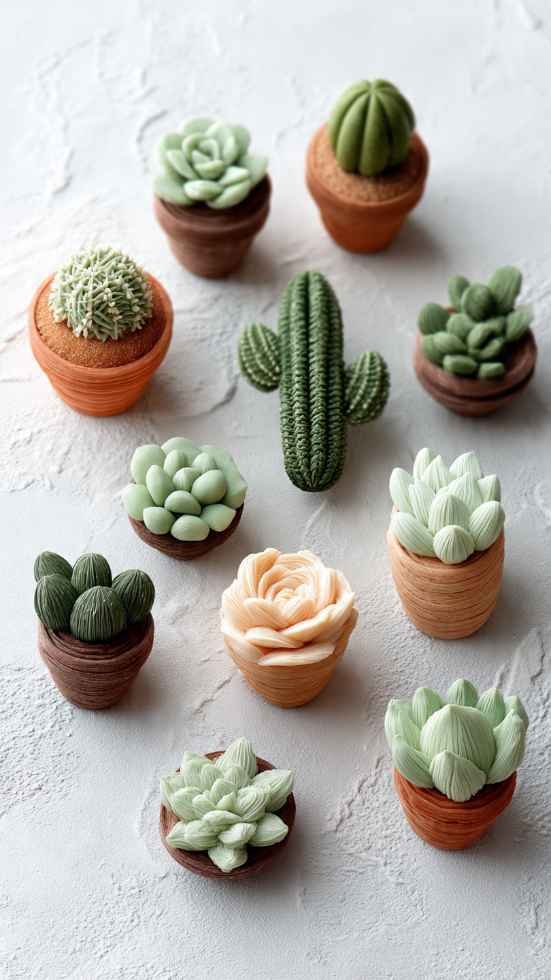
Plant parents are going to love this one. Tiny sculpted cacti and succulents in their little implied clay pots are some of the most popular clay magnets you’ll see online and for good reason – they’re adorable, they’re quick to make once you get the hang of the basic shapes, and you can make a whole little plant collection for your fridge. The round barrel cactus shape is the easiest, the tall saguaro is iconic, and the little rosette succulent just requires layering rounded petals from outside to inside. Do them in terracotta pots and they look like a tiny windowsill garden.
What It Is: Small 3D sculpted polymer clay magnets shaped like various cactus and succulent plants in tiny terracotta-colored pots.
Supplies and Budget: Green polymer clay in multiple shades, brown/terracotta clay for pots ($10–14), toothpick for texture, disc magnets ($5), craft glue, matte varnish ($4). Total: $19–$23
Quick How-To: Form a small pot shape from terracotta clay. Build cactus or succulent on top in green clay. Use toothpick to add texture – lines on cactus, vein details on succulent leaves. Bake as one piece. Cool, varnish, glue magnet.
DIY Tip: Use slightly different shades of green for each plant in your set – mixing a tiny bit of yellow into some and blue into others gives you natural-looking color variety without buying ten different colors.
9. Abstract Wavy Pastel Tiles
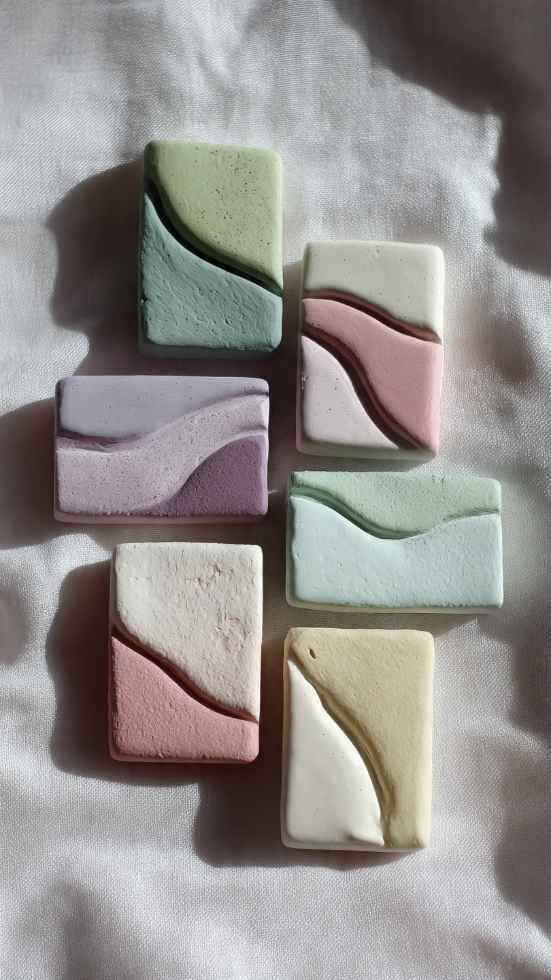
These are for the people who want something that looks very designed and intentional but don’t want to deal with sculpting actual shapes. You roll out clay in two or three complementary pastel colors, then use a toothpick or skewer to swirl and blend the edges slightly where they meet, creating these soft wavy organic patterns. Cut them into simple rectangles or irregular organic shapes. The result is something that looks like expensive poured resin art or handmade ceramic tiles. They’re genuinely beautiful and take almost no skill to make look good.
What It Is: Flat clay magnets with soft abstract wavy patterns created by blending the edges of two or three pastel clay colors together before cutting and baking.
Supplies and Budget: Polymer clay in 3–4 pastel colors ($10–12), blade for cutting, disc magnets ($5), matte or satin varnish ($4), craft glue. Total: $19–$21
Quick How-To: Roll each color to the same thickness. Lay them side by side on your work surface. Use a toothpick to gently blend just the edges where colors meet in wavy lines. Cut into shapes without disturbing the middle. Bake, cool, seal, glue.
DIY Tip: Less blending is more with this technique – you want the colors to stay mostly separate with just soft wavy edges. Over-mixing turns everything into a muddy in-between color and you lose the beautiful contrast.
10. Holiday and Seasonal Sets
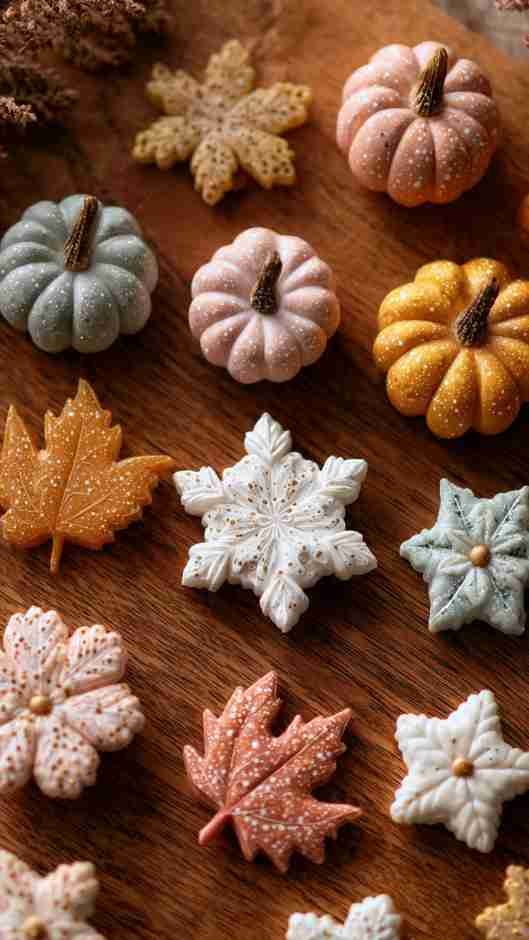
Making seasonal clay magnets is such a good way to switch up your fridge decor without buying new stuff every few months. You make a set for each season or holiday – little pumpkins and leaves for fall, snowflakes and mittens for winter, flowers and butterflies for spring – and just rotate them out when the season changes. The base shapes for most holiday icons are super simple, it’s all about the color palette and small details. Once you have your first set made you’ll want to make all of them, and storing them and bringing them out each year feels really special.
What It Is: Multiple small sets of clay magnets themed to different seasons and holidays, made in coordinating colors and shapes to swap out on the fridge throughout the year.
Supplies and Budget: Polymer clay in seasonal colors ($12–16 for multiple sets), small cookie cutters ($6–8), disc magnets ($5), acrylic paints for details ($5), craft glue. Total: $28–$34
Quick How-To: Use small cookie cutters or a craft knife to cut seasonal shapes. Add detail with a toothpick – lines on a pumpkin, texture on a snowflake. Bake, cool, add painted details, seal. Store off-season sets in a small box.
DIY Tip: Make all your seasonal sets in one big clay session – buy the colors you need for all four seasons, set up an assembly line, and knock them all out at once. It’s way more efficient and cheaper than making them separately.