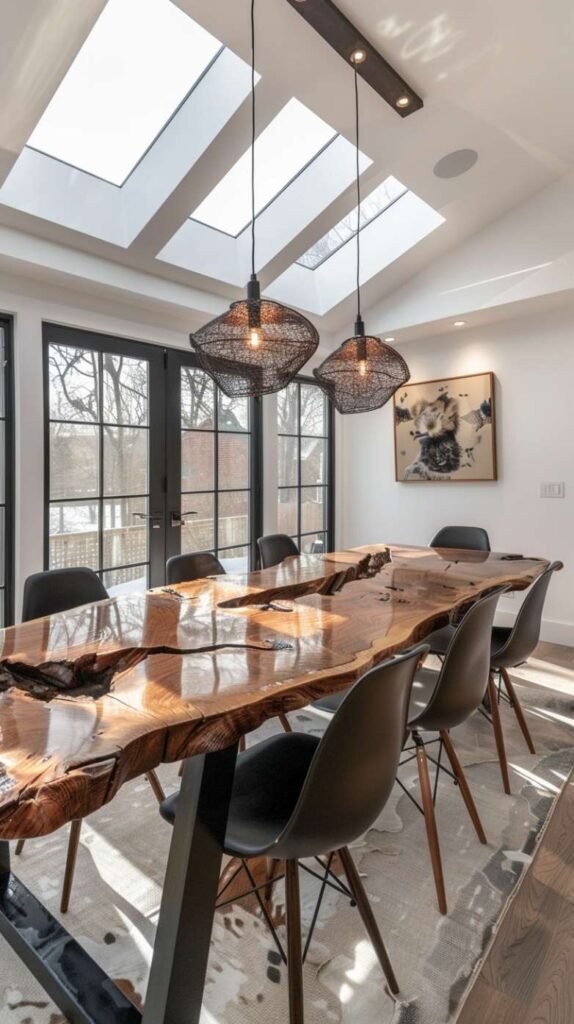
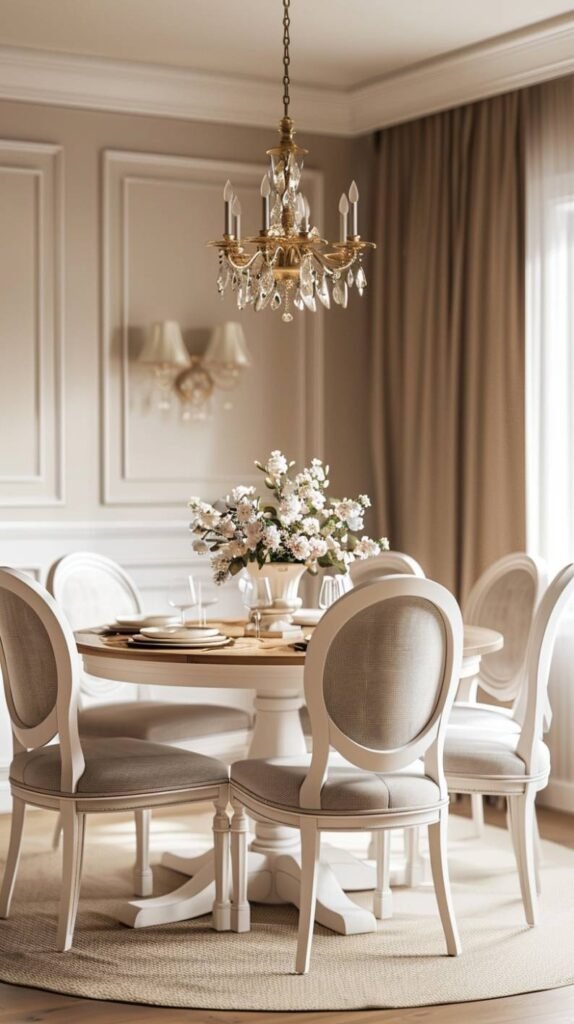
There is something about a dining table that feels more significant than almost any other piece of furniture in a house. It is where people gather, where meals happen, where conversations go long after the food is finished, where kids do homework and adults work from home and everyone ends up eventually. It is the center of a home in a way that a sofa or a bed just is not, and because of that it deserves to be something you actually love rather than something you settled for because the price was right or the store had it in stock.
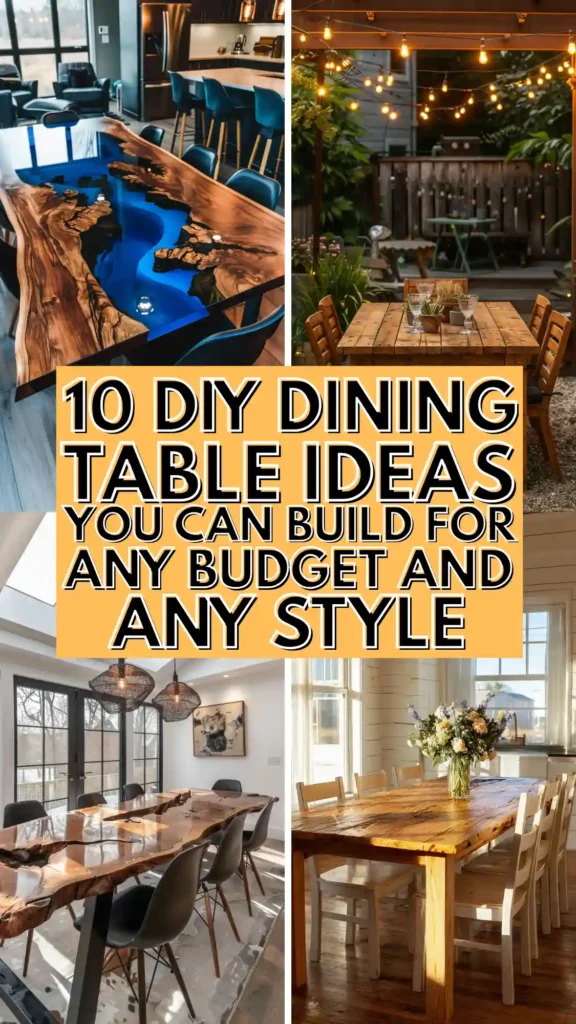
The problem with buying dining tables is that the ones that look genuinely beautiful cost an amount of money that requires actual consideration, and the ones in the affordable range often look exactly as affordable as they are. You end up either spending more than you wanted to or compromising on something – the size, the style, the material, the finish – and either way you are not completely happy with what you brought home.
Building your own dining table solves all of that at once. You get the exact size that fits your dining room. You choose the wood species and finish that matches your aesthetic. You decide on the leg style that works with your existing furniture. You control the height for your specific chairs. None of that flexibility exists when you are shopping retail and the cost savings are genuinely significant – a table that would retail for eight hundred dollars can often be built for under two hundred in materials.
What makes dining tables especially achievable as a DIY project is that the basic structure is not complicated. A tabletop and a leg system – that is the entire concept. The variations in material, finish, style, and detail are what create all the different looks but the fundamental build is always the same idea. Whether you are completely new to woodworking or have some experience already, there is a table build on this list that matches your skill level and your vision for your dining room.
1. Farmhouse Plank Dining Table
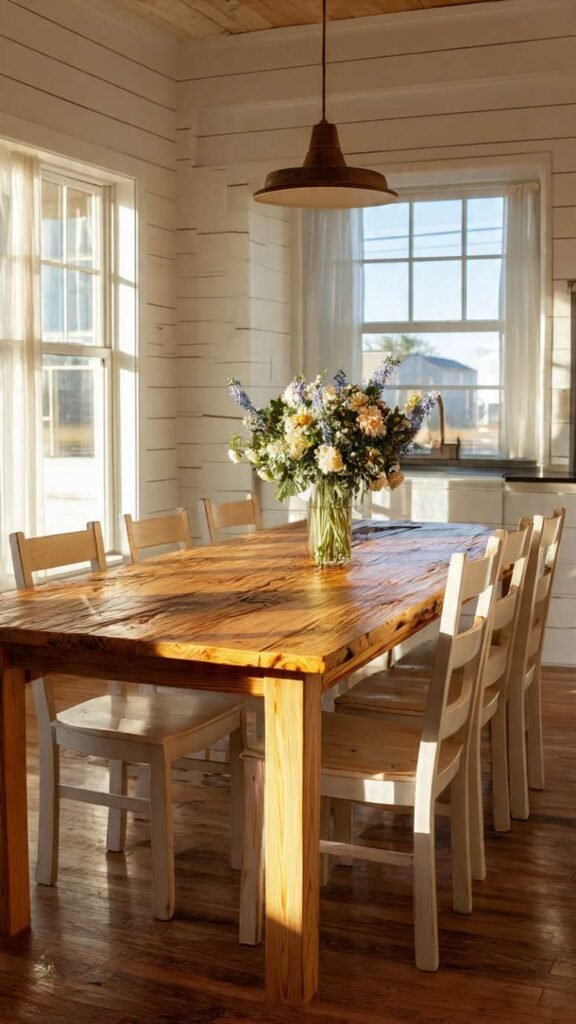
The farmhouse plank table is the classic DIY dining table build and it has stayed popular for good reason – it is straightforward to construct, incredibly sturdy when done right, and the result has that warm, character-filled look that works in farmhouse, rustic, transitional, and even modern spaces depending on the finish you choose. You build the top from wide boards joined together, add a simple apron frame below, and attach four turned or tapered legs. Stain it dark for drama, whitewash it for farmhouse softness, or leave it natural for a more Scandinavian feel. This is the table that looks like it has always been there.
What It Is: A classic farmhouse style dining table built from wide lumber planks joined together for the top, with a simple apron frame and four traditional turned or tapered legs.
Supplies and Budget: 2×10 or 2×12 pine or poplar boards for top ($40–70), 4×4 lumber for legs ($20–35), 2×4 for apron frame ($15–20), wood screws and pocket hole jig ($20–30), wood stain or paint ($15–25), sandpaper ($5–8). Total: $115–$188
Quick How-To: Cut boards to tabletop length and join side by side using pocket hole screws and wood glue. Sand flat when dry. Build rectangular apron frame from 2×4 to match tabletop dimensions. Attach legs at corners of apron. Attach tabletop to apron from below. Sand entire table through grits. Stain or paint and seal with polyurethane.
DIY Tip: Let your joined tabletop boards acclimate in your home for at least a week before building – wood expands and contracts with humidity and if you build with lumber straight from the store the boards can gap or bow after the table is finished and in your dining room.
2. Industrial Pipe and Wood Dining Table
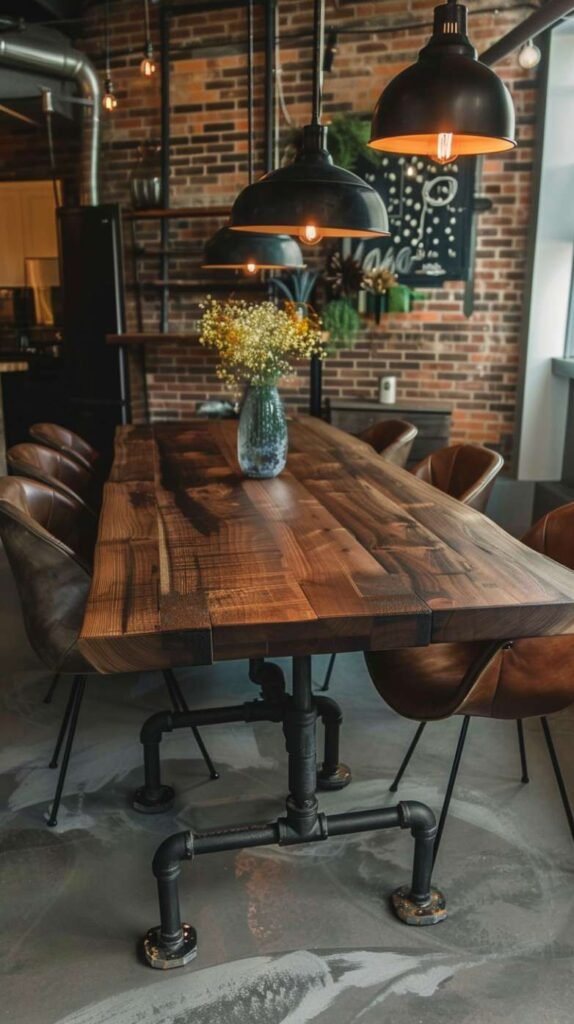
Black iron pipe legs combined with a solid wood or butcher block top create a dining table that has this cool, intentional, industrial character that you really cannot replicate with store-bought furniture. The pipe leg structure is incredibly sturdy and the combination of raw metal and warm wood has a visual tension that makes the table genuinely interesting to look at. It works in loft apartments, modern homes, and eclectic spaces and it photographs beautifully which is a bonus if you spend any time making content at home. The pipe fittings let you build exactly the leg configuration you want.
What It Is: A dining table with a thick wood or butcher block top and structural legs built from black iron plumbing pipes and fittings, creating an industrial aesthetic that is both sturdy and visually striking.
Supplies and Budget: Butcher block or thick wood slab top ($80–150), black iron pipes and fittings ($60–100), pipe flanges ($20–30), pipe thread sealant ($5), wood finish ($15–25). Total: $180–$305
Quick How-To: Design your pipe leg structure – typically four vertical pipes with floor flanges at bottom and top flanges that attach to the underside of the tabletop. Have pipes cut to exact leg height at hardware store. Assemble pipe fittings using thread sealant. Sand and finish wood top. Screw pipe flange legs to tabletop underside at corners.
DIY Tip: Apply pipe thread sealant to every fitting connection rather than just tightening by hand – the sealant prevents the fittings from working loose over time from the slight vibration that happens every time people sit down at the table, which eventually causes wobbly legs.
3. Hairpin Leg Mid-Century Dining Table
Hairpin legs are one of those design elements that instantly communicate a mid-century modern aesthetic and the great thing about them is that they do all the visual work so the tabletop can be relatively simple and the whole table still looks very designed and intentional. You find or make a beautiful tabletop – a solid wood slab, a piece of plywood with a good wood veneer, a butcher block – and attach four hairpin legs in the right height. That is honestly most of the build. The legs are inexpensive, they come pre-made, and they attach with simple screws. The result looks like it costs three times what it does.
What It Is: A mid-century modern style dining table made by attaching pre-made metal hairpin legs to a solid wood or plywood tabletop for a clean, sculptural look with minimal construction required.
Supplies and Budget: Solid wood or plywood tabletop blank ($50–120), hairpin legs 28-inch set of four ($45–80), wood stain or paint ($15–25), sandpaper ($5). Total: $115–$230
Quick How-To: Purchase or cut tabletop to desired dimensions. Sand through grits to 220 for smooth finish. Stain or paint top and let dry fully. Seal with clear finish. Attach hairpin legs at four corners of underside using included screws – pre-drill pilot holes to prevent splitting. Adjust leg placement inward from corners for more visual lightness.
DIY Tip: Position hairpin legs about 4 inches inward from each corner rather than right at the edge – legs at the very corner look a little clunky and pulling them in slightly gives the table that floating, airy quality that makes mid-century tables look so elegant and light.
4. Concrete Top Dining Table
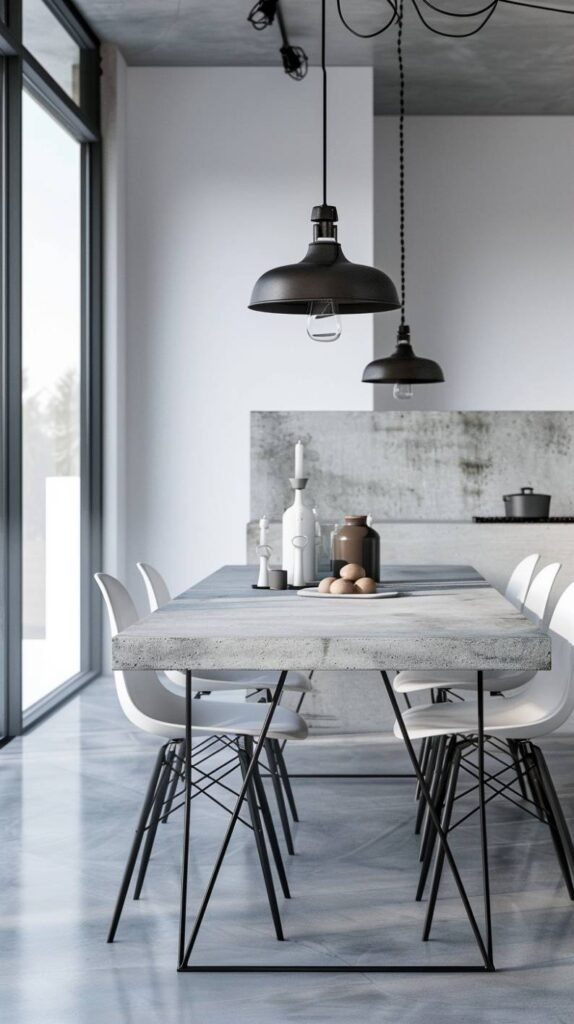
A concrete tabletop sounds heavy and cold and industrial but when it is done right it is actually one of the most beautiful and sophisticated surfaces you can put on a dining table. The material has this subtle texture and variation that makes it look handmade and artisanal, it gets better looking as it develops a patina over time, and the combination of concrete with warm wood or metal legs creates a really interesting material contrast. You can pour it in a mold yourself for a genuinely custom result or use concrete board as a simpler alternative that still gives you the aesthetic without the complexity of a full pour.
What It Is: A dining table with a hand-poured concrete top finished smooth and sealed, mounted on wood or metal legs for a sophisticated industrial or modern organic aesthetic.
Supplies and Budget: Concrete mix Quikrete brand ($20–35), melamine board for mold ($25–40), concrete sealer ($15–25), metal or wood leg set ($45–100), concrete pigment optional ($10–15). Total: $115–$215
Quick How-To: Build a melamine-lined mold to tabletop dimensions and depth of about 2 inches. Mix concrete and pour into mold. Vibrate to remove bubbles. Smooth surface. Cure for minimum 48 hours. Demold carefully. Grind and sand surface smooth through grits. Apply concrete sealer in multiple coats. Attach legs from below.
DIY Tip: Add fiber reinforcement mesh to the center of your pour rather than relying on concrete strength alone – a concrete slab at dining table thickness can crack along the length if it takes an impact or flexes during moving, and fiber mesh dramatically reduces this risk without adding visible bulk.
5. Live Edge Wood Slab Table
A live edge dining table made from a natural wood slab is genuinely one of the most beautiful pieces of furniture you can own and building one yourself makes it achievable at a price point that a furniture store version never would be. You source a raw wood slab with the natural bark edge still intact, flatten and sand it smooth, finish it to bring out the natural color and grain, and attach it to simple metal or wood legs. The natural edge means every table is completely unique and the organic character of the wood – the knots, the grain patterns, the color variations – is the entire beauty of the piece.
What It Is: A dining table made from a natural wood slab with the live edge preserved, finished smooth and sealed, mounted on simple metal or wood trestle legs to showcase the natural beauty of the wood.
Supplies and Budget: Raw wood slab from local lumber yard or wood supplier ($100–300 depending on species and size), epoxy for crack filling optional ($25–40), router sled for flattening if needed ($0 if renting), finishing oil Rubio Monocoat brand ($35–55), metal legs ($60–120). Total: $220–$515
Quick How-To: Source slab and let it acclimate indoors for two weeks minimum. Flatten top surface using router sled or hand planer. Fill any cracks or voids with tinted epoxy. Sand through grits from 80 to 220. Apply finishing oil in thin coats. Attach metal legs to underside. Apply additional oil coats as needed for protection.
DIY Tip: Source your wood slab in person at a lumber yard rather than buying online – live edge slabs vary enormously in character, color, and grain pattern and the only way to choose one you will truly love for years is to see it in person and imagine it in your actual space.
6. Trestle Base Dining Table
A trestle dining table has this timeless, European quality that looks beautiful in traditional, farmhouse, and transitional dining rooms and the base structure is genuinely one of the most satisfying things to build because the joinery is interesting and the finished piece feels very solid and intentional. Two trestle bases support the tabletop from below with a central stretcher connecting them, and the whole construction feels much more architectural than four simple legs in corners. The trestle style handles a wide tabletop especially well and the open base design means chairs can be pushed in fully on the sides.
What It Is: A dining table with two decorative trestle supports connected by a central stretcher beam, supporting a wide plank or slab tabletop for a timeless European-inspired table with strong visual character.
Supplies and Budget: 4×4 and 2×6 lumber for trestle bases ($45–70), 4×4 stretcher beam ($15–25), thick board or glued panel for top ($50–100), wood screws and bolts ($15–20), stain and finish ($15–25). Total: $140–$240
Quick How-To: Cut trestle components: two vertical posts, four angled feet, two horizontal crosspieces per trestle. Assemble each trestle with glue and screws. Connect two trestles with center stretcher beam using bolts for strength. Build or buy tabletop panel. Attach tabletop to trestles from below. Sand complete table and apply finish.
DIY Tip: Use carriage bolts rather than wood screws to connect the stretcher to the trestle bases – the shear force on a dining table base is significant when people lean and push on it daily, and carriage bolts create a much stronger mechanical connection than screws alone in this high-stress joint.
7. Epoxy Resin River Table
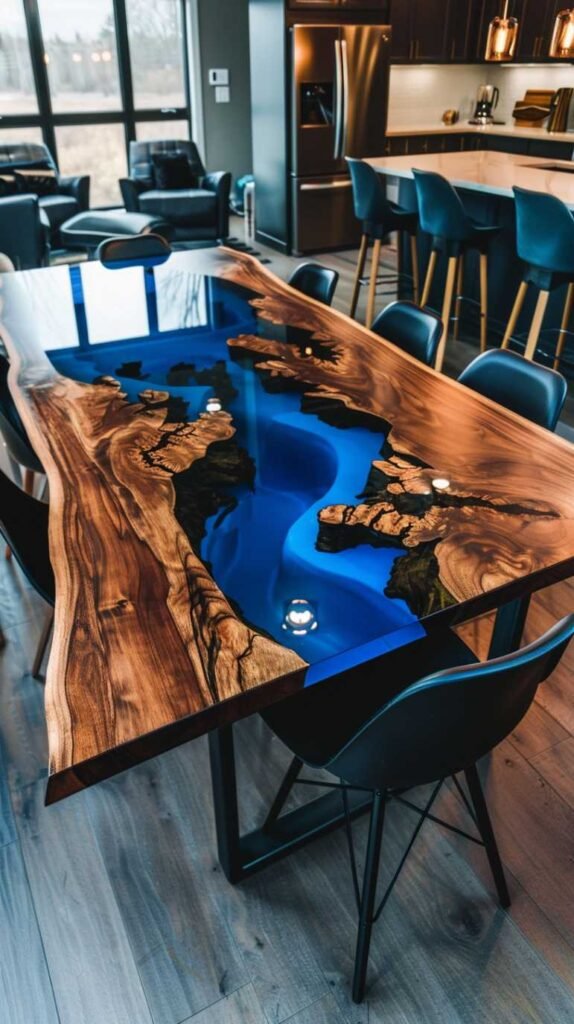
The river table – a design where two wood slabs sit on either side of a poured epoxy river in a contrasting color – became incredibly popular a few years ago and remains one of the most visually dramatic dining table designs you can make. The epoxy river runs down the center of the table like a slice of water or a vein of mineral and the effect is genuinely mesmerizing. Deep blue epoxy looks like water, black looks graphic and modern, and clear lets the wood show through below. It requires patience and careful technique but the result is something truly spectacular and completely unique.
What It Is: A dining table featuring two wood slabs or boards with a poured colored epoxy resin center section creating a dramatic river or channel effect down the length of the table, finished smooth and clear-coated.
Supplies and Budget: Two matching wood slabs or boards ($80–200), deep pour epoxy resin ($60–100), epoxy pigment in chosen color ($15–25), melamine mold boards ($20–30), finishing oil or topcoat ($25–40), metal legs ($60–120). Total: $260–$515
Quick How-To: Build melamine mold the full table size. Position wood slabs on each side leaving a gap in the center for the river. Mix deep pour epoxy per instructions and add pigment. Pour slowly into center gap. Use heat gun to pop surface bubbles. Cure minimum 72 hours. Demold, sand flat, finish with oil or topcoat. Attach legs.
DIY Tip: Pour your epoxy river in multiple thin layers rather than one deep pour even if you are using deep pour epoxy – epoxy generates heat as it cures and a single thick pour can get hot enough to yellow the resin, crack the wood, or create bubbles that are impossible to remove after the fact.
8. Plywood Scandinavian Dining Table
Plywood has a reputation as a cheap material but quality birch plywood finished properly is genuinely beautiful and durable and building a dining table from it gives you a lightweight, modern piece that costs a fraction of what solid wood would. The key is using cabinet-grade birch plywood, cutting cleanly so the edges show the beautiful layered plies, and finishing with a clear hard wax oil that lets the natural warmth of the birch come through. The Scandinavian design tradition has used quality plywood as a primary furniture material for decades precisely because it looks so beautiful when done right.
What It Is: A clean-lined Scandinavian style dining table built from cabinet-grade birch plywood for the top, with simple tapered wood legs and a clear natural finish that shows the beautiful layered plywood edge detail.
Supplies and Budget: Cabinet grade birch plywood 3/4 inch ($50–80), solid wood for edge banding optional ($15–25), tapered wood legs ($30–55), hard wax oil Osmo brand ($25–40), wood glue and sandpaper ($10–15). Total: $130–$215
Quick How-To: Cut plywood to tabletop dimensions with clean cuts. Sand all surfaces starting at 120 grit working to 220. Apply edge banding to hide plywood edge or leave raw for modern look. Attach tapered legs to underside at corners with leg mounting plates. Apply hard wax oil in thin coats. Buff between coats for smooth finish.
DIY Tip: Use a track saw or circular saw with a straight edge guide rather than a table saw to cut large plywood panels – getting a full plywood sheet through a table saw accurately by yourself is genuinely difficult and dangerous, while a track saw cuts perfectly straight lines safely with one person.
9. Painted Pedestal Base Dining Table
A single pedestal base dining table has a completely different feeling from a four-leg table – it is more intimate, the base takes up less visual space, and without legs at the four corners everyone at the table has more room for their own legs which makes it genuinely more comfortable for larger groups. Building a pedestal base from a central post and splayed feet and topping it with a round or oval tabletop creates a piece that feels classic and elegant. Paint the base in a contrasting color to the top – a dark painted pedestal under a light wood top is especially striking and current.
What It Is: A dining table with a single central pedestal base constructed from a thick post and four splayed feet, supporting a round or oval tabletop for an elegant classic dining table with a smaller visual footprint than four-leg designs.
Supplies and Budget: 4×4 post for pedestal ($15–25), thick lumber for feet ($20–35), round tabletop blank or cut from plywood ($50–100), paint for base ($15–25), stain or paint for top ($15–25), connecting hardware ($15–20). Total: $130–$230
Quick How-To: Cut four angled feet and attach to base of central post in an X or splayed pattern using strong joinery. Build up post height with additional lumber if needed for right table height. Create or purchase round tabletop. Attach tabletop to pedestal post with metal mounting plate and bolts from below. Paint base and finish top.
DIY Tip: Add a heavy base plate of steel or thick plywood between the pedestal post and the floor to distribute weight and prevent the single post from putting too much concentrated pressure on any flooring surface, which can dent hardwood floors or damage tile grout over years of use.
10. Outdoor Dining Table From Cedar or Redwood
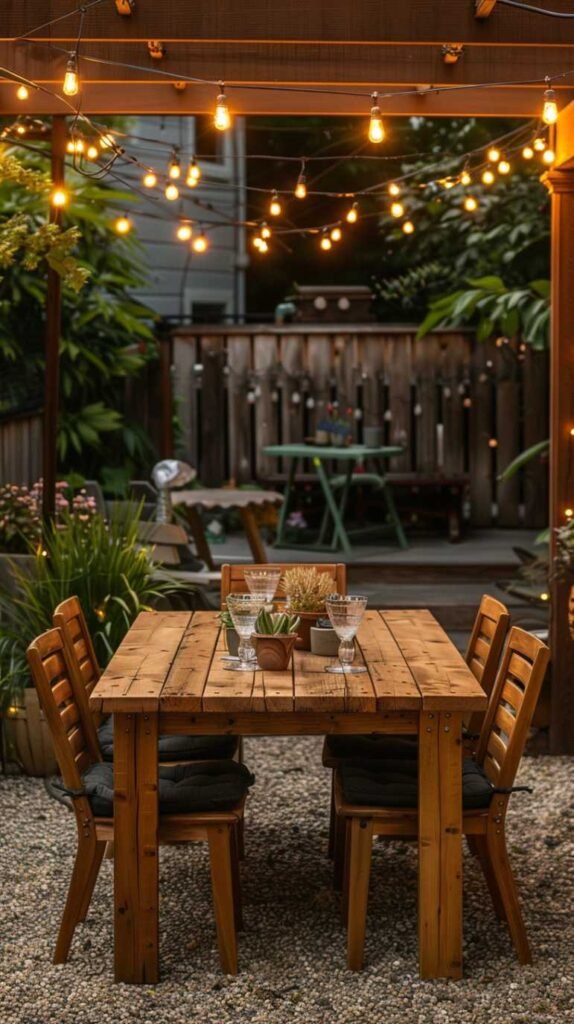
Building an outdoor dining table from naturally weather-resistant wood like cedar or redwood means you end up with a piece that handles the elements beautifully, develops a gorgeous silver-gray patina over time if left unsealed, and costs significantly less than most outdoor furniture sold at garden centers. Cedar and redwood are both naturally rot-resistant, insect-resistant, and lightweight enough to move around the patio. The construction is similar to a basic farmhouse table but the joinery is simpler because outdoor furniture prioritizes durability and weather-resistance over fine finish details. This is a genuinely achievable first build even for complete beginners.
What It Is: An outdoor dining table built from naturally weather-resistant cedar or redwood lumber, designed for patio or garden use with simple sturdy construction and optional exterior finish for longevity.
Supplies and Budget: Cedar or redwood 2×6 boards for top ($40–70), 4×4 cedar legs ($20–35), 2×4 cedar for apron and stretcher ($15–25), exterior wood screws ($10–15), exterior wood sealer or teak oil optional ($15–25). Total: $100–$170
Quick How-To: Cut boards to tabletop length with slight gaps between for drainage. Build simple apron frame from 2×4. Attach 4×4 legs at corners with exterior screws and optional metal corner brackets for strength. Leave small gaps between top boards for water drainage. Apply exterior sealer or teak oil if desired or leave to silver naturally.
DIY Tip: Leave small gaps of about an eighth of an inch between your tabletop boards rather than pressing them tight together – these drainage gaps let rainwater run straight through rather than pooling on the surface, which is the main cause of rot in outdoor wood tables even when using naturally resistant species.