Can we talk about the shoe situation by the front door for a second? Because mine got completely out of control and I kept telling myself I would deal with it later and later kept not coming. There were shoes everywhere – kicked off by the door, lined up along the wall, shoved under the bench, and honestly just creating this chaotic first impression every single time someone walked into my house. I was embarrassed but also genuinely unsure what to actually do about it because nothing I found in stores was quite the right size or style for my space.
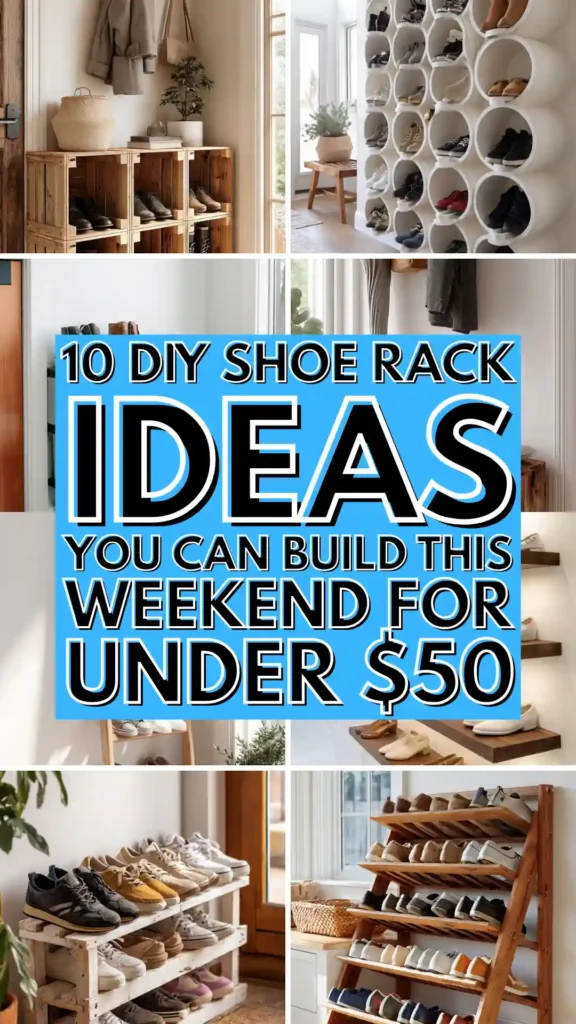
That’s when I started looking at DIY shoe storage and realized that the options are so much better than anything I’d been finding in furniture stores. The store-bought versions are either too small, too flimsy, too ugly, or way too expensive for what they actually are. A shoe rack is not a complicated piece of furniture. It is literally just a structure that holds shoes off the floor in an organized way, and that is something you can absolutely build yourself for a fraction of the cost.
What I love about making your own shoe rack is that you can build it to fit your exact space. Got a narrow entryway? Build something tall and slim. Have a wide mudroom? Go big and build something that handles the whole family’s shoes. Only wear heels and boots? Design the spacing to actually fit those. No store-bought solution gives you that level of customization and it genuinely makes a difference in whether you actually use the thing consistently.
Most of these builds are beginner-friendly too. You don’t need a workshop full of tools or advanced woodworking skills. A lot of them use basic lumber, pipes, crates, or things you already have. The hardest part is honestly just committing to starting, and once you do the whole project usually comes together faster than you expected. Your entryway is about to look so much better.
1. Simple Wooden Ladder Shoe Rack
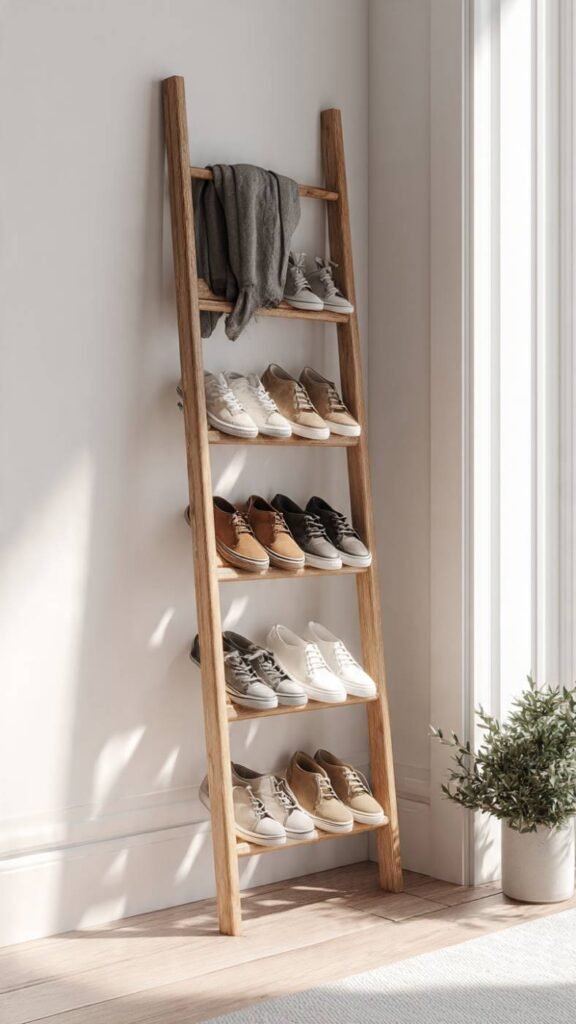
A leaning ladder used as a shoe rack is one of those ideas that is so obvious once you see it that you wonder why you didn’t think of it sooner. You either buy a simple wooden ladder from a craft or hardware store or build one from basic lumber, lean it against the wall, and drape shoes over the rungs. The angled lean keeps it stable without any wall mounting, the open design means it looks airy rather than bulky, and the wooden ladder aesthetic works in farmhouse, Scandinavian, modern, and rustic interiors equally well. It’s functional and genuinely attractive.
What It Is: A simple wooden ladder leaned against the wall with shoes draped over the horizontal rungs, functioning as an open freestanding shoe display and storage piece.
Supplies and Budget: Pre-made wooden ladder ($15–25) or two wooden dowels plus rungs to build ($12–20), sandpaper ($3), wood stain or paint ($8–12). Total: $18–$37
Quick How-To: Sand ladder smooth if building or refinishing. Stain or paint in desired color and let dry fully. Lean against wall at a slight angle – about 15 degrees from vertical for stability. Drape shoes over rungs with heels toward the wall, toes hanging forward. Add a rubber mat beneath for floors.
DIY Tip: Space your ladder rungs about 6 to 8 inches apart when building – this spacing works for most shoe sizes and styles without being so close that shoes overlap each other or so far apart that the ladder feels like it has gaps.
2. Cinder Block and Wood Plank Shoe Shelf
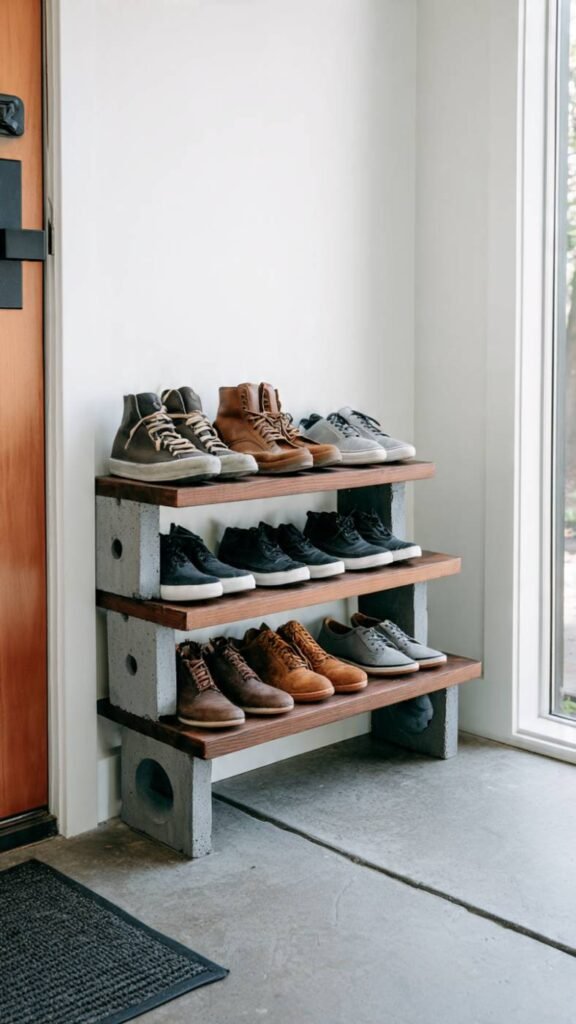
The same cinder block and wood plank combination that makes such a great TV stand works absolutely beautifully as a shoe rack and costs almost nothing to put together. You stack cinder blocks at each end to create the uprights, lay wood planks across them as shelves, and stack another row of blocks to create the next level. The industrial look is surprisingly attractive and the whole thing is completely modular – you can add more levels, make it wider, reconfigure it whenever you want. The cinder block holes can even hold small items or decorative plants.
What It Is: A freestanding multi-tier shoe shelf built by stacking cinder blocks as supports at each end with wooden planks laid across them as shoe shelves, requiring no tools or construction.
Supplies and Budget: Cinder blocks ($1–2 each, need 6–8), wooden planks 2×10 or 2×12 ($10–20 each), wood stain ($8–12), sandpaper ($3). Total: $35–$60
Quick How-To: Sand and stain wood planks and let dry. Place two cinder blocks side by side at each end of desired width. Lay first plank across. Stack second row of blocks on each end. Lay second plank. Continue for desired height. Fill cinder block holes with small plants or decorative objects.
DIY Tip: Orient your cinder blocks so the holes face upward on the top row – this lets you tuck small rolled items or use the holes as little cubbies for sunglasses, keys, or small accessories right at the shoe rack level.
3. PVC Pipe Shoe Cubbies

This one looks seriously cool and almost nobody guesses what it’s made from until you tell them. You cut sections of wide PVC pipe into individual shoe cubbies, arrange them in a honeycomb or grid pattern, and glue them together. Each pipe section holds one pair of shoes slid in toe-first. The circular openings create this really interesting geometric display and the whole thing can be spray painted any color you want – white looks clean and modern, black looks bold and dramatic, metallic looks genuinely luxurious. It’s lightweight, easy to clean, and holds a surprising number of shoes.
What It Is: A modular shoe storage rack made from sections of wide PVC pipe cut to equal lengths, arranged in a grid or honeycomb pattern and glued together so each pipe holds one pair of shoes.
Supplies and Budget: 4-inch diameter PVC pipe ($15–25 for a length), PVC cutter or hacksaw ($10–15 if needed), PVC glue ($5–7), spray paint ($6–8). Total: $36–$55
Quick How-To: Cut PVC pipe into equal sections about 12 inches long. Sand cut edges smooth. Arrange sections in desired pattern on flat surface. Apply PVC glue between touching pipes and hold for 30 seconds each. Let cure fully for two hours. Spray paint entire rack when assembled.
DIY Tip: Cut all your pipe sections the same length by setting up a simple stop block guide – clamp a piece of wood to your work surface at the right measurement so every cut automatically stops at the same point and all your cubbies are perfectly even.
4. Wooden Crate Stacked Shoe Storage
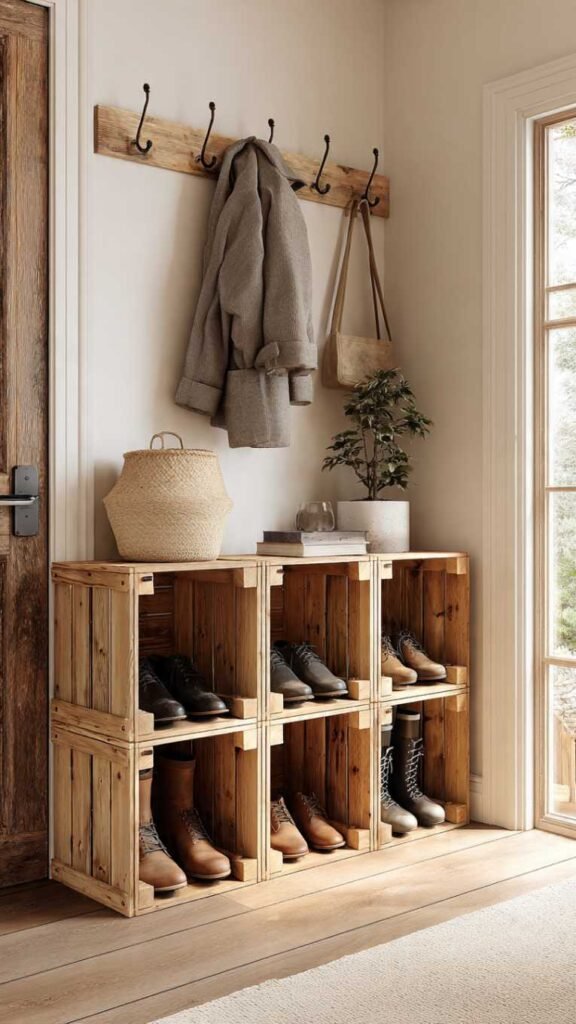
Wooden crates stacked and secured together create shoe storage that looks like something from a boutique shop display and works for any room size because you just use more or fewer crates depending on your needs. Lay them on their sides so the open face is toward you and the interior becomes a cubby that holds two to three pairs of shoes. Stack them in a staircase pattern, a straight column, or a grid – whatever fits your space. Stain them all matching or do slightly varied finishes for a more collected look. The wood crates add warmth that plastic storage solutions never do.
What It Is: A modular shoe storage unit made from wooden crates laid on their sides and stacked or arranged in a grid pattern, with each crate interior serving as an open shoe cubby.
Supplies and Budget: Wooden crates ($8–18 each, need 4–8), wood stain or paint ($10–15), L-brackets to secure together ($6–8), sandpaper ($3). Total: $55–$130 depending on number of crates
Quick How-To: Sand all crates smooth. Stain or paint in chosen color and let dry. Arrange in desired configuration on floor. Secure crates together using L-brackets on interior corners so they cannot shift or topple. Add a rubber mat underneath to protect floors.
DIY Tip: Reinforce the bottom crate of any stack to the wall with a single L-bracket and wall anchor – stacked crates can become unstable when people are bending down to grab shoes and a quick pull can topple the whole arrangement unexpectedly.
5. Hairpin Leg Shoe Bench With Storage
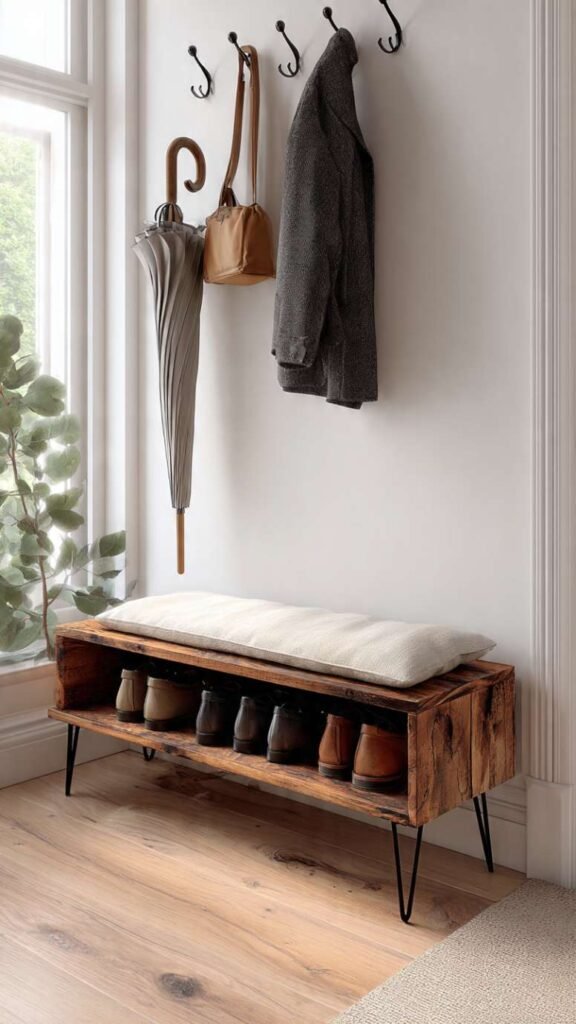
A low bench with hairpin legs and a slatted wood top that doubles as shoe storage underneath is one of the most useful things you can add to an entryway and building one is more straightforward than it looks. You make a simple low platform from plywood or boards, attach hairpin legs, and either leave the top open for sitting or add a hinged lid for hidden storage inside. The slatted version has a more open and airy look while the solid top is cleaner and more minimal. Either way you end up with somewhere to sit while putting on shoes and storage right underneath.
What It Is: A low entryway bench with hairpin legs and either open slatted sides for visible shoe storage underneath or a hinged lid top for concealed shoe storage inside the bench box.
Supplies and Budget: Plywood or boards ($20–35), hairpin legs set of four ($25–40), wood stain or paint ($10–15), piano hinge for lid version ($6–10), sandpaper ($3). Total: $64–$103
Quick How-To: Cut plywood to bench dimensions – typically 36 to 48 inches long, 12 inches deep, 16 inches high. Assemble box with wood glue and screws. Sand smooth. Stain or paint. Attach hairpin legs at corners with included screws. Add hinged lid if making storage version. Add cushion on top optionally.
6. Floating Wall Mounted Shoe Shelves

Floating shelves specifically designed for shoes mounted directly to the wall take up zero floor space which is a game changer in small entryways, apartments, and tight mudrooms. You mount simple brackets or build small shelf boxes that attach to the wall studs, space them at the right height for your shoe types, and suddenly your shoes are displayed like they’re in a shoe store. The visual effect is really clean and organized, and because everything is off the floor the whole space feels bigger and easier to clean. This works in entryways, bedrooms, and closets equally well.
What It Is: Individual wall-mounted floating shelves installed at staggered heights specifically sized and spaced for shoe storage, keeping all shoes off the floor and displayed like a shoe store wall.
Supplies and Budget: Floating shelf brackets or shelf hardware ($15–30), wood boards or pre-made shelves ($20–40 for several), stain or paint ($10), wall anchors and screws ($5). Total: $50–$85
Quick How-To: Find wall studs and mark locations. Decide shelf heights based on your shoe types – flats and sneakers need less height than boots and heels. Mount brackets into studs securely. Attach shelf boards to brackets. Space shelves about 6 inches apart vertically for most shoe styles.
7. Pipe and Reclaimed Wood Industrial Shoe Rack
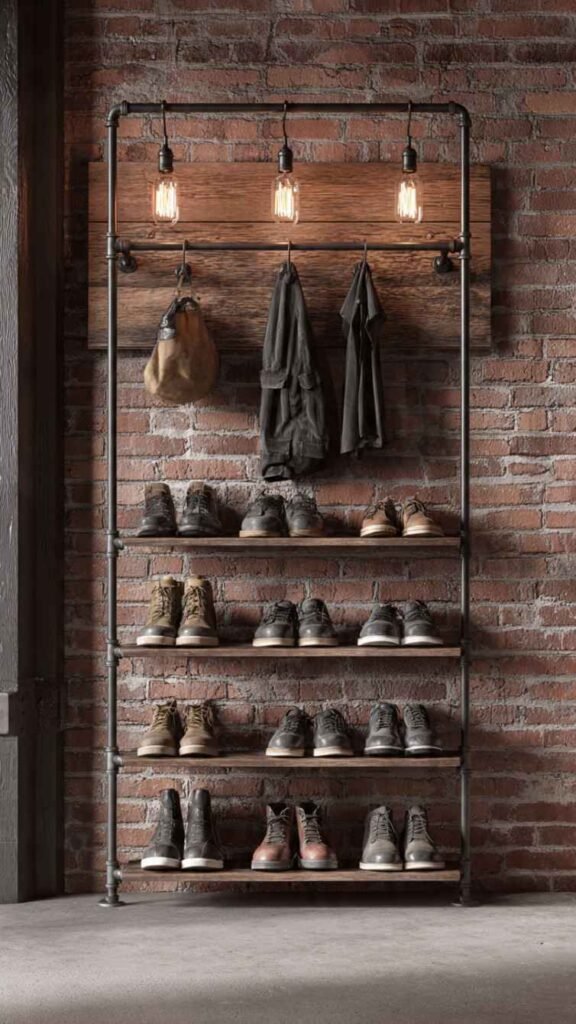
Black iron pipe combined with reclaimed wood creates a shoe rack that looks genuinely expensive and custom-made, the kind of thing you would see in a high-end loft apartment or a boutique store. The pipes act as both the frame and the horizontal rods that hold the shoes, with the wood serving as the backing panel or top shelf. The whole thing has that warm industrial quality where the rough character of the reclaimed wood balances the sleekness of the black metal. It works in industrial, modern farmhouse, and contemporary spaces and it’s sturdy enough to hold a lot of heavy boots.
What It Is: An industrial-style shoe rack built with black iron plumbing pipes as the structural frame and horizontal shoe rods, combined with a reclaimed wood backing panel or shelves.
Supplies and Budget: Black iron pipes and fittings ($35–55), reclaimed wood panel ($15–25), pipe flanges ($15–20), sandpaper and wood finish ($8–12). Total: $73–$112
Quick How-To: Plan pipe layout with horizontal rods at shoe height intervals. Have pipes cut to length at hardware store. Screw floor flanges to reclaimed wood backing. Connect pipes through fittings to create frame with horizontal rods. Sand and seal reclaimed wood. Mount entire unit to wall or use as freestanding.
DIY Tip: Buy all your pipe pieces from the same hardware store batch when possible – pipe from different batches can vary slightly in the black coating finish and the color difference is noticeable when pipes sit right next to each other in the finished rack.
8. Tiered Slanted Shoe Organizer
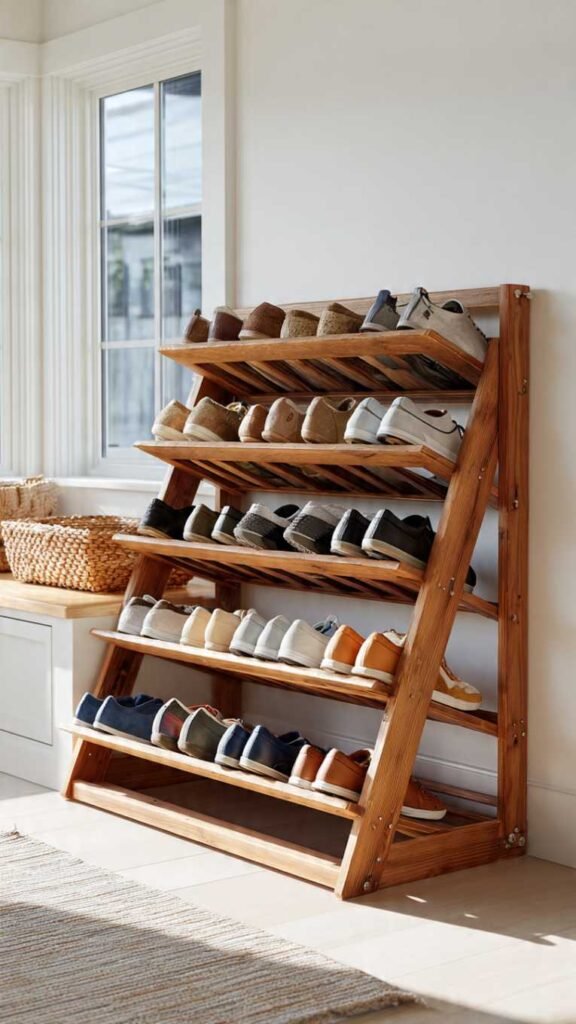
A tiered slanted shoe rack is the design that actual shoe stores use because it shows the shoes at an angle that looks great and makes them easy to grab. The slant means the shoes naturally stay in place without falling over and you can see all of them at a glance. Building one from basic lumber is very achievable with beginner woodworking skills and the result is something that looks completely professional. You can make it as wide as you need and add as many tiers as your shoe collection requires. This is the most functional pure shoe storage design on the whole list.
What It Is: A multi-tier angled shoe rack built from wood where each shelf is slightly tilted so shoes rest at a natural forward-facing angle, keeping them visible and in place without any dividers.
Supplies and Budget: 1×4 and 1×6 lumber boards ($20–35), wood screws ($5), sandpaper ($3), wood stain or paint ($10–15), saw or hardware store cuts. Total: $38–$58
Quick How-To: Cut two side panels with notches or dadoes at the shelf angles. Cut shelf boards to desired width. Assemble by sliding shelf boards into notches and securing with screws. Sand all surfaces smooth. Stain or paint. The angle should be about 15 to 20 degrees from horizontal for shoes to rest naturally.
DIY Tip: Test your shelf angle with an actual shoe before cutting all your pieces – lay a board at different angles and set a shoe on it to find the angle where the shoe sits comfortably without sliding off or looking like it’s straining to stay put.
9. Repurposed Pallet Shoe Rack
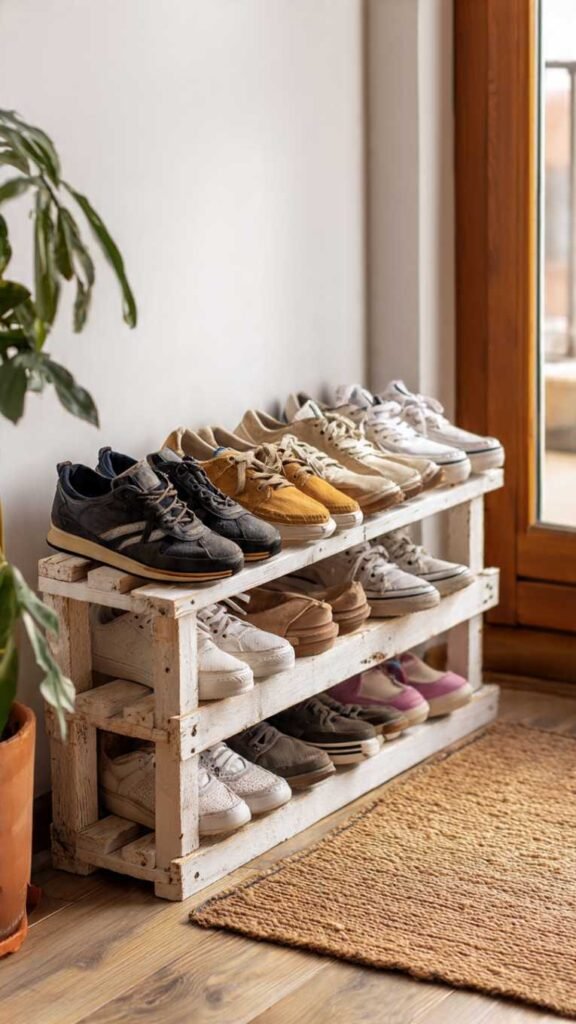
A wooden pallet leaned against the wall and lightly cleaned up is literally already a shoe rack – the slats become the shelves and the spaces between them hold shoes perfectly. The best part is that pallets are free or nearly free from hardware stores, garden centers, and furniture shops who give them away rather than disposing of them. You sand the rough edges so nobody gets a splinter, give it a coat of paint or stain if you want a more finished look, and lean it in your entryway. It’s the most budget-friendly option on this entire list and it genuinely looks cool in the right space.
What It Is: A wooden shipping pallet lightly sanded, optionally painted or stained, and leaned against a wall to use as a freestanding shoe rack with the pallet slats acting as natural shoe shelves.
Supplies and Budget: Wooden pallet (free from stores or $5–10), sandpaper ($3–5), paint or stain optional ($8–12), rubber feet or mat for floor protection ($4–6). Total: $15–$33
Quick How-To: Find a heat-treated pallet marked HT – avoid chemically treated ones. Sand all surfaces and edges very well to remove splinters. Paint or stain if desired and let dry fully. Lean against wall at a slight angle. Place rubber feet or mat underneath to protect floors. Slide shoes onto pallet slats.
DIY Tip: Look for the HT stamp on pallet wood before using it for any indoor project – HT means heat treated which is safe, while MB means methyl bromide treated which is a chemical fumigant you absolutely do not want inside your home.
10. Built-In Mudroom Shoe Cubby Wall
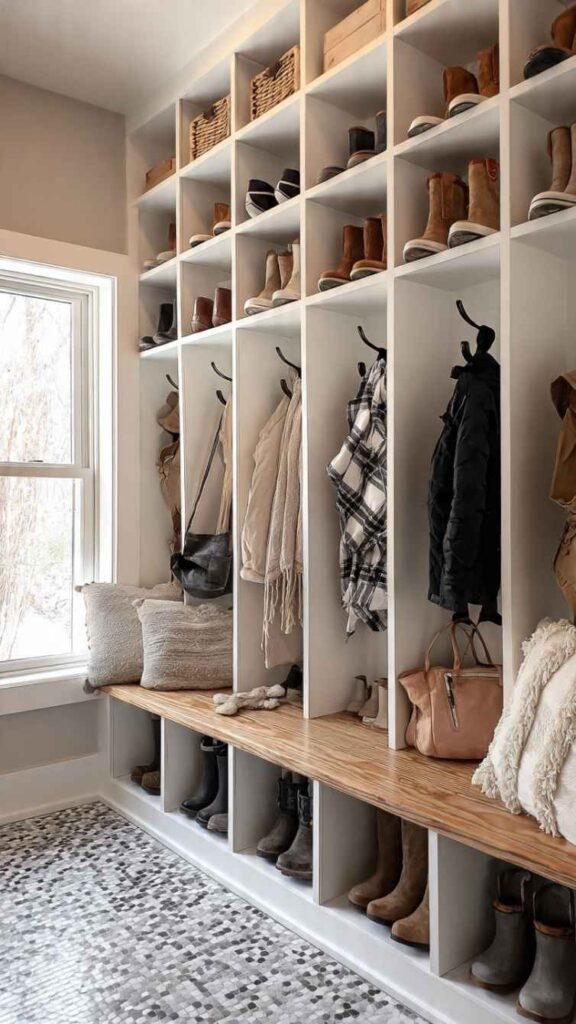
This is the big one – the project that transforms a whole wall of your entryway or mudroom into a proper built-in shoe storage system with individual cubbies for each family member. It sounds intimidating but it’s essentially just a series of plywood boxes assembled and mounted together, then painted to look like built-in millwork. The result looks like something a contractor built and charged thousands of dollars for, but the material cost is genuinely much lower when you do it yourself. Add hooks above and a bench seat below and you have a complete entryway organization system that will make you happy every single day.
What It Is: A full wall built-in shoe cubby system made from plywood boxes assembled and painted to look like custom millwork, with individual cubbies sized for each person’s shoes plus optional bench seating and hooks above.
Supplies and Budget: Plywood sheets ($40–80), wood screws and glue ($10–15), sandpaper and wood filler ($8–12), paint and primer ($20–30), hooks ($15–25). Total: $93–$162 for full wall system
Quick How-To: Measure wall and plan cubby sizes – typically 12 inches wide and 12 inches tall per cubby. Cut plywood into panels. Assemble individual boxes. Join boxes together and secure to wall studs. Fill all screw holes and seams with wood filler. Sand completely smooth. Prime and paint two coats for built-in look.
DIY Tip: Fill every single nail hole and seam with wood filler and sand it completely smooth before painting – the built-in painted look only works when the surface is perfectly smooth, and any holes or gaps show up dramatically under paint and ruin the custom millwork effect.