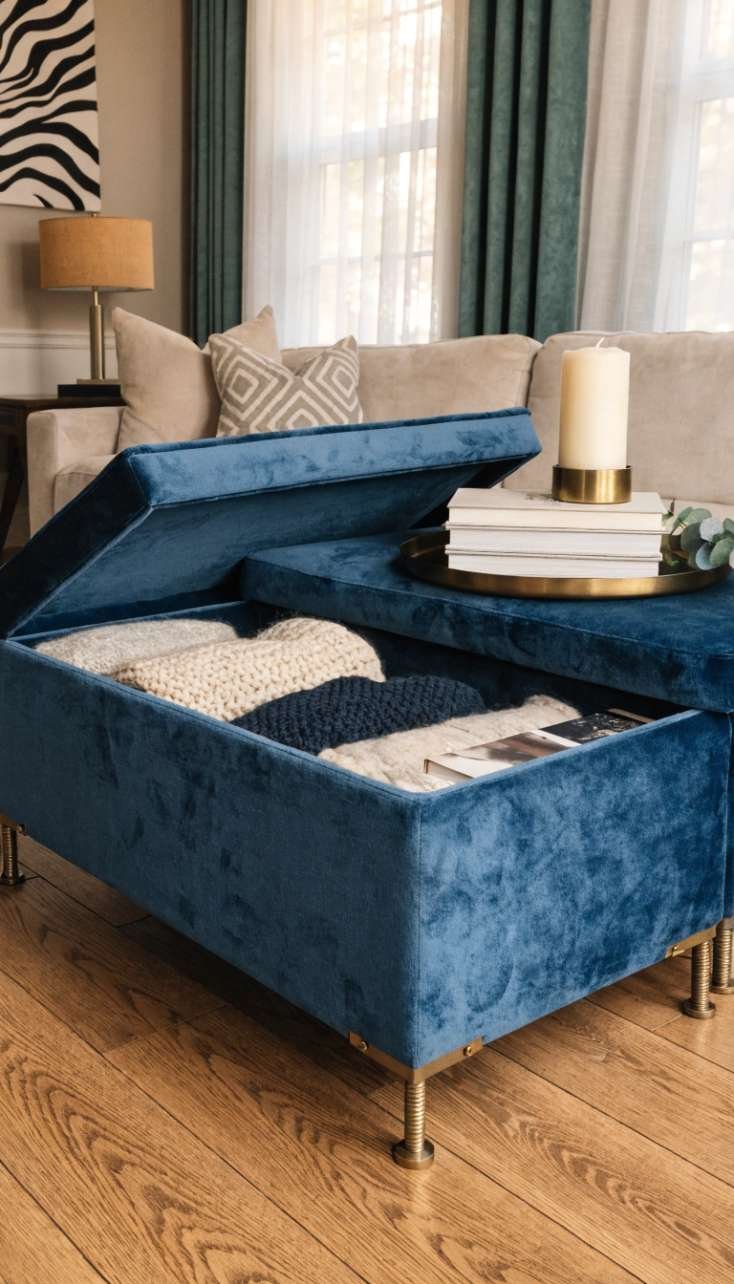
I have moved so many times in my life that I have gotten really good at making blank walls feel like home quickly and without spending a lot of money. There is something about a bare wall that feels unfinished and temporary, like you haven’t really committed to living somewhere yet. But the moment you put something meaningful and beautiful on a wall, the whole room shifts. It stops feeling like a space you’re passing through and starts feeling like somewhere you actually live.

The problem is that real art is expensive. Like genuinely, properly expensive if you want something original and beautiful. And the stuff that isn’t expensive usually looks like it isn’t expensive, which defeats the whole purpose. I spent years buying cheap prints in cheap frames and wondering why my walls still looked sad, and then I started making my own wall art and everything changed completely.
What nobody tells you about DIY wall art is that handmade pieces have a quality that bought pieces almost never have – they have personality. They have small imperfections that make them interesting. They fit your exact space and your exact color palette because you made them specifically for that wall in that room. A piece of art you made yourself also just means more, both to you and to anyone who visits and asks where you got it.
The other thing is that you do not need to be artistic to make beautiful wall art. Most of these ideas are more about process than skill – following steps, working with materials, letting things happen naturally. Some of the most stunning results come from techniques where you have the least control, which is both humbling and kind of wonderful.
These ten ideas cover a huge range of styles from modern and minimal to bold and maximalist, from quick afternoon projects to more involved weekend makes. Whatever your walls need right now, something on this list is going to work for you.
1. Abstract Canvas Painting With Household Tools
The reason most people are scared to try abstract painting is that they think they need to know what they’re doing, but abstract art is literally the one category where not knowing what you’re doing is actually the whole point. You grab a canvas, squeeze out three or four colors that look good together, and apply them with whatever you have around – a credit card, a palette knife, a sponge, a piece of cardboard. The scraping and layering creates texture and movement that looks genuinely intentional and artistic. No brushstrokes required and no artistic ability needed whatsoever.
What It Is: An original abstract canvas painting created using palette knives, credit cards, or household tools to apply and scrape acrylic paint in layers, creating texture and movement without needing any painting skills.
Supplies and Budget: Canvas ($8–15), acrylic paints in 3–4 colors ($10–15), old credit card or palette knife ($0–5), painter’s tape optional ($4). Total: $18–$34
Quick How-To: Tape canvas edges for clean border if desired. Squeeze paint directly onto canvas. Use credit card held at an angle to drag and scrape paint across surface. Layer colors while wet. Add more paint, scrape again. Stop when it looks good to you. Let dry flat.
DIY Tip: Work with the canvas flat on a table rather than upright on an easel while scraping – gravity makes the paint run and drip when the canvas is vertical and you lose control of where the colors go, which is frustrating when you’re trying to build up layers.
2. Pressed Botanical Frames
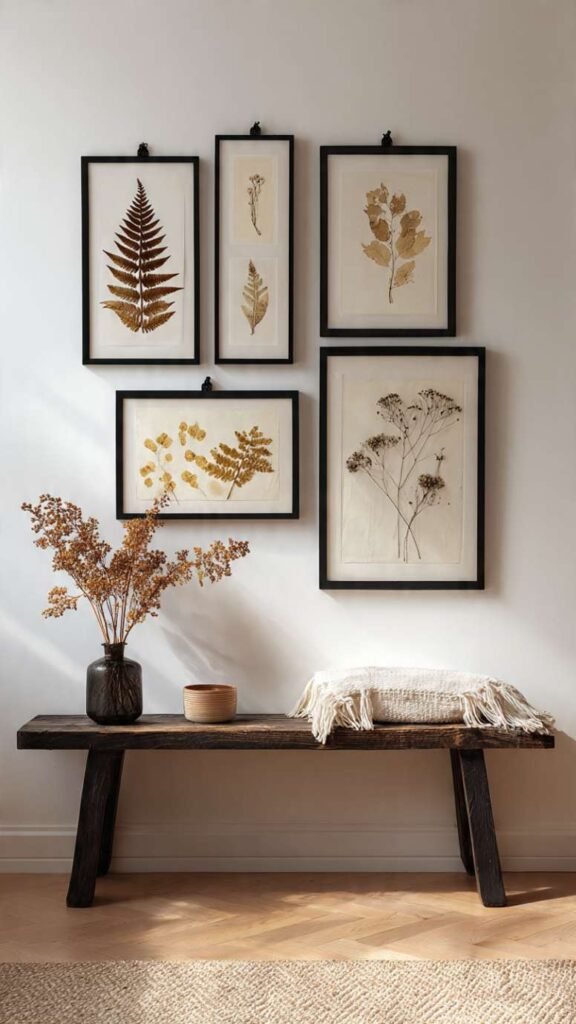
Pressed botanicals framed simply in glass frames are one of those things that look like you bought them from an expensive Scandinavian home store but cost almost nothing to make. You collect leaves, ferns, wildflowers, or herbs, press them flat between heavy books for a week or two, and then arrange them in simple clip frames or floating glass frames. The natural shapes and tones of pressed plants are genuinely beautiful and work in almost any room. A grouping of three or five matching frames with different pressed specimens arranged on a wall looks incredibly curated and intentional.
What It Is: Wall art made by pressing and drying botanical specimens – leaves, ferns, flowers, and herbs – then framing them in simple glass frames for a natural, Scandinavian-inspired display.
Supplies and Budget: Simple clip frames or floating frames ($4–12 each), fresh botanical specimens (free from garden or park), heavy books for pressing, optional white cardstock backing ($3–5). Total: $15–$45 for a set of three to five
Quick How-To: Place fresh botanicals between sheets of parchment paper inside heavy books. Stack more books on top and leave for 1–2 weeks until completely flat and dry. Arrange on white or kraft cardstock backing. Place in frame. Hang in grouping on wall.
DIY Tip: Change your botanicals with the seasons to keep the wall art feeling fresh – spring flowers in spring, colorful autumn leaves in fall, evergreen sprigs in winter. The frames stay the same and you just swap out the specimens, which costs nothing if you collect them yourself.
3. Woven Wall Hanging
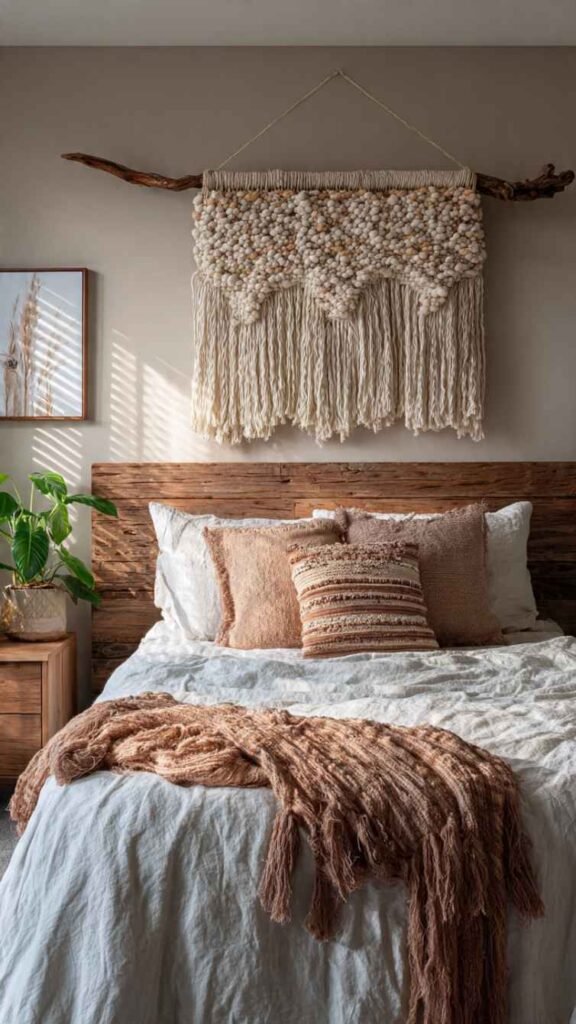
Weaving a wall hanging sounds like something that requires special skills or a proper loom but a simple beginner weave on a small DIY cardboard or branch loom is genuinely achievable in a weekend with zero experience. You string warp threads vertically, then weave yarn, fabric strips, and other textures horizontally in simple over-under patterns. Add fringe at the bottom, hang it from a dowel or branch, and you have a piece of textile art that adds warmth, texture, and a handmade quality to any wall that nothing else quite replicates. These look especially beautiful in bedrooms and living rooms.
What It Is: A handwoven textile wall hanging made on a simple DIY loom using yarn, fabric strips, and natural fibers, hung from a wooden dowel or natural branch as wall art.
Supplies and Budget: Yarn in coordinating colors ($10–18), wooden dowel or natural branch ($3–6 or free), cardboard for loom (free), weaving needle or fork ($2–4), scissors. Total: $15–$28
Quick How-To: Cut cardboard into rectangle and notch top and bottom edges evenly. String warp thread through notches vertically. Weave yarn horizontally over and under warp threads. Add different textures and colors as you go. Add fringe by looping yarn through bottom warp threads. Slide off loom and hang from dowel.
DIY Tip: Keep your weft yarn tension loose as you weave each row – if you pull the horizontal yarn too tight the sides of your weaving will draw in and curve inward rather than staying straight, and you end up with an hourglass shape instead of a rectangle.
4. Geometric Tape and Paint Wall Mural
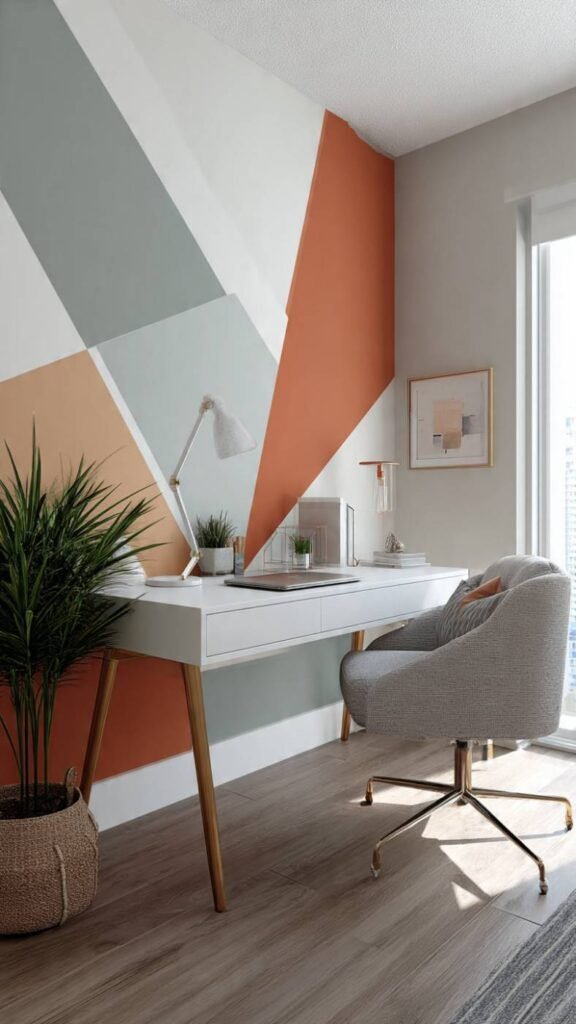
A geometric painted wall treatment using painter’s tape as your guide is one of the most dramatic things you can do to a wall and it requires absolutely no artistic ability – just straight lines and patience. You apply painter’s tape in a geometric pattern, paint over everything, peel the tape, and reveal crisp clean lines beneath. Triangles, diamonds, hexagons, chevrons – the pattern options are endless. You can do a small section above a sofa or desk, or go full wall for real impact. The clean graphic result looks like professional wallpaper or a commissioned mural.
What It Is: A painted geometric wall art piece or full wall mural created using painter’s tape as a guide for crisp lines, filled with paint in two or more coordinating colors.
Supplies and Budget: Painter’s tape ($4–8), wall paint or acrylic paint in 2–3 colors ($15–30), level and pencil ($0 if owned), foam roller or brushes ($5–8). Total: $24–$46
Quick How-To: Plan your geometric pattern and lightly mark guidelines with pencil and level. Apply painter’s tape along all lines pressing firmly. Paint each section in your chosen colors. Let dry. Apply a second coat. Peel tape slowly at a 45-degree angle while paint is still slightly tacky for sharpest edges.
DIY Tip: Seal the edges of your painter’s tape with a thin coat of the base wall color first before applying your actual design colors – this fills any tiny gaps under the tape and prevents the design color from bleeding beneath it for truly sharp geometric lines.
5. Gallery Wall of Thrifted Vintage Frames
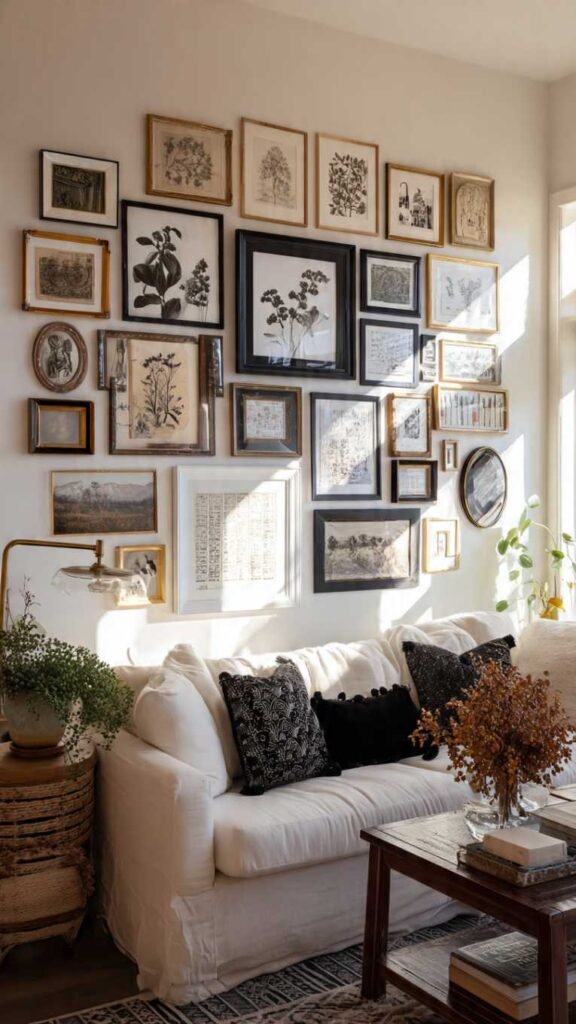
A gallery wall made entirely from thrifted frames – painted all the same color to unify them – is one of the best kept secrets in home decorating. You spend a few weeks collecting mismatched frames from thrift stores and garage sales, spray paint every single one the same color (black, white, gold, or terracotta all work beautifully), and arrange them on your wall. The unified color makes wildly different frame shapes and sizes look completely intentional and designed. Fill them with art prints, photos, fabric swatches, pages from old books – anything flat and interesting.
What It Is: A gallery wall created from mismatched thrifted frames all spray painted in one unifying color, filled with a mix of art prints, photos, and interesting flat objects for a collected, curated look.
Supplies and Budget: Thrifted frames ($1–4 each, need 8–15), spray paint in one color ($6–10), art prints or photos to fill frames ($0–20 depending on source), picture hanging strips ($8). Total: $30–$80 for full gallery wall
Quick How-To: Collect frames over time in varied sizes. Clean them and remove glass. Spray paint all frames same color – two light coats. Let dry. Fill with chosen art. Lay entire arrangement on floor and photograph to plan wall layout. Hang largest frames first then fill in around them.
DIY Tip: Photograph your floor arrangement from directly above before touching the wall – this gives you a reference photo to look at while hanging so you can recreate the exact spacing and arrangement without having to guess and fill extra nail holes.
6. Canvas Textured With Joint Compound
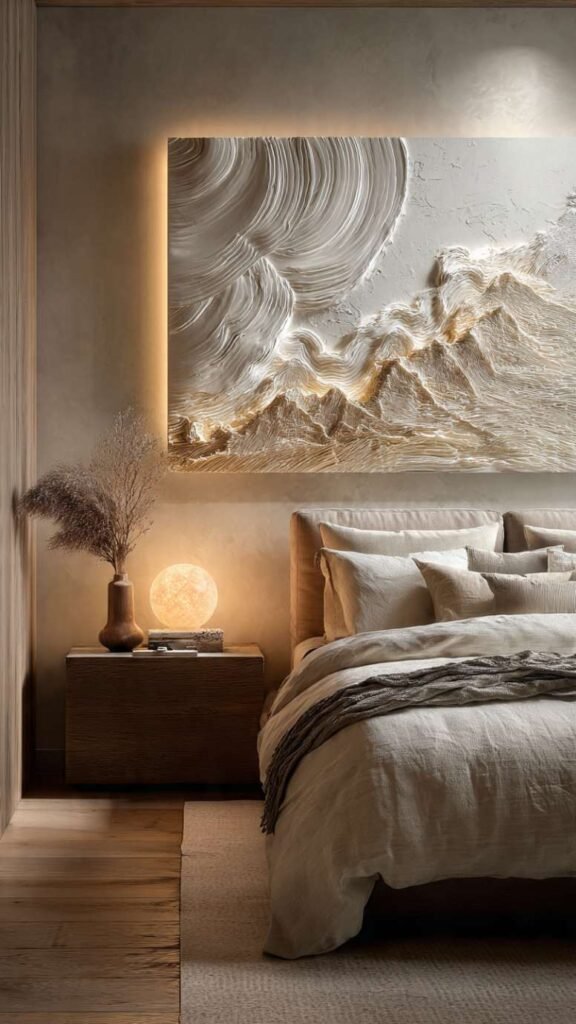
This technique produces some of the most beautiful and sophisticated looking wall art on this entire list and uses a material most people have never thought to use for art – joint compound, also called drywall mud, from the hardware store. You spread it onto a canvas with a palette knife or old credit card, creating peaks, ridges, swirls, and texture, let it dry, and then paint over it in neutrals. The texture catches light and creates shadows that make the piece look like expensive sculptural art. These pieces look incredible in bedrooms, living rooms, and home offices.
What It Is: Textured canvas wall art made by applying joint compound or drywall mud to a canvas with palette knives to create dimensional texture, then painting over it in neutral or earthy tones.
Supplies and Budget: Canvas ($8–15), joint compound from hardware store ($8–12 for small tub), palette knife or old credit card ($0–5), acrylic or chalk paint in 2–3 neutral tones ($10–15). Total: $26–$47
Quick How-To: Apply joint compound to canvas in sections using palette knife – create swirls, peaks, and ridges as desired. Let dry completely for 24 hours minimum – it will crack slightly which adds to the effect. Paint over with base color then dry brush lighter tone over raised areas.
DIY Tip: Let the joint compound dry completely before painting – it needs a full 24 hours and looks darker and slightly translucent when wet, so wait until it’s completely white and matte all the way through or the paint won’t adhere properly and will peel.
7. Fabric Stretched on Canvas Frame
Fabric as wall art is one of the most underrated decorating ideas and it makes so much sense when you think about it – fabric comes in the most incredible patterns, it’s affordable, it adds texture and warmth that paper prints never do, and stretching it over a canvas frame is genuinely one of the easiest projects on this list. You find a fabric you love – a bold pattern, a beautiful linen, an interesting texture – stretch it over a canvas stretcher frame or even just a piece of plywood, staple it to the back, and hang it. Done. It looks completely intentional and finished.
What It Is: Wall art made by stretching a piece of fabric tightly over a canvas stretcher frame or plywood board and stapling it to the back, turning any interesting fabric into a framed art piece.
Supplies and Budget: Canvas stretcher bars or plywood ($8–18), fabric of choice ($8–20 per yard), staple gun and staples ($10–15 if you don’t own one), scissors. Total: $26–$53
Quick How-To: Cut fabric several inches larger than your frame on all sides. Lay frame face down on fabric. Pull fabric over one side and staple to back. Pull opposite side taut and staple. Work around all four sides pulling fabric taut and even as you go. Fold corners neatly and staple flat.
DIY Tip: Start stapling from the center of each side rather than from the corners – working center outward on each side keeps the tension even and prevents the fabric pattern from going crooked, which is really noticeable once it’s hanging on the wall.
8. Block Print Wall Art
Block printing your own wall art gives you pieces that are genuinely one of a kind because hand printing always has slight variations that make each print unique. You can carve your own simple stamp from a foam block or a linoleum block, or use a potato or even a sponge cut into a shape for the simplest version. Dip in paint, press onto paper or fabric, repeat in a pattern. The result is this beautiful artisan-quality print that looks like something from an independent art market. Simple geometric shapes, leaves, or abstract marks all work beautifully.
What It Is: Original printed wall art created using hand-carved foam or linoleum blocks, or simple cut sponge stamps, printed repeatedly onto paper or fabric to create a patterned or repeating design.
Supplies and Budget: Foam block or linoleum carving block ($4–8), carving tools ($6–10) or just scissors for foam, acrylic or block printing ink ($8–12), watercolor paper or canvas ($8–15). Total: $26–$45
Quick How-To: Draw your design on foam or linoleum block. Carve away the areas you don’t want to print. Roll or brush ink evenly onto block surface. Press firmly and evenly onto paper or canvas. Lift straight up without sliding. Repeat to build pattern. Let dry fully before framing.
DIY Tip: Apply ink to your block in thin even layers rather than thick globs – too much ink fills in the carved areas and you lose the crisp definition of your design, while the right amount gives clean sharp prints with visible detail.
9. Large Scale Macrame Wall Art

Macrame wall hangings have been having a moment for years now and honestly they deserve it because there is nothing else that adds warmth, texture, and that handcrafted quality to a wall the way a large piece of macrame does. The basic knots are genuinely simple to learn – square knots and half hitches will get you through almost any beginner pattern – and within a few hours you have something substantial enough to make a real statement. Large pieces look especially incredible above a bed or sofa where they fill vertical wall space beautifully without weighing the room down visually.
What It Is: A large handmade macrame wall hanging created using basic knotting techniques with natural cotton rope, hung from a wooden dowel or branch as decorative textile wall art.
Supplies and Budget: Natural cotton macrame rope ($15–25 for a large piece), wooden dowel or branch ($3–6 or free), scissors, measuring tape. Total: $18–$31
Quick How-To: Cut rope pieces three to four times the desired finished length. Fold each piece in half and attach to dowel with a lark’s head knot. Work square knots across the piece following a simple beginner pattern. Add fringe sections and spiral knot details. Trim fringe to desired length at the end.
DIY Tip: Cut your rope pieces longer than the pattern suggests if you are a beginner – you use up rope faster than you expect when you are learning and running out mid-piece means your knots change tension where you join new rope, which is very visible in the finished piece.
10. Floating Shelves With Styled Vignette Art
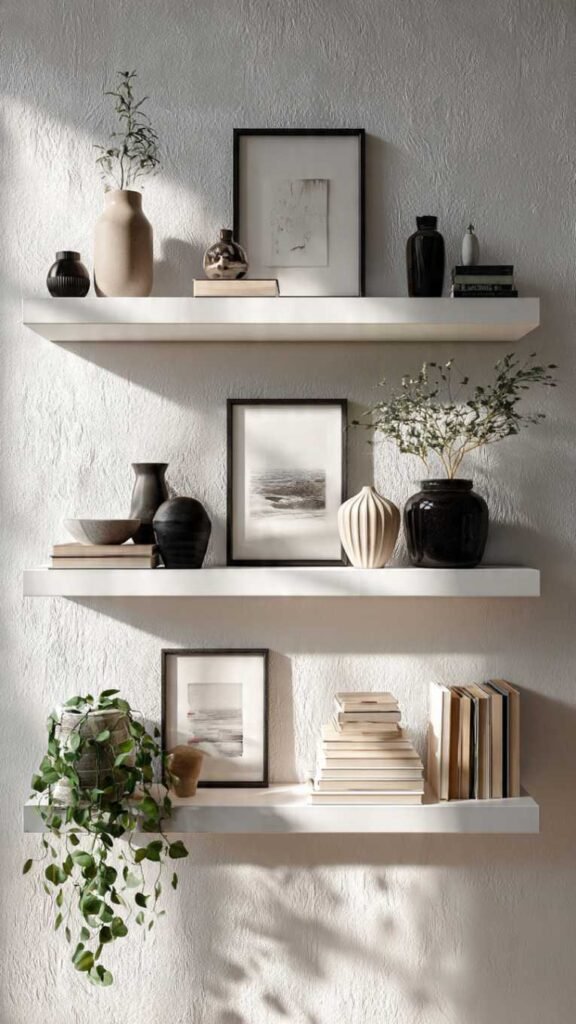
Sometimes the best wall art isn’t a single hanging piece but a thoughtfully styled arrangement on floating shelves that creates a visual moment on your wall. A set of two or three simple floating shelves styled with a mix of objects – a small framed print, a sculptural vase, a trailing plant, a stack of books, a candle – creates a layered three-dimensional wall display that is more interesting and alive than anything flat could be. The key is treating the whole shelf arrangement as a composition the same way you would a painting, thinking about height, texture, color, and negative space.
What It Is: A styled wall display using floating shelves arranged with a curated mix of objects, plants, art, and decorative items to create a three-dimensional living wall art moment.
Supplies and Budget: Floating shelves ($15–40 for two to three), wall anchors and screws ($5), decorative objects and plants you already own ($0–30 for any new additions). Total: $20–$75
Quick How-To: Install floating shelves at varied heights using a level. Style with a mix of heights – tall items at back, shorter in front. Vary textures: smooth ceramics, rough natural objects, glossy books. Add one trailing plant per shelf. Leave some empty space so it doesn’t look cluttered.
DIY Tip: The rule of odd numbers works really well for shelf styling – groups of three objects look more natural and interesting than groups of two or four, so arrange items in threes and your shelves will look intentionally styled rather than randomly placed.