Red velvet cookies are like the fancy cousins of regular cookies – they’re beautiful, they’re dramatic with that gorgeous deep red color, and they always make people stop and ask for the recipe. I love making these for Valentine’s Day, Christmas, or honestly any time I want to impress people with something that looks way more complicated than it actually is. These 10 red velvet cookie recipe ideas take that beloved red velvet cake flavor and transform it into cookies that are just as delicious and way easier to serve at parties.
The Classic Red Velvet Cookies are where everyone should start – that perfect blend of chocolate and vanilla with cream cheese frosting on top. The Soft & Chewy Red Velvet Cookies have that bakery-style texture I absolutely love, while the Red Velvet Crinkle Cookies with their powdered sugar coating look like they came from a fancy bakery. The Red Velvet Chocolate Chip Cookies add extra chocolate because why not, and the Red Velvet Oreo Cookies are loaded with crushed cookies for texture. The Cream Cheese–Stuffed Red Velvet Cookies hide a surprise cream cheese filling in the center, and the Red Velvet Sandwich Cookies give you that classic cake experience in cookie form. The Red Velvet Cake Mix Cookies are my shortcut when I’m pressed for time, the Red Velvet White Chocolate Cookies add sweet white chocolate chips, and the Red Velvet Walnut Cookies bring nutty crunch.
What makes red velvet cookies so special is how they’re festive and eye-catching without needing complicated decorating – that vibrant red color does all the work. They’re perfect for holidays, celebrations, bake sales, or gift-giving because they look impressive and taste incredible. Once you master red velvet cookies, you’ll be making them for every special occasion!
1. Classic Red Velvet Cookies
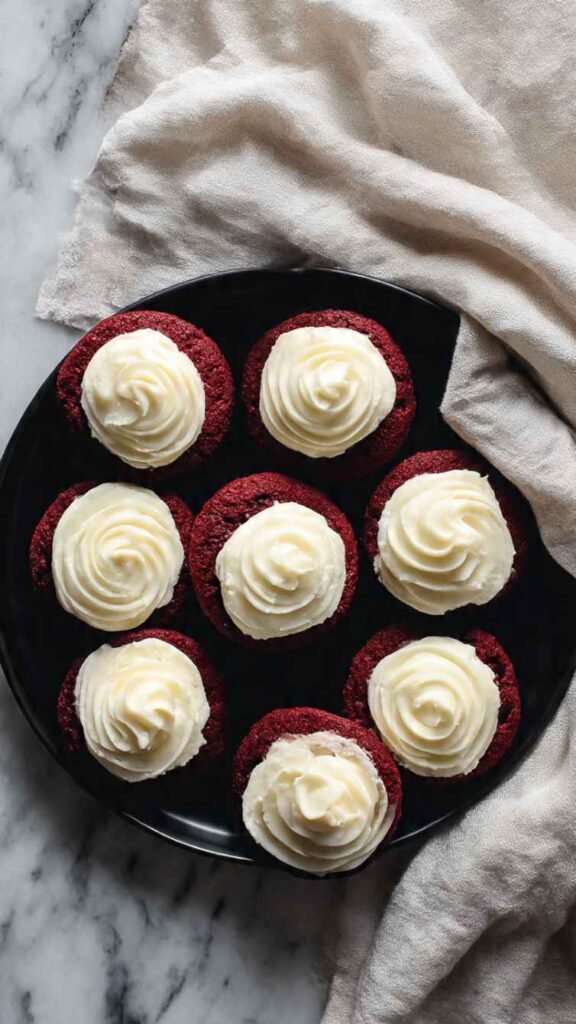
Classic red velvet cookies are soft, vibrant, and perfectly balanced with subtle cocoa flavor and tangy buttermilk creating the signature taste. The combination of deep red color, tender texture, and cream cheese frosting makes these cookies instantly recognizable and absolutely irresistible. I’ve been perfecting this recipe for years because red velvet is such a beloved flavor that deserves to be done right. The key is using the right amount of cocoa powder – not too much, just enough to give that distinctive red velvet taste – and quality red food coloring for that signature vibrant hue. This has become my most-requested cookie for special occasions because they’re beautiful, delicious, and taste exactly like red velvet cake. Every bite delivers that perfect combination of chocolatey-vanilla flavor with a hint of tanginess.
Ingredients
For the cookies:
- 2½ cups all-purpose flour
- 2 tablespoons unsweetened cocoa powder
- 1 teaspoon baking soda
- ½ teaspoon salt
- ½ cup (1 stick) unsalted butter, softened
- 1½ cups granulated sugar
- 2 large eggs
- 1 teaspoon vanilla extract
- 1 tablespoon red food coloring (liquid or gel)
- 1 teaspoon white vinegar
- ½ cup buttermilk
For the cream cheese frosting:
- 4 oz cream cheese, softened
- 2 tablespoons unsalted butter, softened
- 2 cups powdered sugar
- 1 teaspoon vanilla extract
Steps
Step 1: Preheat your oven to 350°F and line baking sheets with parchment paper. In a medium bowl, whisk together the flour, cocoa powder, baking soda, and salt. The cocoa powder should be measured carefully – too much and they’ll taste like chocolate cookies instead of red velvet. Set aside. In a large bowl using an electric mixer, cream together the softened butter and sugar for three to four minutes until light and fluffy. The mixture should be pale and airy.
Step 2: Add the eggs one at a time to the butter mixture, beating well after each addition. Add the vanilla extract, red food coloring, and white vinegar. Mix until the color is evenly distributed throughout – the mixture should be vibrant red. The vinegar reacts with the baking soda to help create the tender texture and also enhances the red color. Don’t skip it even though it seems like a small amount.
Step 3: Add the dry ingredients to the wet ingredients in three additions, alternating with the buttermilk, beginning and ending with the dry ingredients. Mix on low speed after each addition until just combined. The buttermilk adds tanginess and creates the tender crumb that makes red velvet special. Don’t overmix – stop as soon as you no longer see streaks of flour. The dough will be soft, slightly sticky, and brilliantly red.
Step 4: Drop rounded tablespoons of dough onto the prepared baking sheets, spacing them about two inches apart. These cookies will spread slightly as they bake. You can use a cookie scoop for uniform size. Bake for ten to twelve minutes until the edges are set but the centers still look soft and slightly underbaked. Don’t overbake – they should barely have any browning on the edges. Let the cookies cool on the baking sheet for five minutes before transferring to a wire rack to cool completely.
Step 5: While the cookies cool, make the cream cheese frosting: In a medium bowl, beat together the softened cream cheese and butter until smooth and creamy. Gradually add the powdered sugar, beating until fluffy. Add the vanilla extract and mix until combined. Once the cookies are completely cool, spread or pipe the cream cheese frosting on top of each cookie. The white frosting against the red cookie is the classic red velvet look. These classic red velvet cookies are soft, beautiful, and taste exactly like red velvet cake. The cream cheese frosting is essential and absolutely delicious. They’re perfect for Valentine’s Day, Christmas, or any special occasion.
Prep Time: 20 minutes
Baking Time: 12 minutes per batch
Servings: 30 cookies
2. Soft & Chewy Red Velvet Cookies
Soft and chewy red velvet cookies are ultra-tender with a pillowy texture that stays soft for days. The combination of extra brown sugar and an additional egg yolk creates incredibly chewy cookies with that perfect red velvet flavor. I developed this recipe when I wanted the chewiest possible red velvet cookies. The key is slightly underbaking them and using more brown sugar which adds moisture and chewiness. This has become my favorite texture for red velvet cookies because they’re so tender and satisfying. Every bite is soft, chewy, and packed with red velvet flavor.
Ingredients
- 2½ cups all-purpose flour
- 2 tablespoons unsweetened cocoa powder
- 1 teaspoon baking soda
- ½ teaspoon salt
- ½ cup (1 stick) unsalted butter, softened
- 1 cup packed brown sugar
- ½ cup granulated sugar
- 1 large egg plus 1 egg yolk
- 2 teaspoons vanilla extract
- 1 tablespoon red food coloring
- 1 teaspoon white vinegar
- ½ cup buttermilk
Steps
Step 1: Preheat your oven to 350°F and line baking sheets with parchment paper. In a medium bowl, whisk together the flour, cocoa powder, baking soda, and salt. Set aside. In a large bowl, cream the softened butter, brown sugar, and granulated sugar for three to four minutes until light and fluffy. The extra brown sugar is what makes these cookies extra chewy – brown sugar contains more moisture than white sugar.
Step 2: Add the whole egg, egg yolk, vanilla extract, red food coloring, and white vinegar. Beat until well combined and the mixture is evenly red. The extra egg yolk is the secret to ultra-chewy cookies – it adds fat and richness without making them cakey. Add the dry ingredients alternately with the buttermilk in three additions. Mix until just combined. The dough will be soft.
Step 3: Cover the dough with plastic wrap and refrigerate for at least thirty minutes or up to two hours. Chilling is important for soft, chewy cookies – it prevents them from spreading too much and helps them maintain thickness. Once chilled, scoop the dough into balls using a large cookie scoop (about 2 tablespoons each).
Step 4: Place on prepared baking sheets about three inches apart. These cookies are larger and need room. Don’t flatten them – you want them to stay thick. Bake for ten to eleven minutes until the edges are just barely set but the centers still look soft, puffy, and slightly underbaked. This is crucial – they should look like they need another minute but resist the urge.
Step 5: Let the cookies cool on the baking sheet for ten minutes. They’ll look very soft but will firm up as they cool while maintaining incredible chewiness. Transfer to a wire rack. These soft and chewy red velvet cookies are incredibly tender with a pillowy texture. They stay soft for days when stored in an airtight container. They’re perfect for anyone who loves soft cookies.
Prep Time: 15 minutes (plus 30 minutes chilling)
Baking Time: 11 minutes per batch
Servings: 24 large cookies
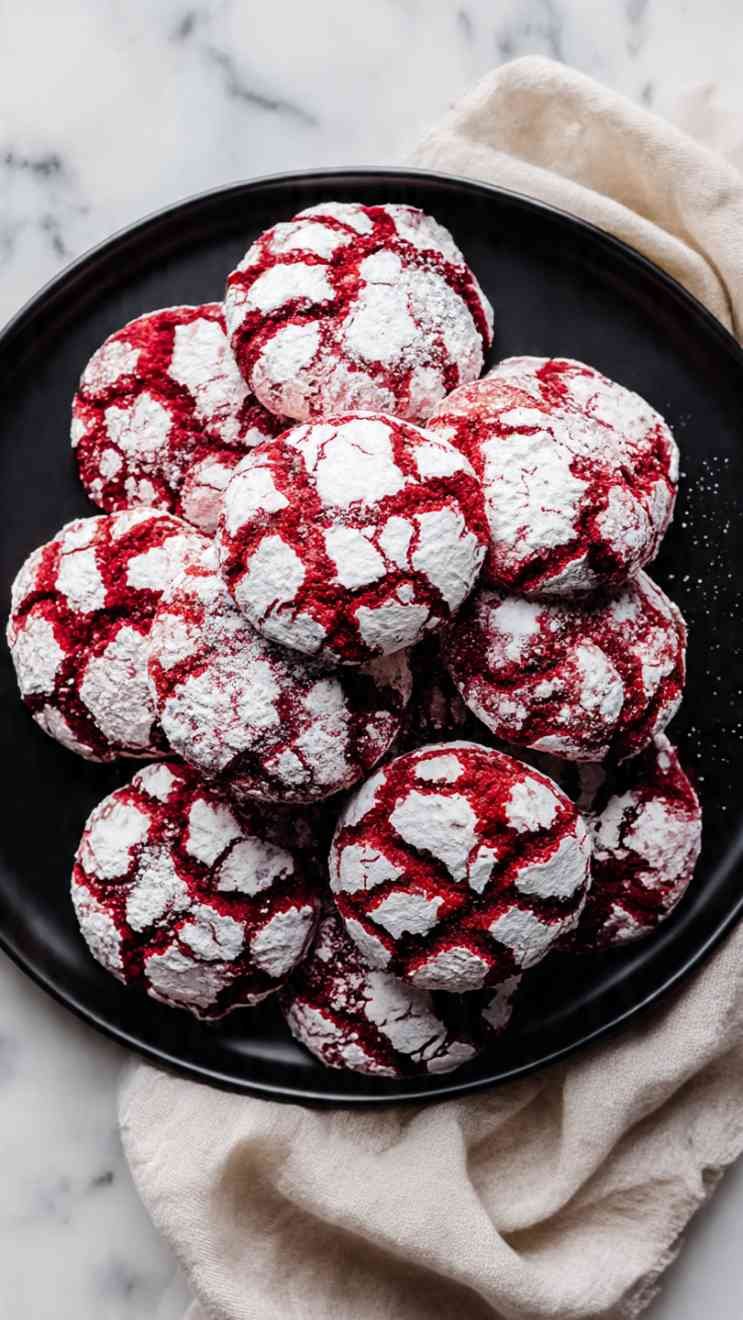
3. Red Velvet Crinkle Cookies
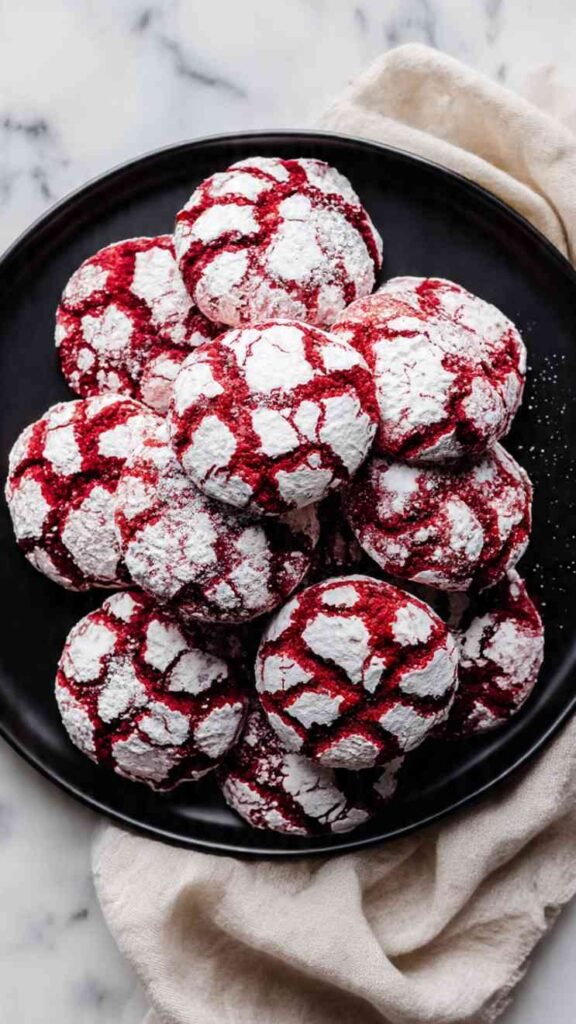
Red velvet crinkle cookies have that beautiful crackled appearance with powdered sugar creating stunning contrast against the red. The combination of fudgy interior and crispy powdered sugar coating makes these visually striking and delicious. I created this recipe when I wanted red velvet cookies with that iconic crinkle cookie look. The key is rolling them in powdered sugar which creates the dramatic cracks as they bake. This has become my favorite showstopper cookie because they’re so beautiful. Every cookie has unique crackled patterns.
Ingredients
- 2 cups all-purpose flour
- 2 tablespoons unsweetened cocoa powder
- 1 teaspoon baking powder
- ½ teaspoon salt
- ½ cup (1 stick) unsalted butter, softened
- 1½ cups granulated sugar
- 2 large eggs
- 2 teaspoons vanilla extract
- 1½ tablespoons red food coloring
- 1 teaspoon white vinegar
- ½ cup buttermilk
- 1 cup powdered sugar for rolling
Steps
Step 1: Preheat your oven to 350°F and line baking sheets with parchment paper. In a medium bowl, whisk together the flour, cocoa powder, baking powder, and salt. Set aside. In a large bowl, cream the softened butter and sugar for three to four minutes until fluffy.
Step 2: Add the eggs one at a time, beating well after each addition. Add the vanilla extract, red food coloring, and white vinegar. Mix until the color is evenly distributed. Add the dry ingredients alternately with the buttermilk in three additions. Mix until just combined. The dough will be soft and sticky.
Step 3: Cover and refrigerate the dough for at least two hours or overnight. The dough must be well-chilled for crinkle cookies – warm dough won’t create the signature cracks. Once chilled, place the powdered sugar in a shallow bowl. Scoop the dough into balls about 1½ tablespoons each.
Step 4: Roll each ball generously in the powdered sugar, coating completely. The thick coating is what creates the dramatic crinkle effect. Don’t be shy with the sugar. Place on prepared baking sheets about two inches apart. The cookies will spread and crack as they bake.
Step 5: Bake for eleven to thirteen minutes until the cookies are puffed and crackled. The red color should show through the white powdered sugar in dramatic cracks. Let cool on the baking sheet for five minutes before transferring to a wire rack. These red velvet crinkle cookies are stunning with beautiful crackled appearance. The contrast of red and white is dramatic. They’re perfect for holidays and special occasions.
Prep Time: 20 minutes (plus 2 hours chilling)
Baking Time: 13 minutes per batch
Servings: 30 cookies
4. Red Velvet Chocolate Chip Cookies

Red velvet chocolate chip cookies combine two beloved flavors with chocolate chips adding extra richness to red velvet. The combination of red velvet dough studded with melty chocolate chips is absolutely delicious. I developed this recipe when I wanted more chocolate in my red velvet cookies. The key is using semi-sweet or dark chocolate chips which complement the red velvet flavor perfectly. This has become my favorite loaded version because the chocolate chips make them extra indulgent. Every bite has red velvet flavor with pockets of melted chocolate.
Ingredients
- 2½ cups all-purpose flour
- 2 tablespoons unsweetened cocoa powder
- 1 teaspoon baking soda
- ½ teaspoon salt
- ½ cup (1 stick) unsalted butter, softened
- 1½ cups granulated sugar
- 2 large eggs
- 2 teaspoons vanilla extract
- 1 tablespoon red food coloring
- 1 teaspoon white vinegar
- ½ cup buttermilk
- 1½ cups semi-sweet chocolate chips
Steps
Step 1: Preheat your oven to 350°F and line baking sheets with parchment paper. Whisk together the flour, cocoa powder, baking soda, and salt in a medium bowl. Set aside. In a large bowl, cream the softened butter and sugar for three to four minutes until light and fluffy.
Step 2: Add the eggs one at a time, beating well after each addition. Add the vanilla extract, red food coloring, and white vinegar. Mix until evenly red. Add the dry ingredients alternately with the buttermilk. Mix until just combined. Fold in the chocolate chips using a wooden spoon. The chips should be evenly distributed throughout the vibrant red dough.
Step 3: Drop rounded tablespoons of dough onto prepared baking sheets about two inches apart. The chocolate chips will be visible in the red dough, creating beautiful contrast. Don’t flatten – let them spread naturally to maintain thickness.
Step 4: Bake for eleven to thirteen minutes until the edges are set but the centers still look soft. The chocolate chips will be melty and gooey. Don’t overbake – they should stay soft and chewy. Let cool on the baking sheet for five minutes before transferring to a wire rack.
Step 5: The chocolate chips will remain soft and melty inside. These red velvet chocolate chip cookies are the best of both worlds with red velvet flavor and melty chocolate. The combination is rich and delicious. They’re perfect for chocolate lovers.
Prep Time: 15 minutes
Baking Time: 13 minutes per batch
Servings: 36 cookies
5. Red Velvet Oreo Cookies
Red velvet Oreo cookies sandwich cream cheese frosting between two red velvet cookies creating homemade Oreos. The combination creates an elevated, gourmet version of the classic sandwich cookie. I created this recipe when I wanted to make fancy sandwich cookies. The key is making thin, crispy red velvet cookies that pair perfectly with the cream cheese filling. This has become my favorite impressive cookie because they look professional. Each sandwich cookie is beautiful and delicious.
Ingredients
For the cookies:
- 2 cups all-purpose flour
- 2 tablespoons unsweetened cocoa powder
- 1 teaspoon baking powder
- ½ teaspoon salt
- ½ cup (1 stick) unsalted butter, softened
- 1 cup granulated sugar
- 1 large egg
- 1 teaspoon vanilla extract
- 1 tablespoon red food coloring
For the filling:
- 8 oz cream cheese, softened
- ¼ cup (½ stick) butter, softened
- 3 cups powdered sugar
- 1 teaspoon vanilla extract
Steps
Step 1: Preheat your oven to 350°F and line baking sheets with parchment paper. Whisk together the flour, cocoa powder, baking powder, and salt. Set aside. Cream the butter and sugar for three minutes until fluffy. Add the egg, vanilla, and red food coloring. Mix until evenly red. Gradually add the dry ingredients, mixing until just combined. The dough will be soft.
Step 2: Scoop small balls of dough (about 2 teaspoons each) onto prepared baking sheets. These should be smaller than regular cookies since you’ll be sandwiching two together. Flatten each ball with the bottom of a glass dipped in sugar. Press down to about ¼ inch thick. They should be thin and uniform.
Step 3: Bake for eight to ten minutes until the edges are crispy and set. These cookies should be crisper than regular red velvet cookies to hold up as sandwich cookies. Let cool completely on a wire rack. They must be completely cool before filling.
Step 4: Make the filling: Beat the softened cream cheese and butter until smooth. Gradually add the powdered sugar, beating until fluffy. Add the vanilla and mix until combined. The filling should be thick and spreadable.
Step 5: Match up cookies in similar sizes. Spread or pipe about 1 tablespoon of filling on the flat side of one cookie. Top with another cookie to create a sandwich, pressing gently. The filling should spread to the edges. These red velvet Oreo cookies are impressive and delicious with cream cheese filling. They’re homemade sandwich cookies that look professional. Perfect for gifting or special occasions.
Prep Time: 30 minutes
Baking Time: 10 minutes per batch
Servings: 24 sandwich cookies
6. Cream Cheese-Stuffed Red Velvet Cookies
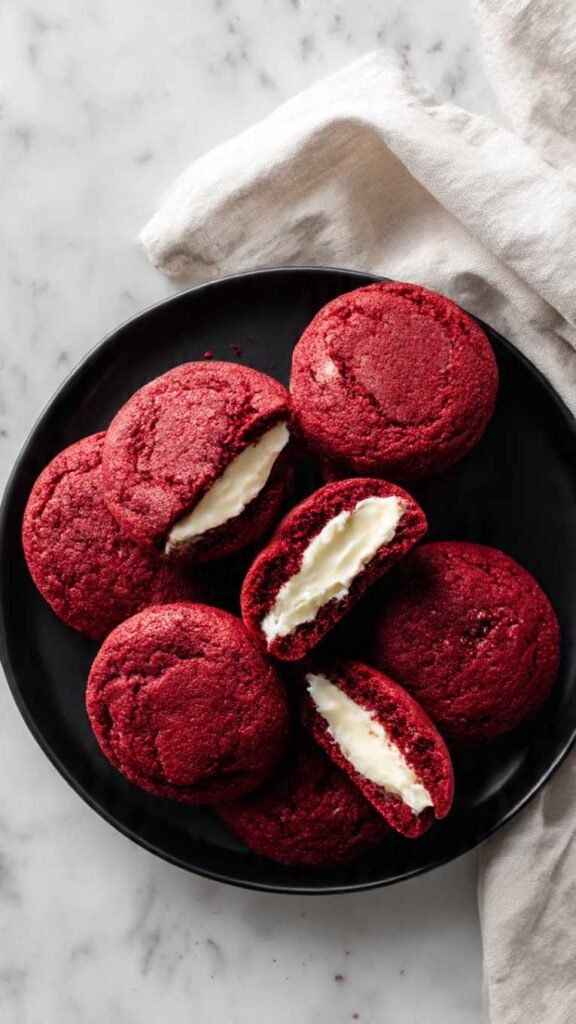
Cream cheese-stuffed red velvet cookies have a cream cheese filling baked right inside creating gooey centers. The combination of red velvet dough with tangy cream cheese in the middle is absolutely incredible. I developed this recipe when I wanted cream cheese in every bite. The key is freezing the cream cheese filling so it doesn’t melt out during baking. This has become my most indulgent version because the cream cheese center is so rich. Every bite has that wonderful cream cheese surprise.
Ingredients
For the filling:
- 8 oz cream cheese, softened
- ¼ cup powdered sugar
- 1 teaspoon vanilla extract
For the cookies:
- 2½ cups all-purpose flour
- 2 tablespoons unsweetened cocoa powder
- 1 teaspoon baking soda
- ½ teaspoon salt
- ½ cup (1 stick) unsalted butter, softened
- 1½ cups granulated sugar
- 2 large eggs
- 2 teaspoons vanilla extract
- 1 tablespoon red food coloring
- ½ cup buttermilk
Steps
Step 1: Make the filling first: Beat the cream cheese, powdered sugar, and vanilla until smooth. Scoop teaspoon-sized portions onto a parchment-lined plate. Freeze for at least one hour until solid. The frozen filling won’t melt out during baking.
Step 2: Preheat your oven to 350°F and line baking sheets with parchment paper. Whisk together the flour, cocoa powder, baking soda, and salt. Set aside. Cream the butter and sugar for three to four minutes until fluffy. Add the eggs, vanilla, and red food coloring. Mix until evenly red.
Step 3: Add the dry ingredients alternately with the buttermilk. Mix until just combined. The dough will be soft. Scoop about 1½ tablespoons of dough and flatten it in your palm. Place a frozen cream cheese ball in the center. Wrap the dough around it completely, sealing the edges. Roll into a smooth ball.
Step 4: Place on prepared baking sheets about two inches apart. The filling is sealed inside each cookie. Bake for twelve to fourteen minutes until the edges are set. The frozen filling will melt inside, creating a gooey center. Let cool on the baking sheet for ten minutes before transferring.
Step 5: These cookies are best served slightly warm when the cream cheese center is still soft. Store at room temperature for same-day eating or refrigerate for longer storage. These cream cheese-stuffed red velvet cookies are incredibly indulgent with gooey centers. The surprise filling makes them special. They’re perfect for cream cheese lovers.
Prep Time: 30 minutes (plus 1 hour freezing)
Baking Time: 14 minutes per batch
Servings: 24 cookies
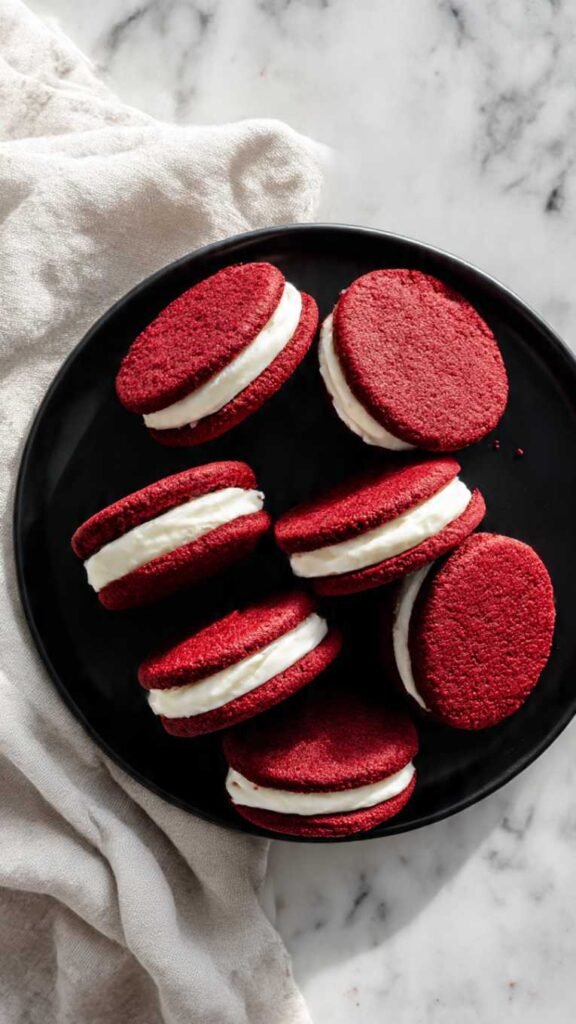
7. Red Velvet Sandwich Cookies

Red velvet sandwich cookies feature two soft cookies with cream cheese frosting in between creating elegant treats. The combination creates a substantial, impressive cookie that’s perfect for special occasions. I created this recipe when I wanted something more special than single cookies. The key is making soft, tender cookies that pair perfectly with the frosting. This has become my favorite gift cookie because they look so elegant. Each sandwich cookie is generous and beautiful.
Ingredients
For the cookies:
- 2½ cups all-purpose flour
- 2 tablespoons unsweetened cocoa powder
- 1 teaspoon baking soda
- ½ teaspoon salt
- ½ cup (1 stick) unsalted butter, softened
- 1½ cups granulated sugar
- 2 large eggs
- 2 teaspoons vanilla extract
- 1 tablespoon red food coloring
- ½ cup buttermilk
For the filling:
- 8 oz cream cheese, softened
- ¼ cup (½ stick) butter, softened
- 3 cups powdered sugar
- 2 teaspoons vanilla extract
Steps
Step 1: Preheat your oven to 350°F and line baking sheets with parchment paper. Whisk together the flour, cocoa powder, baking soda, and salt. Set aside. Cream the butter and sugar for three to four minutes until fluffy. Add the eggs, vanilla, and red food coloring. Mix until evenly red.
Step 2: Add the dry ingredients alternately with the buttermilk. Mix until just combined. Drop rounded tablespoons of dough onto prepared baking sheets, making sure they’re uniform in size so they match up well for sandwiches. Bake for ten to twelve minutes until set. Let cool completely.
Step 3: Make the filling: Beat the cream cheese and butter until smooth and creamy. Gradually add the powdered sugar, beating until fluffy. Add the vanilla and mix until combined. The filling should be thick and spreadable.
Step 4: Match up cookies in similar sizes and shapes. This makes prettier sandwich cookies. Spread or pipe about 2 tablespoons of filling on the flat side of one cookie. The filling should be generous.
Step 5: Top with another cookie to create a sandwich, pressing gently so the filling spreads to the edges. The white cream cheese filling against the red cookies is beautiful. These red velvet sandwich cookies are elegant and delicious with generous cream cheese filling. They’re substantial and impressive. Perfect for special occasions or gifting.
Prep Time: 25 minutes
Baking Time: 12 minutes per batch
Servings: 18 sandwich cookies
8. Red Velvet Cake Mix Cookies
Red velvet cake mix cookies are incredibly easy using cake mix as a shortcut while still delivering great flavor. The combination of cake mix with a few additions creates quick, delicious cookies. I developed this recipe for busy days when I want red velvet cookies fast. The key is adding the right ingredients to the cake mix to create proper cookie texture. This has become my favorite quick version because they’re so easy. You get red velvet cookies in minimal time.
Ingredients
- 1 box (15.25 oz) red velvet cake mix
- 2 large eggs
- ⅓ cup vegetable oil
- 1 teaspoon vanilla extract
- Optional: 1 cup white chocolate chips or cream cheese chips
Steps
Step 1: Preheat your oven to 350°F and line baking sheets with parchment paper. In a large bowl, combine the red velvet cake mix, eggs, vegetable oil, and vanilla extract. Stir with a wooden spoon until well combined. The dough will be thick and slightly sticky. If using white chocolate chips, fold them in now.
Step 2: The beauty of cake mix cookies is their simplicity – you don’t need to measure multiple ingredients or sift flour. The dough comes together in minutes. Let the dough rest for five minutes to allow the cake mix to hydrate properly.
Step 3: Scoop rounded tablespoons of dough onto prepared baking sheets about two inches apart. The cookies will spread moderately. You can roll them into balls for a prettier appearance or leave them as scooped for a more rustic look.
Step 4: Bake for nine to eleven minutes until the edges are set but the centers still look soft. Don’t overbake – cake mix cookies can dry out easily if cooked too long. They should be soft with slightly crispy edges.
Step 5: Let cool on the baking sheet for five minutes before transferring to a wire rack. These cake mix cookies are tender and have that distinctive red velvet flavor. If desired, frost with cream cheese frosting once cool. These red velvet cake mix cookies are incredibly easy and quick. Using cake mix is a genius shortcut. They’re perfect for when you need cookies fast.
Prep Time: 10 minutes
Baking Time: 11 minutes per batch
Servings: 24 cookies
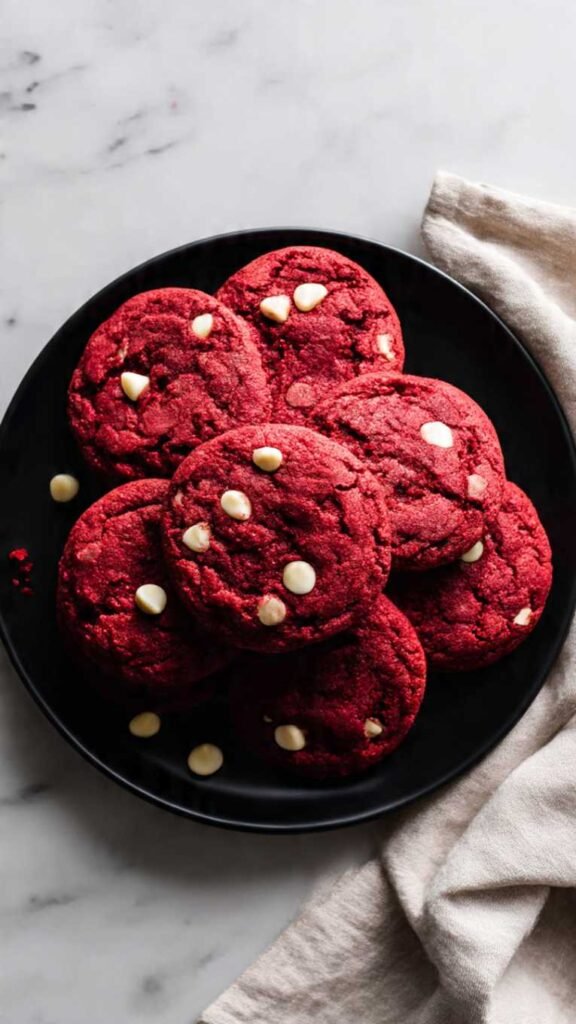
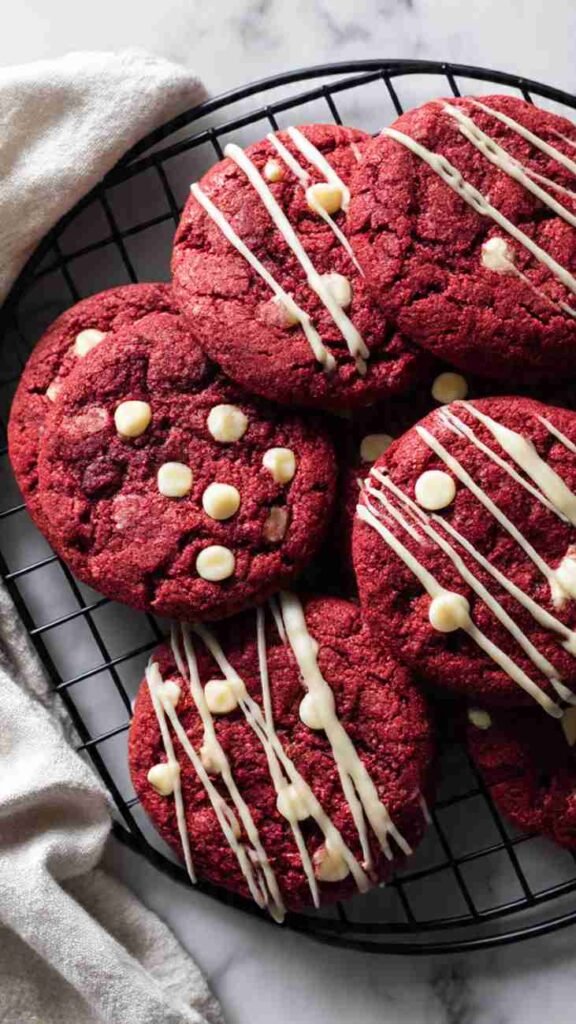
9. Red Velvet White Chocolate Cookies
Red velvet white chocolate cookies combine the tangy red velvet with sweet white chocolate creating wonderful flavor balance. The combination of red cookies with white chocolate chips is both beautiful and delicious. I created this recipe when I wanted something sweeter than regular red velvet. The key is using quality white chocolate chips which melt beautifully. This has become my favorite elegant version because the white chocolate looks so pretty. Every bite has red velvet with creamy white chocolate.
Ingredients
- 2½ cups all-purpose flour
- 2 tablespoons unsweetened cocoa powder
- 1 teaspoon baking soda
- ½ teaspoon salt
- ½ cup (1 stick) unsalted butter, softened
- 1½ cups granulated sugar
- 2 large eggs
- 2 teaspoons vanilla extract
- 1 tablespoon red food coloring
- ½ cup buttermilk
- 1½ cups white chocolate chips
- Optional: white chocolate for drizzling
Steps
Step 1: Preheat your oven to 350°F and line baking sheets with parchment paper. Whisk together the flour, cocoa powder, baking soda, and salt. Set aside. Cream the butter and sugar for three to four minutes until fluffy. Add the eggs, vanilla, and red food coloring. Mix until evenly red.
Step 2: Add the dry ingredients alternately with the buttermilk. Mix until just combined. Fold in the white chocolate chips using a wooden spoon. The white chips against the red dough create beautiful contrast.
Step 3: Drop rounded tablespoons of dough onto prepared baking sheets about two inches apart. The white chocolate chips should be visible throughout. Bake for eleven to thirteen minutes until the edges are set but centers still look soft.
Step 4: Let cool on the baking sheet for five minutes before transferring to a wire rack. The white chocolate chips will remain soft and creamy inside.
Step 5: Once completely cool, you can drizzle with melted white chocolate for extra elegance. Melt white chocolate chips and drizzle over the cookies in a zigzag pattern. The white drizzle on red cookies is stunning. These red velvet white chocolate cookies are beautiful and delicious with sweet white chocolate. The combination of red velvet and white chocolate is elegant. They’re perfect for special occasions.
Prep Time: 15 minutes
Baking Time: 13 minutes per batch
Servings: 36 cookies
10. Red Velvet Walnut Cookies
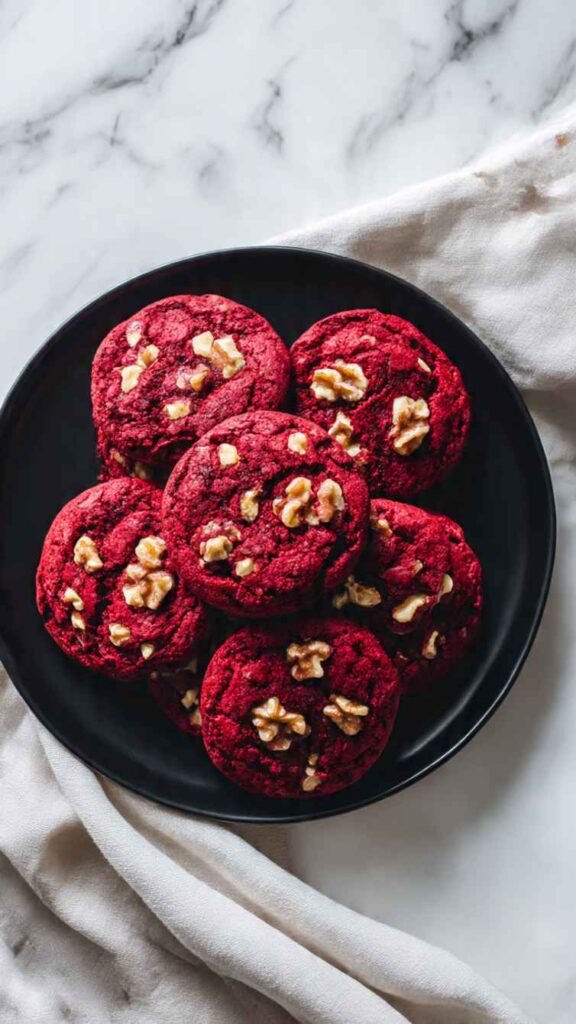
Red velvet walnut cookies feature toasted walnuts adding wonderful crunch and nutty flavor to red velvet. The combination of soft red velvet with crunchy walnuts creates interesting texture. I developed this recipe when I wanted more texture in my red velvet cookies. The key is toasting the walnuts which intensifies their flavor dramatically. This has become my favorite sophisticated version because the walnuts make them feel more elegant. Every bite has red velvet flavor with crunchy nuts.
Ingredients
- 2½ cups all-purpose flour
- 2 tablespoons unsweetened cocoa powder
- 1 teaspoon baking soda
- ½ teaspoon salt
- ½ cup (1 stick) unsalted butter, softened
- 1½ cups granulated sugar
- 2 large eggs
- 2 teaspoons vanilla extract
- 1 tablespoon red food coloring
- ½ cup buttermilk
- 1½ cups walnuts, toasted and chopped
Steps
Step 1: Preheat your oven to 350°F. Toast the chopped walnuts on a baking sheet for eight to ten minutes until fragrant and lightly browned. Let cool completely. Toasting is essential – it brings out the oils and intensifies the nutty flavor. Line baking sheets with parchment paper.
Step 2: Whisk together the flour, cocoa powder, baking soda, and salt. Set aside. Cream the butter and sugar for three to four minutes until fluffy. Add the eggs, vanilla, and red food coloring. Mix until evenly red.
Step 3: Add the dry ingredients alternately with the buttermilk. Mix until just combined. Fold in the toasted walnuts using a wooden spoon. The walnuts should be evenly distributed throughout the red dough.
Step 4: Drop rounded tablespoons of dough onto prepared baking sheets about two inches apart. The walnuts will be visible in the dough. Bake for eleven to thirteen minutes until the edges are set but centers still look soft.
Step 5: Let cool on the baking sheet for five minutes before transferring to a wire rack. The walnuts will be crunchy and the cookies soft. These red velvet walnut cookies are sophisticated with wonderful nutty flavor and crunch. The toasted walnuts add incredible depth. They’re perfect for nut lovers who want something different.
Prep Time: 20 minutes
Baking Time: 13 minutes per batch
Servings: 36 cookies


thank you for the recipes!! i’m making the crinkle version for cookie boxes this christmas. what is the best way to make these ahead of time? how long will they last in an airtight container?
So glad you’re making the crinkle version for cookie boxes — such a great idea! 😊 You can make the dough ahead of time by refrigerating it for a few days before baking, or even **freeze the unbaked dough balls for up to about 3 months and bake them when you’re ready. Once the cookies are baked and completely cool, they’ll stay fresh in an airtight container at room temperature for about 4–5 days — or you can freeze baked cookies for up to 3 months too. Just thaw before gifting!