Thumbprint cookies are one of those charming little treats that look incredibly impressive but are actually so easy to make, which is exactly my kind of baking. I love how you literally use your thumb to create that perfect little well in each cookie, then fill it with something delicious and colorful – it’s like edible jewelry for your cookie platter. These 10 thumbprint cookie recipe ideas are perfect for holiday baking, cookie exchanges, or anytime you want something that looks bakery-quality without the bakery price tag or complicated techniques.
The Classic Jam Thumbprint Cookies are where I fell in love with these adorable treats – simple, buttery cookies with jewel-toned jam centers that sparkle. The Raspberry Thumbprint Cookies are my go-to for holidays with their gorgeous ruby red color, while the Strawberry Thumbprint Cookies bring sweet, fruity brightness. The Lemon Curd Thumbprint Cookies are tangy and refreshing, perfect for spring gatherings. The Almond Thumbprint Cookies have that subtle nutty flavor I absolutely adore, and the Chocolate Thumbprint Cookies are for serious chocolate lovers with chocolate in both the cookie and filling. The Peanut Butter Thumbprint Cookies combine the best flavors, the sophisticated Caramel Pecan Thumbprint Cookies are like tiny tarts, and the Blueberry Thumbprint Cookies and Apricot Thumbprint Cookies offer beautiful color variations that look stunning on cookie platters.
What makes thumbprint cookies so perfect is how customizable they are – you can match the filling to the season, use up whatever jam you have on hand, or go fancy with homemade curds and caramel. They’re also freezer-friendly, which means you can make big batches ahead of time for parties or gifting. Plus, there’s something really satisfying about pressing your thumb into each cookie and watching that perfect little indent form. They’re simple, beautiful, and absolutely delicious!
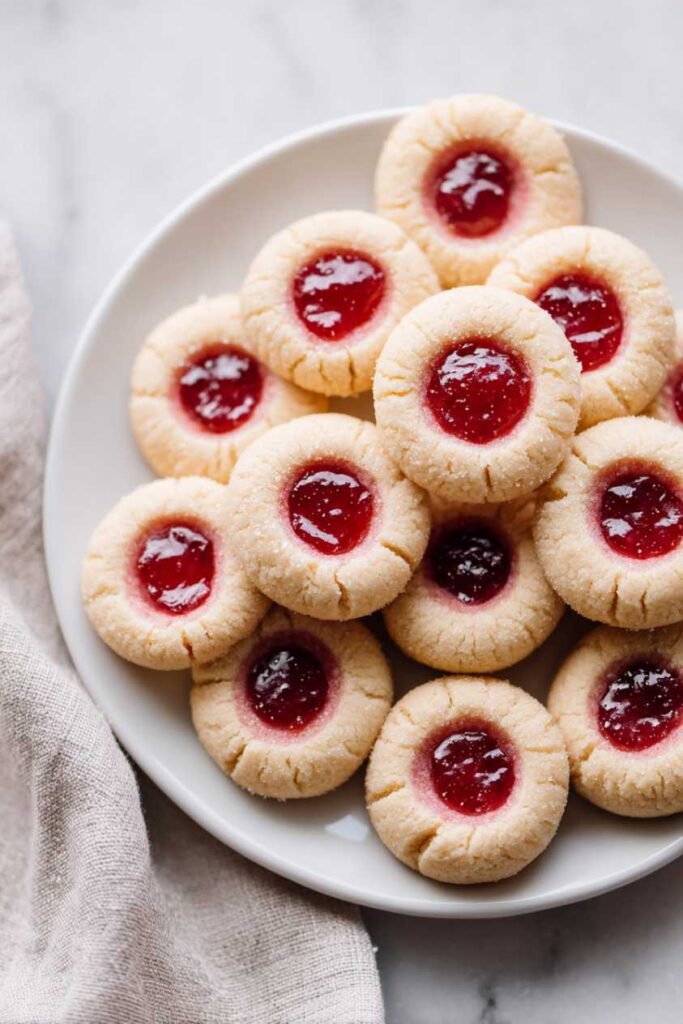
1. Classic Jam Thumbprint Cookies
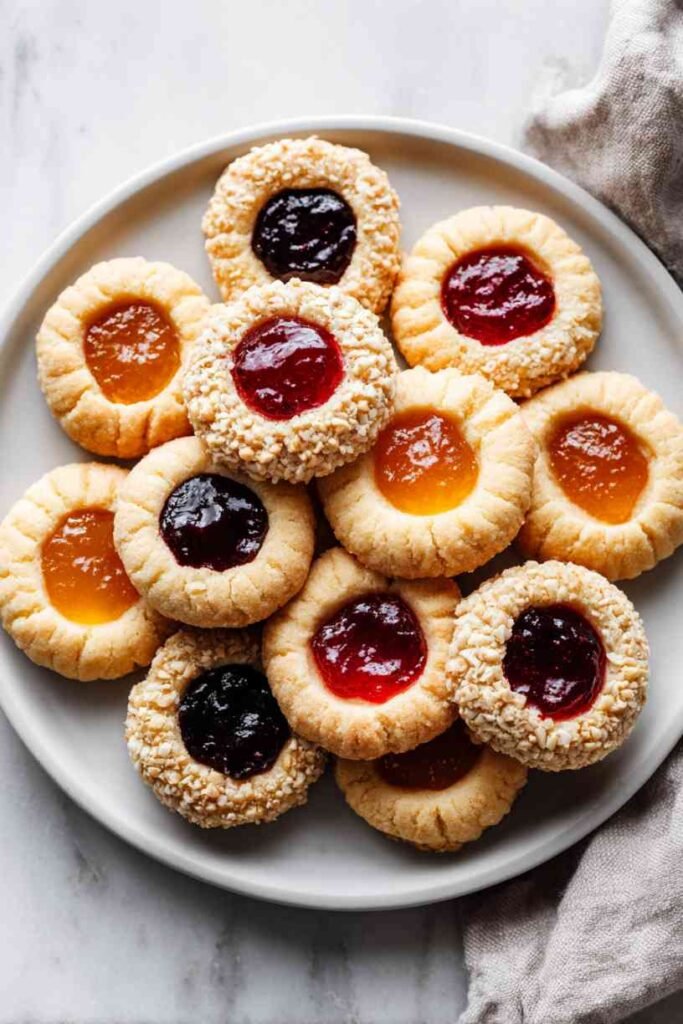
Classic jam thumbprint cookies are timeless treats with buttery shortbread-style cookies filled with your favorite jam. The combination of tender, crumbly cookies with sweet fruit preserves creates these elegant cookies that look as beautiful as they taste. I grew up making these cookies with my grandmother every Christmas using different colored jams to create a festive cookie platter. The key is using quality jam and creating a proper indentation that holds the filling without spreading during baking. This has become my most-made holiday cookie because they’re beautiful, delicious, and you can customize them with different jam flavors. Every bite delivers buttery cookie with a burst of sweet fruit flavor.
Ingredients
- 1 cup (2 sticks) unsalted butter, softened
- ⅔ cup granulated sugar
- 2 large egg yolks
- 2 teaspoons vanilla extract
- ¼ teaspoon almond extract
- 2 cups all-purpose flour
- ½ teaspoon salt
- ¾ cup finely chopped pecans or walnuts (optional, for rolling)
- ½ cup jam or preserves (use multiple flavors for variety)
- Powdered sugar for dusting (optional)
Steps
Step 1: Preheat your oven to 350°F and line baking sheets with parchment paper. In a large bowl using an electric mixer, cream together the softened butter and sugar for three to four minutes until light and fluffy. The mixture should be pale and airy – this creaming process creates the tender texture. Add the egg yolks one at a time, beating well after each addition. Add the vanilla and almond extracts. The almond extract enhances the flavor and is traditional for thumbprint cookies. Mix until smooth and well combined.
Step 2: In a medium bowl, whisk together the flour and salt. Gradually add the dry ingredients to the wet ingredients, mixing on low speed until just combined. The dough will be soft and slightly sticky – this is correct. Don’t overmix or the cookies will be tough. Cover the dough with plastic wrap and refrigerate for at least thirty minutes or up to two hours. Chilling makes the dough easier to handle and prevents excessive spreading during baking.
Step 3: If using nuts for coating, place the finely chopped pecans or walnuts in a shallow bowl. Once the dough is chilled, scoop it into balls using a small cookie scoop or tablespoon, about one tablespoon each. Roll each ball between your palms to make it smooth and round. If using the nut coating, roll each ball in the chopped nuts, pressing gently so they adhere. Place the balls on prepared baking sheets about two inches apart.
Step 4: Here’s the signature step: use your thumb or the back of a small spoon to make an indentation in the center of each cookie. Press down firmly to create a well about ½ inch deep and ¾ inch wide. The indentation should be deep enough to hold the jam without it overflowing. If the edges crack slightly, gently press them back together. Make sure the indentation is deep – if it’s too shallow, it will puff up during baking and the jam will overflow.
Step 5: Fill each indentation with about ½ teaspoon of jam. Don’t overfill or the jam will bubble over during baking. You can use one type of jam or create variety with multiple flavors like raspberry, strawberry, and apricot. Bake for twelve to fifteen minutes until the edges are lightly golden but the centers are still pale. The jam will bubble slightly. Let the cookies cool on the baking sheet for five minutes before transferring to a wire rack. Once completely cool, dust with powdered sugar if desired. These classic jam thumbprint cookies are buttery and beautiful with sweet jam centers. The tender cookie with fruit filling is elegant and timeless. They’re perfect for holidays or any special occasion.
Prep Time: 20 minutes (plus 30 minutes chilling)
Baking Time: 15 minutes per batch
Servings: 36 cookies
2. Raspberry Thumbprint Cookies
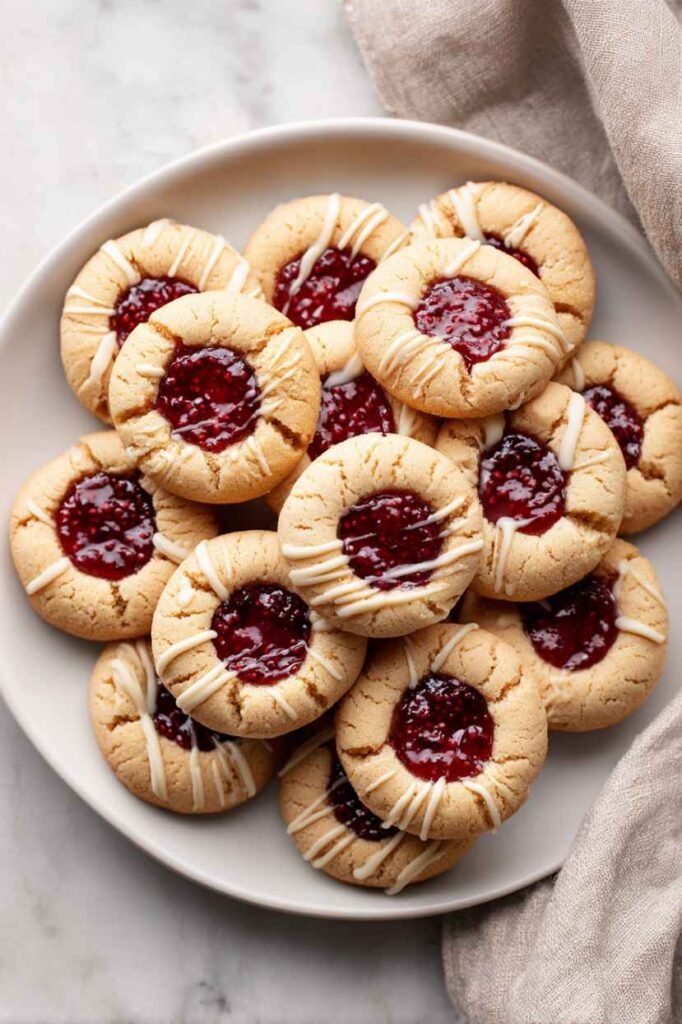
Raspberry thumbprint cookies feature vibrant raspberry jam creating beautiful pink-filled cookies with tart-sweet flavor. The combination of buttery cookies with tangy raspberry preserves is absolutely classic and delicious. I developed this recipe to showcase raspberry specifically because it’s the most popular thumbprint flavor. The key is using quality raspberry jam which provides the best flavor and color. This has become my favorite single-flavor version because the raspberry is so beautiful and tastes amazing. Every bite has that perfect balance of buttery cookie and tart raspberry.
Ingredients
- 1 cup (2 sticks) unsalted butter, softened
- ⅔ cup granulated sugar
- 2 large egg yolks
- 2 teaspoons vanilla extract
- 2 cups all-purpose flour
- ½ teaspoon salt
- ¾ cup seedless raspberry jam or preserves
- Optional: white chocolate for drizzling
Steps
Step 1: Preheat your oven to 350°F and line baking sheets with parchment paper. In a large bowl, cream together the softened butter and sugar for three to four minutes until light and fluffy. Add the egg yolks one at a time, beating well after each addition. Add the vanilla extract and mix until smooth. The mixture should be pale and creamy.
Step 2: Whisk together the flour and salt in a medium bowl. Gradually add to the wet ingredients, mixing on low speed until just combined. The dough will be soft. Cover and refrigerate for thirty minutes to one hour. Chilling is important for these delicate cookies – it prevents them from spreading too much.
Step 3: Once chilled, scoop the dough into balls about one tablespoon each. Roll each ball between your palms to make it smooth and round. Place on prepared baking sheets about two inches apart. Using your thumb or the back of a small measuring spoon, make a deep indentation in the center of each cookie. Press down firmly to create a well that’s about ½ inch deep.
Step 4: Fill each indentation with about ½ teaspoon of raspberry jam. The vibrant pink color is beautiful. Make sure not to overfill – the jam will spread slightly during baking. Bake for twelve to fifteen minutes until the edges are lightly golden. The raspberry jam will darken slightly and may bubble. Let cool on the baking sheet for five minutes before transferring to a wire rack.
Step 5: Once completely cool, you can drizzle with melted white chocolate for extra elegance if desired. Melt white chocolate chips and drizzle over the cookies in a zigzag pattern. The white chocolate adds beautiful contrast to the pink raspberry. These raspberry thumbprint cookies are gorgeous with vibrant raspberry centers. The tart-sweet flavor is classic and beloved. They’re perfect for Valentine’s Day or any time you want something pretty.
Prep Time: 20 minutes (plus chilling)
Baking Time: 15 minutes per batch
Servings: 36 cookies
3. Strawberry Thumbprint Cookies
Strawberry thumbprint cookies are sweet and fruity with strawberry jam creating lovely red-filled treats. The combination of buttery cookies with strawberry preserves is classic and universally loved. I created this recipe when I wanted a sweeter, less tart fruit filling. The key is using quality strawberry jam which provides wonderful flavor and beautiful color. This has become my kids’ favorite thumbprint cookie because strawberry is their favorite flavor. Every bite is sweet and delicious with prominent strawberry flavor.
Ingredients
- 1 cup (2 sticks) unsalted butter, softened
- ⅔ cup granulated sugar
- 2 large egg yolks
- 1½ teaspoons vanilla extract
- ½ teaspoon strawberry extract (optional)
- 2 cups all-purpose flour
- ½ teaspoon salt
- Pink food coloring (optional, just 1-2 drops)
- ¾ cup strawberry jam or preserves
- Freeze-dried strawberries, crushed, for garnish (optional)
Steps
Step 1: Preheat your oven to 350°F and line baking sheets with parchment paper. In a large bowl, cream the softened butter and sugar for three to four minutes until light and fluffy. Add the egg yolks one at a time, beating well after each addition. Add the vanilla and strawberry extracts if using. The strawberry extract enhances the strawberry flavor. If you want pink-tinted cookies, add one to two drops of pink food coloring and mix until the color is even.
Step 2: Whisk together the flour and salt. Gradually add to the wet ingredients, mixing until just combined. The dough should be soft and, if you added food coloring, slightly pink. Cover and refrigerate for thirty minutes to one hour. The chilling makes the dough easier to handle and prevents spreading.
Step 3: Scoop the chilled dough into balls about one tablespoon each. Roll smooth between your palms. Place on prepared baking sheets about two inches apart. Make a deep indentation in the center of each cookie using your thumb or the back of a small spoon. The well should be about ½ inch deep to hold the jam.
Step 4: Fill each indentation with about ½ teaspoon of strawberry jam. The red color is vibrant and beautiful. Don’t overfill or it will overflow during baking. Bake for twelve to fifteen minutes until the edges are lightly golden. The jam will bubble slightly and darken.
Step 5: Let cool on the baking sheet for five minutes, then transfer to a wire rack. Once completely cool, you can sprinkle with crushed freeze-dried strawberries for extra strawberry flavor and beautiful presentation. The pink powder adds wonderful texture and intensifies the strawberry taste. These strawberry thumbprint cookies are sweet and fruity with gorgeous strawberry centers. The flavor is universally loved and perfect for strawberry fans. They’re great for spring and summer gatherings.
Prep Time: 20 minutes (plus chilling)
Baking Time: 15 minutes per batch
Servings: 36 cookies
4. Lemon Curd Thumbprint Cookies
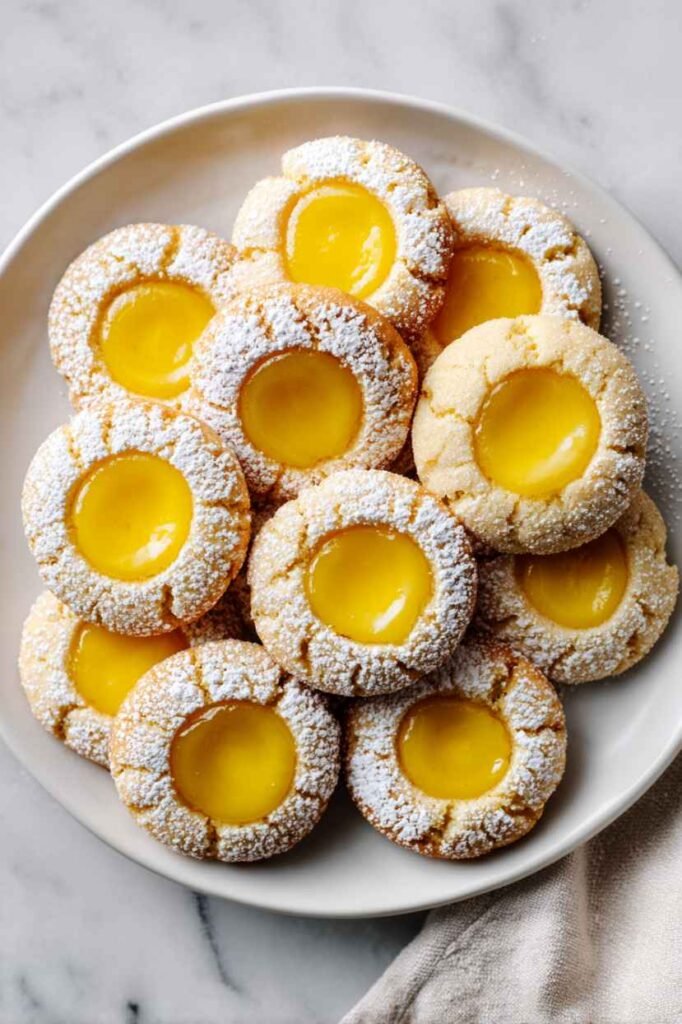
Lemon curd thumbprint cookies are bright and tangy with homemade or store-bought lemon curd filling. The combination of buttery cookies with tart lemon curd creates wonderful citrus flavor. I developed this recipe when I wanted something more sophisticated than jam-filled cookies. The key is using quality lemon curd which provides intense lemon flavor. This has become my favorite elegant variation because the lemon is so refreshing and different. Every bite delivers buttery cookie with bright, tangy lemon.
Ingredients
- 1 cup (2 sticks) unsalted butter, softened
- ⅔ cup granulated sugar
- 2 large egg yolks
- 2 teaspoons vanilla extract
- Zest of 2 lemons
- 2 cups all-purpose flour
- ½ teaspoon salt
- ¾ cup lemon curd (homemade or store-bought)
- Powdered sugar for dusting
Steps
Step 1: Preheat your oven to 350°F and line baking sheets with parchment paper. In a large bowl, cream the softened butter and sugar for three to four minutes until light and fluffy. Add the egg yolks one at a time, beating well after each addition. Add the vanilla extract and lemon zest. The lemon zest adds wonderful aroma and flavor to the cookie dough itself.
Step 2: Whisk together the flour and salt. Gradually add to the wet ingredients, mixing until just combined. The dough will be soft and fragrant with lemon. Cover and refrigerate for thirty minutes to one hour. The chilling is especially important for these cookies as the lemon zest can make the dough slightly softer.
Step 3: Scoop the chilled dough into balls about one tablespoon each. Roll between your palms until smooth. Place on prepared baking sheets about two inches apart. Make a deep indentation in the center of each cookie with your thumb or the back of a spoon. Press down firmly to create a well about ½ inch deep.
Step 4: Fill each indentation with about ½ teaspoon of lemon curd. The yellow color is beautiful and sunny. Be careful not to overfill. Bake for twelve to fifteen minutes until the edges are lightly golden. The lemon curd will set slightly but remain soft and tangy.
Step 5: Let cool on the baking sheet for five minutes, then transfer carefully to a wire rack. Once completely cool, dust with powdered sugar for a beautiful finish. The white powdered sugar contrasts beautifully with the yellow lemon curd. These lemon curd thumbprint cookies are bright and refreshing with wonderful citrus flavor. The tangy lemon curd is sophisticated and delicious. They’re perfect for spring, summer, or anytime you want something fresh.
Prep Time: 20 minutes (plus chilling)
Baking Time: 15 minutes per batch
Servings: 36 cookies
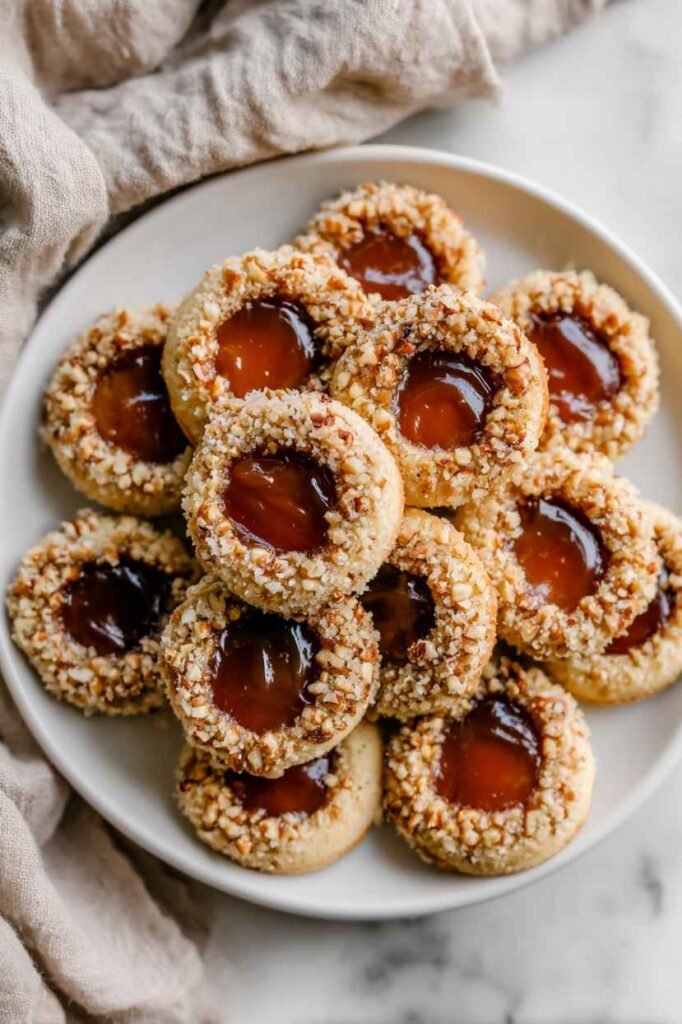
5. Almond Thumbprint Cookies
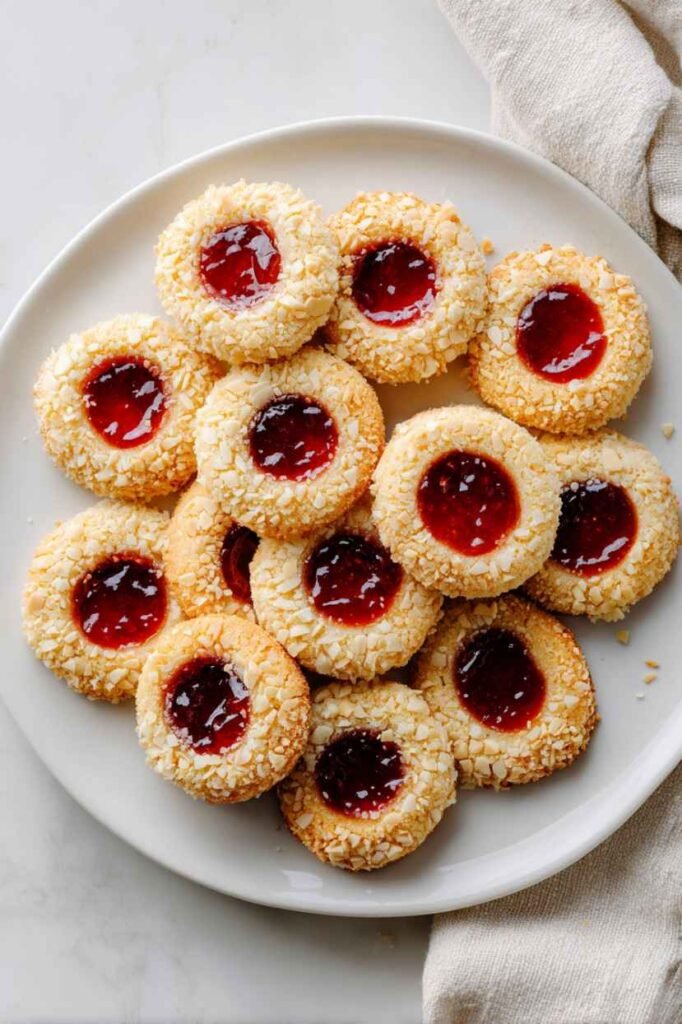
Almond thumbprint cookies feature almond extract in the dough and an almond coating creating wonderful nutty flavor. The combination of almond-flavored cookies with jam filling is classic and elegant. I created this recipe when I wanted to emphasize almond flavor in thumbprint cookies. The key is using both almond extract and sliced almonds which creates layers of almond taste. This has become my favorite sophisticated version because the almond makes them feel special. Every bite has nutty almond flavor with sweet jam.
Ingredients
- 1 cup (2 sticks) unsalted butter, softened
- ⅔ cup granulated sugar
- 2 large egg yolks
- 1 teaspoon vanilla extract
- 1½ teaspoons almond extract
- 2 cups all-purpose flour
- ½ teaspoon salt
- 1 egg white, lightly beaten
- 1 cup sliced almonds, finely chopped
- ¾ cup apricot or raspberry jam
Steps
Step 1: Preheat your oven to 350°F and line baking sheets with parchment paper. In a large bowl, cream the softened butter and sugar for three to four minutes until light and fluffy. Add the egg yolks one at a time, beating well after each addition. Add the vanilla and almond extracts. The almond extract provides that distinctive almond flavor that makes these cookies special.
Step 2: Whisk together the flour and salt. Gradually add to the wet ingredients, mixing until just combined. The dough will be soft and smell wonderfully of almonds. Cover and refrigerate for thirty minutes to one hour. The chilling makes the dough easier to handle for the coating process.
Step 3: Place the beaten egg white in a shallow bowl. Place the finely chopped sliced almonds in another shallow bowl. Scoop the chilled dough into balls about one tablespoon each. Dip each ball in the egg white, then roll in the chopped almonds, pressing gently so they adhere. The almond coating adds wonderful texture and additional almond flavor. Place on prepared baking sheets about two inches apart.
Step 4: Make a deep indentation in the center of each cookie using your thumb or the back of a spoon. The almond coating might crack slightly – this is normal. Press down firmly to create a well about ½ inch deep. Fill each indentation with about ½ teaspoon of jam. Apricot jam pairs beautifully with almond, but raspberry also works well.
Step 5: Bake for twelve to fifteen minutes until the almonds are toasted and golden and the cookie edges are set. The sliced almonds will become fragrant and crunchy. Let cool on the baking sheet for five minutes before transferring to a wire rack. These almond thumbprint cookies are elegant and sophisticated with wonderful nutty flavor. The almond coating and almond extract create layers of almond taste. They’re perfect for anyone who loves almond-flavored treats.
Prep Time: 25 minutes (plus chilling)
Baking Time: 15 minutes per batch
Servings: 36 cookies
6. Chocolate Thumbprint Cookies
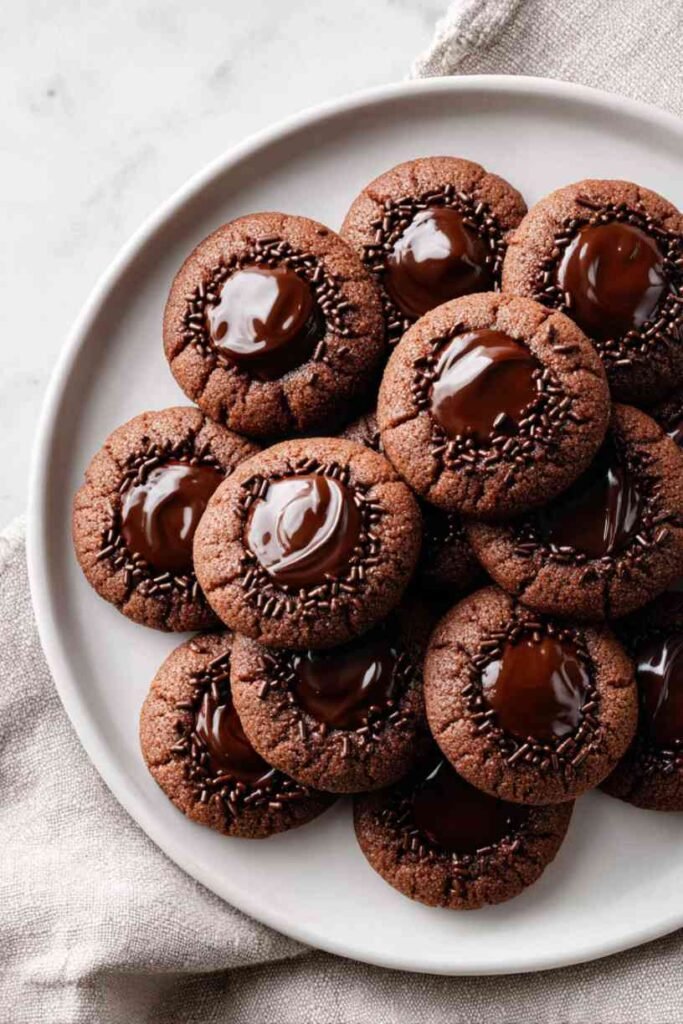
Chocolate thumbprint cookies feature chocolate dough filled with chocolate ganache or fudge creating decadent double chocolate treats. The combination of chocolate cookie with chocolate filling is absolutely indulgent. I developed this recipe for chocolate lovers who wanted thumbprint cookies. The key is using quality cocoa powder and a thick chocolate filling that won’t overflow. This has become my most decadent thumbprint cookie because it’s chocolate on chocolate. Every bite is rich, fudgy, and absolutely chocolatey.
Ingredients
For the cookies:
- 1 cup (2 sticks) unsalted butter, softened
- ⅔ cup granulated sugar
- 2 large egg yolks
- 2 teaspoons vanilla extract
- 1¾ cups all-purpose flour
- ⅓ cup unsweetened cocoa powder
- ½ teaspoon salt
For the filling:
- ½ cup heavy cream
- 1 cup semi-sweet chocolate chips
- Optional: chocolate sprinkles for garnish
Steps
Step 1: Preheat your oven to 350°F and line baking sheets with parchment paper. In a large bowl, cream the softened butter and sugar for three to four minutes until light and fluffy. Add the egg yolks one at a time, beating well after each addition. Add the vanilla extract and mix until combined.
Step 2: In a medium bowl, whisk together the flour, cocoa powder, and salt. Make sure the cocoa powder is sifted or well-mixed with no lumps. Gradually add the dry ingredients to the wet ingredients, mixing until just combined. The dough will be darker in color from the cocoa. Cover and refrigerate for thirty minutes to one hour. Chocolate dough benefits from chilling as it can be softer than plain dough.
Step 3: Scoop the chilled dough into balls about one tablespoon each. Roll between your palms until smooth. The dough should be firm from chilling. Place on prepared baking sheets about two inches apart. Make a deep indentation in the center of each cookie with your thumb or the back of a spoon. Press down firmly.
Step 4: Bake for twelve to fourteen minutes until the cookies are set. They won’t change color much since they’re already dark. Let them cool completely on a wire rack before filling – this is important as hot cookies will melt the chocolate filling. While the cookies cool, make the ganache: heat the heavy cream until just simmering, then pour over the chocolate chips. Let sit for two minutes, then stir until smooth and glossy.
Step 5: Once the cookies are completely cool, fill each indentation with the chocolate ganache using a small spoon or piping bag. The ganache should be thick but pourable. If desired, sprinkle with chocolate sprinkles while the ganache is still wet. Let the ganache set for about thirty minutes at room temperature or fifteen minutes in the refrigerator. These chocolate thumbprint cookies are incredibly rich and decadent with double chocolate flavor. The combination of chocolate cookie and chocolate ganache is pure indulgence. They’re perfect for serious chocolate lovers.
Prep Time: 25 minutes (plus chilling)
Baking Time: 14 minutes per batch
Servings: 36 cookies
7. Peanut Butter Thumbprint Cookies

Peanut Butter thumbprint cookies feature peanut butter dough filled with chocolate or jam creating the perfect peanut butter treat. The combination of nutty peanut butter cookies with chocolate filling is absolutely classic. I created this recipe when I wanted peanut butter flavor in thumbprint cookies. The key is using creamy peanut butter which creates the right texture. This has become my favorite flavor combination because peanut butter and chocolate is unbeatable. Every bite delivers rich peanut butter with sweet filling.
Ingredients
- ½ cup (1 stick) unsalted butter, softened
- ¾ cup creamy peanut butter
- ½ cup granulated sugar
- ½ cup packed brown sugar
- 1 large egg
- 1 teaspoon vanilla extract
- 1½ cups all-purpose flour
- ½ teaspoon baking soda
- ¼ teaspoon salt
- ½ cup chocolate chips, melted (or use jam)
- Chopped peanuts for rolling (optional)
Steps
Step 1: Preheat your oven to 350°F and line baking sheets with parchment paper. In a large bowl, cream together the softened butter, peanut butter, granulated sugar, and brown sugar for three to four minutes until light and fluffy. The peanut butter should be completely incorporated. Add the egg and vanilla extract. Mix until smooth.
Step 2: In a medium bowl, whisk together the flour, baking soda, and salt. Gradually add to the wet ingredients, mixing until just combined. The dough will be thick and very peanut buttery. If using chopped peanuts for coating, place them in a shallow bowl. Scoop the dough into balls about one tablespoon each.
Step 3: If using the peanut coating, roll each ball in the chopped peanuts, pressing gently so they adhere. Place on prepared baking sheets about two inches apart. Make an indentation in the center of each cookie with your thumb. The peanut butter dough is sturdy and creates nice deep wells.
Step 4: Bake for ten to twelve minutes until the edges are lightly golden and set. Don’t overbake – they should still look slightly soft in the center. Let cool completely on a wire rack before filling. Peanut butter cookies need to cool completely or the filling will melt.
Step 5: Melt the chocolate chips in the microwave or double boiler until smooth. Fill each indentation with melted chocolate. Alternatively, you can use jam for a different flavor profile. Let the chocolate set at room temperature or in the refrigerator. These peanut butter thumbprint cookies are rich and satisfying with wonderful peanut butter flavor. The chocolate filling pairs perfectly with the peanut butter. They’re classic and delicious.
Prep Time: 20 minutes
Baking Time: 12 minutes per batch
Servings: 30 cookies
8. Caramel Pecan Thumbprint Cookies
Caramel pecan thumbprint cookies feature toasted pecans in the dough and caramel filling creating indulgent treats. The combination of nutty cookies with sweet, sticky caramel is absolutely decadent. I developed this recipe when I wanted something more luxurious than jam-filled cookies. The key is using thick caramel that won’t overflow and toasted pecans for maximum flavor. This has become my most special-occasion cookie because they’re so indulgent. Every bite has buttery pecan cookie with rich caramel.
Ingredients
- 1 cup (2 sticks) unsalted butter, softened
- ⅔ cup packed brown sugar
- 2 large egg yolks
- 2 teaspoons vanilla extract
- 2 cups all-purpose flour
- ½ teaspoon salt
- 1 cup pecans, toasted and finely chopped (divided)
- 1 egg white, lightly beaten
- ¾ cup thick caramel sauce or caramel candies, melted
- Sea salt for sprinkling (optional)
Steps
Step 1: Preheat your oven to 350°F. Toast ¾ cup of the chopped pecans on a baking sheet for eight to ten minutes until fragrant. Let cool. Line baking sheets with parchment paper. In a large bowl, cream the softened butter and brown sugar for three to four minutes until light and fluffy. The brown sugar adds wonderful caramel notes. Add the egg yolks and vanilla. Mix until smooth.
Step 2: Whisk together the flour and salt. Add ½ cup of the toasted pecans to the flour mixture. Gradually add the flour-pecan mixture to the wet ingredients, mixing until just combined. The toasted pecans in the dough add wonderful flavor and texture. Cover and refrigerate for thirty minutes.
Step 3: Place the beaten egg white in a shallow bowl. Place the remaining ¼ cup toasted pecans in another bowl. Scoop the chilled dough into balls about one tablespoon each. Dip each ball in egg white, then roll in the chopped pecans. Place on prepared baking sheets. Make a deep indentation in the center of each cookie.
Step 4: Bake for twelve to fifteen minutes until the edges are golden and the pecans are toasted. Let cool completely on a wire rack. The cookies must be completely cool before filling with caramel or it will be too runny.
Step 5: Fill each indentation with thick caramel sauce. If using caramel candies, melt them with a little cream until smooth and thick. The caramel should be thick enough to stay in the well without overflowing. If desired, sprinkle with a tiny pinch of sea salt for salted caramel flavor. Let the caramel set for at least thirty minutes. These caramel pecan thumbprint cookies are incredibly indulgent with wonderful nutty, caramel flavor. The combination is luxurious and perfect for special occasions.
Prep Time: 25 minutes (plus chilling)
Baking Time: 15 minutes per batch
Servings: 36 cookies
9. Blueberry Thumbprint Cookies

Blueberry thumbprint cookies feature blueberry jam creating beautiful purple-filled treats with wonderful berry flavor. The combination of buttery cookies with sweet blueberry preserves is delicious and visually striking. I created this recipe when I wanted to showcase blueberry specifically. The key is using quality blueberry jam which provides the best flavor and gorgeous color. This has become my favorite summer thumbprint cookie because blueberries feel seasonal. Every bite has sweet blueberry flavor.
Ingredients
- 1 cup (2 sticks) unsalted butter, softened
- ⅔ cup granulated sugar
- 2 large egg yolks
- 2 teaspoons vanilla extract
- ¼ teaspoon lemon extract
- 2 cups all-purpose flour
- ½ teaspoon salt
- ¾ cup blueberry jam or preserves
- Lemon zest for garnish (optional)
Steps
Step 1: Preheat your oven to 350°F and line baking sheets with parchment paper. In a large bowl, cream the softened butter and sugar for three to four minutes until light and fluffy. Add the egg yolks one at a time, beating well after each addition. Add the vanilla and lemon extracts. The lemon extract complements the blueberry beautifully.
Step 2: Whisk together the flour and salt. Gradually add to the wet ingredients, mixing until just combined. The dough will be soft and pale. Cover and refrigerate for thirty minutes to one hour. The chilling makes the dough easier to handle and prevents spreading.
Step 3: Scoop the chilled dough into balls about one tablespoon each. Roll between your palms until smooth. Place on prepared baking sheets about two inches apart. Make a deep indentation in the center of each cookie with your thumb or the back of a spoon. Press down firmly to create a well about ½ inch deep.
Step 4: Fill each indentation with about ½ teaspoon of blueberry jam. The deep purple-blue color is gorgeous and unique. Don’t overfill or it will overflow. Bake for twelve to fifteen minutes until the edges are lightly golden. The blueberry jam will darken slightly and may bubble.
Step 5: Let cool on the baking sheet for five minutes, then transfer to a wire rack. Once cool, you can add a tiny sprinkle of fresh lemon zest on top for extra flavor and visual appeal. The yellow zest contrasts beautifully with the purple blueberry. These blueberry thumbprint cookies are beautiful with gorgeous purple centers. The blueberry flavor is sweet and delicious. They’re perfect for summer or patriotic holidays.
Prep Time: 20 minutes (plus chilling)
Baking Time: 15 minutes per batch
Servings: 36 cookies
10. Apricot Thumbprint Cookies
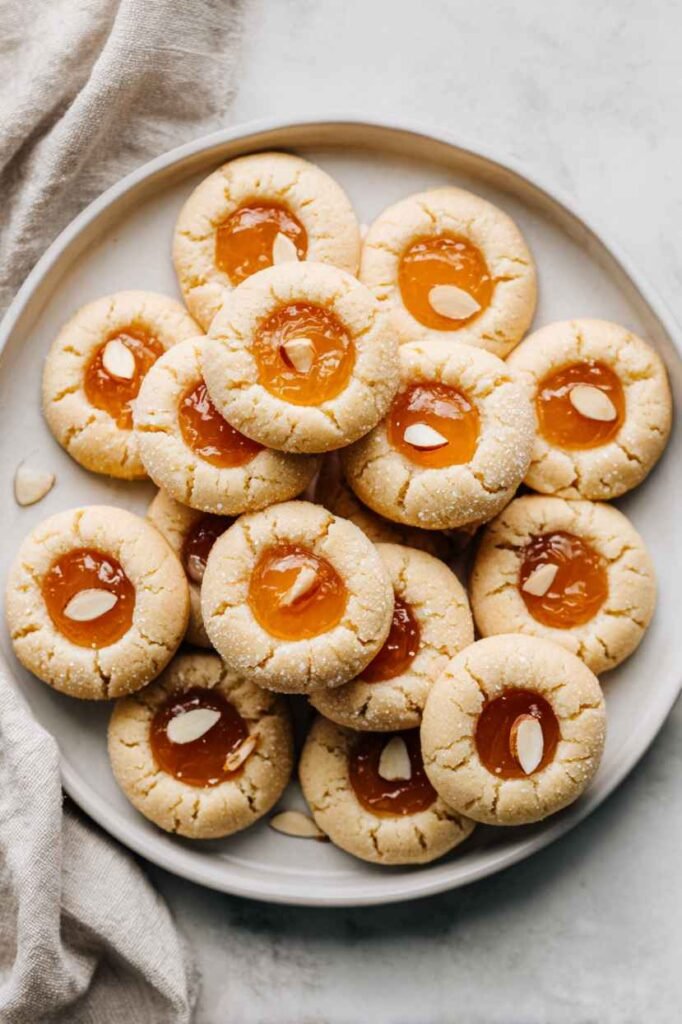
Apricot thumbprint cookies feature apricot preserves creating elegant orange-filled cookies with sophisticated flavor. The combination of buttery cookies with tangy-sweet apricot is classic and refined. I created this recipe because apricot is the traditional European choice for thumbprint cookies. The key is using quality apricot preserves which provide wonderful flavor. This has become my favorite elegant version because apricot feels more sophisticated. Every bite has that distinctive apricot flavor.
Ingredients
- 1 cup (2 sticks) unsalted butter, softened
- ⅔ cup granulated sugar
- 2 large egg yolks
- 2 teaspoons vanilla extract
- ½ teaspoon almond extract
- 2 cups all-purpose flour
- ½ teaspoon salt
- ¾ cup apricot preserves
- Sliced almonds for topping (optional)
- Powdered sugar for dusting
Steps
Step 1: Preheat your oven to 350°F and line baking sheets with parchment paper. In a large bowl, cream the softened butter and sugar for three to four minutes until light and fluffy. Add the egg yolks one at a time, beating well after each addition. Add the vanilla and almond extracts. The almond extract pairs beautifully with apricot – it’s a classic European combination.
Step 2: Whisk together the flour and salt. Gradually add to the wet ingredients, mixing until just combined. The dough will be soft and smooth. Cover and refrigerate for thirty minutes to one hour. The chilling is important for maintaining the cookie shape during baking.
Step 3: Scoop the chilled dough into balls about one tablespoon each. Roll between your palms until smooth. Place on prepared baking sheets about two inches apart. Make a deep indentation in the center of each cookie with your thumb or the back of a spoon. The well should be about ½ inch deep to hold the apricot filling.
Step 4: Fill each indentation with about ½ teaspoon of apricot preserves. The orange-golden color is beautiful and elegant. If desired, place a sliced almond on top of the apricot filling for extra elegance and almond flavor. Bake for twelve to fifteen minutes until the edges are lightly golden. The apricot will darken slightly.
Step 5: Let cool on the baking sheet for five minutes, then transfer carefully to a wire rack. Once completely cool, dust lightly with powdered sugar for a sophisticated finish. The white sugar contrasts beautifully with the orange apricot. These apricot thumbprint cookies are elegant and refined with wonderful apricot flavor. The combination of apricot and almond is classic European. They’re perfect for elegant occasions or afternoon tea.
Prep Time: 20 minutes (plus chilling)
Baking Time: 15 minutes per batch
Servings: 36 cookies