I used to buy those little bags of toffee bits from the baking aisle without thinking twice. I would sprinkle them over cookies or ice cream and call it a day. But one afternoon, while getting ready to bake with my daughter, I realized I didn’t have any left. Instead of running to the store, I stood in my kitchen and thought, maybe I can make them myself.
I checked the pantry and saw exactly what I needed — one stick of unsalted butter, light brown sugar, and a little fine sea salt. That was it. Just three simple ingredients. It almost felt too easy.
I melted the butter in a saucepan, then stirred in the brown sugar. As it started to bubble and thicken, the color slowly changed into a deep golden brown. The smell was rich and sweet, like caramel with a warm buttery note. I kept stirring gently, watching it cook and become smooth and glossy.
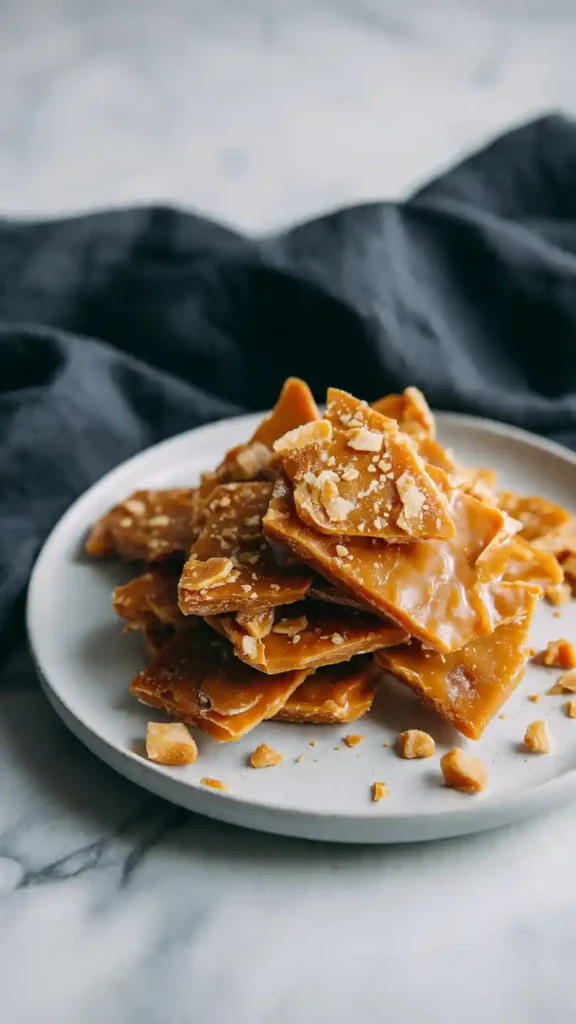
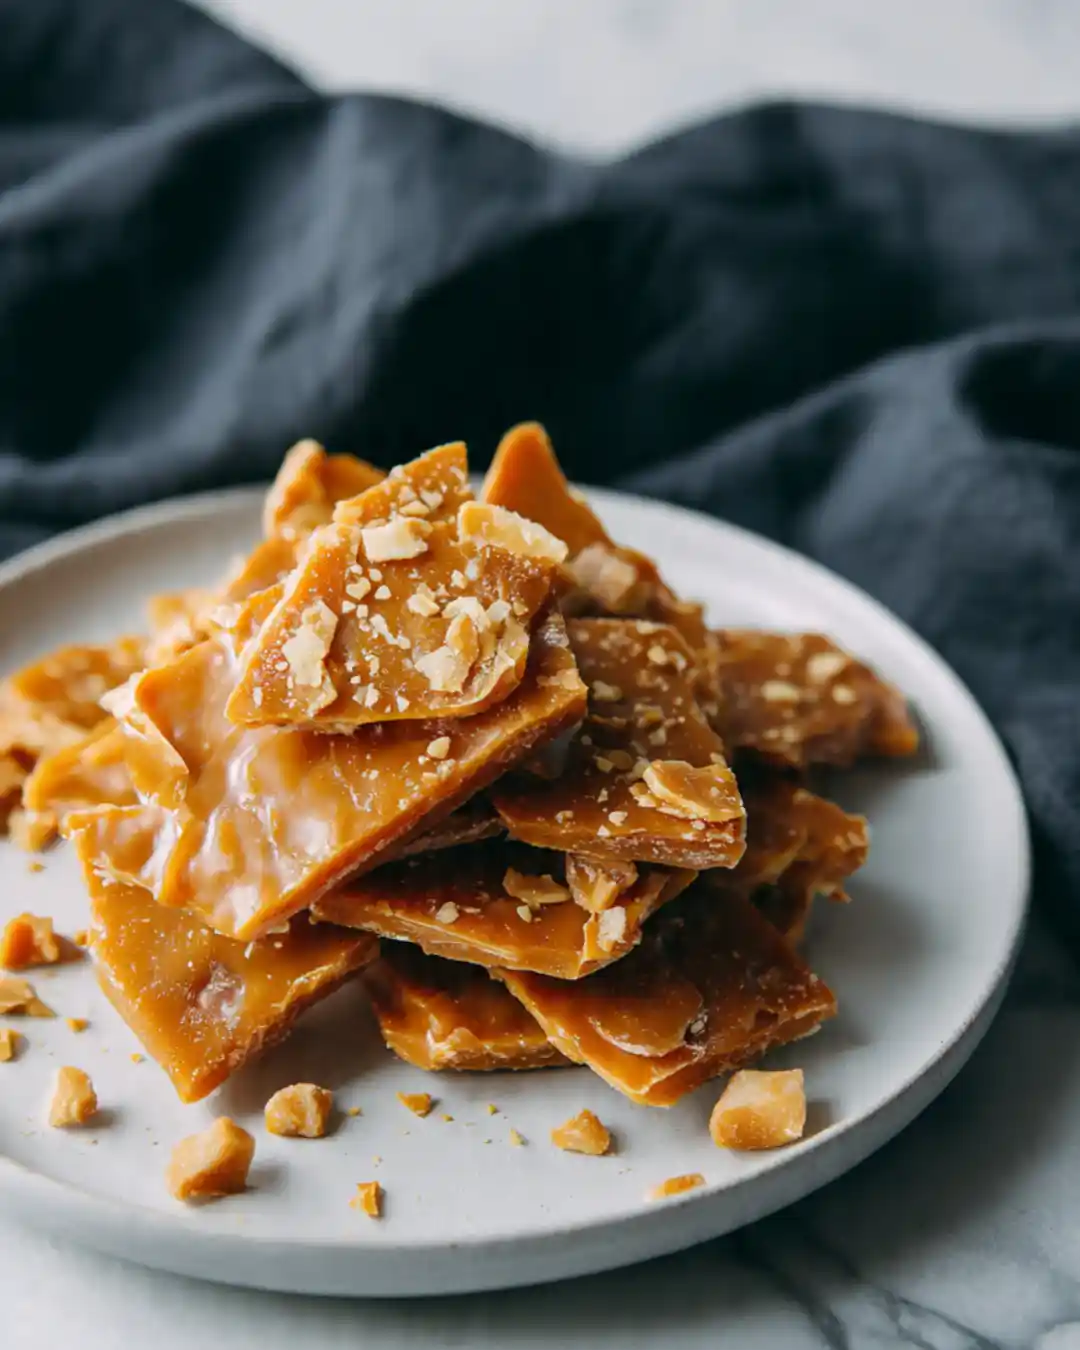
When it reached that perfect golden shade, I poured it onto a lined baking sheet and spread it out carefully. I sprinkled a little sea salt over the top for balance. Then came the waiting part, which is always the hardest. Once it cooled and hardened, I broke it into small crunchy pieces.
The first bite had that perfect snap, sweet and buttery with just the right hint of salt. My husband grabbed a few pieces and smiled, saying they were even better than store bought. Making these homemade toffee bits reminded me that sometimes the best baking surprises come from using what you already have right at home.
What Is Toffee Bits
When I make toffee bits at home, I see them as small, crisp pieces of caramelized sugar and butter that harden into a golden sheet before being broken apart. For me, toffee bits are made by cooking butter and brown sugar together until they reach a deep golden color and rich aroma. Once poured onto a lined pan and cooled, the mixture becomes firm and snaps easily into tiny shards. I like how just a few simple ingredients transform through careful cooking. Homemade toffee bits add a sweet crunch and can be sprinkled over cookies, ice cream, or baked goods.
Why You’ll Love This Toffee Bits
From the first time I made these toffee bits, I realized how satisfying the process can be. I love that this recipe uses only a few basic ingredients and comes together in one small saucepan. Watching the mixture change color and thicken feels precise and rewarding. Once it cools, breaking it into small pieces is simple and even a little fun. I also enjoy how versatile they are, since I can sprinkle them over desserts or mix them into cookie dough. For me, this recipe feels dependable and easy to repeat whenever I need a crunchy topping.
Ingredients for Toffee Bits
- Unsalted butter – forms the rich base of the toffee and melts smoothly with the sugar.
- Light brown sugar – caramelizes as it cooks, creating the golden color and crisp texture.
- Fine sea salt – balances the sweetness and sharpens the overall taste of the finished toffee.
Kitchen Equipment Needed
- Small heavy bottom saucepan – cooks the butter and sugar evenly and helps prevent burning.
- Whisk – blends the butter and brown sugar smoothly while cooking.
- Heatproof spatula – scrapes the sides and bottom of the pan to keep the mixture from sticking.
- Candy thermometer (optional) – checks that the toffee reaches the correct temperature.
- Rimmed baking sheet – holds the hot toffee as it cools and hardens.
- Parchment paper or silicone baking mat – prevents sticking and makes removal easy.
- Serrated knife or rolling pin – breaks the hardened toffee into small bits.
What to Serve with Toffee Bits
Whenever I use homemade toffee bits, I like to think of them as a topping rather than a dessert on their own. I often sprinkle them over vanilla ice cream or mix them into cookie dough before baking. Sometimes I add them to brownies or press them into the tops of cupcakes for extra crunch. I also enjoy stirring a handful into yogurt or oatmeal for texture. In my experience, toffee bits work well anywhere you want a sweet, crisp contrast. They are easy to scatter over simple desserts and instantly add a golden, crunchy finish.
How to Store Toffee Bits
After the toffee has completely hardened and I have broken it into small bits, I make sure it is fully cool before storing. I place the pieces in an airtight container and keep it tightly sealed at room temperature. I choose a cool, dry place away from heat or sunlight, since warmth can make the toffee sticky. In my experience, moisture is the biggest issue, so I avoid the refrigerator unless my kitchen is very warm. When stored properly, the toffee bits stay crisp for about one week and are ready to use whenever I need them.

FAQs
1. Why did my toffee separate while cooking?
Separation can happen if the butter and sugar heat too quickly. Keep the heat steady and stir gently until the mixture turns a smooth golden color.
2. Do I need a candy thermometer?
It’s very helpful. Toffee needs to reach the hard crack stage to become crisp and break into perfect little bits.
3. Why is my toffee chewy instead of crunchy?
It likely didn’t cook long enough. The sugar mixture needs to reach the right temperature so it sets firm as it cools.
4. Can I add chocolate to homemade toffee bits?
Absolutely. You can spread melted chocolate over the hot toffee before it sets, then break it into pieces once cooled for a delicious chocolate layer.
Homemade Toffee Bits
Ingredients
Equipment
Method
- Start by preparing your pan. Line a rimmed baking sheet with parchment paper or a silicone baking mat so the toffee can be poured out easily and removed once it cools.
- Melt the butter by placing it in a small, heavy bottom saucepan over medium heat. Let it melt slowly and gently, since using high heat can cause the mixture to separate.
- Add the sugar and salt once the butter has mostly melted. Stir in the brown sugar and salt, then whisk briskly for a full minute until the mixture looks smooth and well blended. The sugar may not be completely dissolved at this stage, and that is perfectly fine.
- Continue cooking over medium heat, stirring nonstop and making sure to scrape along the edges so no sugar sticks or burns. The mixture will start to bubble and thicken, taking on the look of smooth, melted peanut butter. Important: Stay right by the stove and keep stirring the entire time. Toffee can burn fast if it is left alone, even briefly.
- If the mixture separates at any time, take the pan off the heat and whisk it briskly until it comes back together and looks smooth. Then return it to medium heat and continue cooking, stirring constantly, until it is finished.
- With a candy thermometer, cook until the mixture reaches 295°F to 305°F, which usually takes about 8 to 10 minutes.Without a thermometer, rely on sight and smell. It is ready when the mixture looks very smooth and glossy, turns a deep golden brown color, and gives off a rich, toasted caramel scent.
- Pour and spread: Carefully pour the hot toffee onto the prepared pan right away. Use a spatula to spread it into an even layer. Work gently since the mixture is extremely hot. Let it sit undisturbed for about 20 minutes, or until completely cool and firm.