My mother has six grandchildren ranging from two years old to fourteen and for years the sleeping situation when everyone visited was a chaotic combination of air mattresses in the living room, sleeping bags on the floor, and at least one grandchild on the pullout sofa that nobody actually slept well on. The kids still loved coming but the sleeping arrangements were always a source of stress and honestly a little bit of complaint from the older ones who wanted their own space.
When my mother finally converted her spare bedroom into a proper grandkids room the change was remarkable and not just practically. Something about having a room that was specifically theirs at grandma’s house made the grandchildren feel more permanently welcome, more rooted in that space, more like the house genuinely belonged to them in some small way. The youngest one now asks to go to grandma’s house specifically because of her special bed there. The older ones have claimed specific spots as their own and have strong feelings about their designated territory which is honestly adorable.
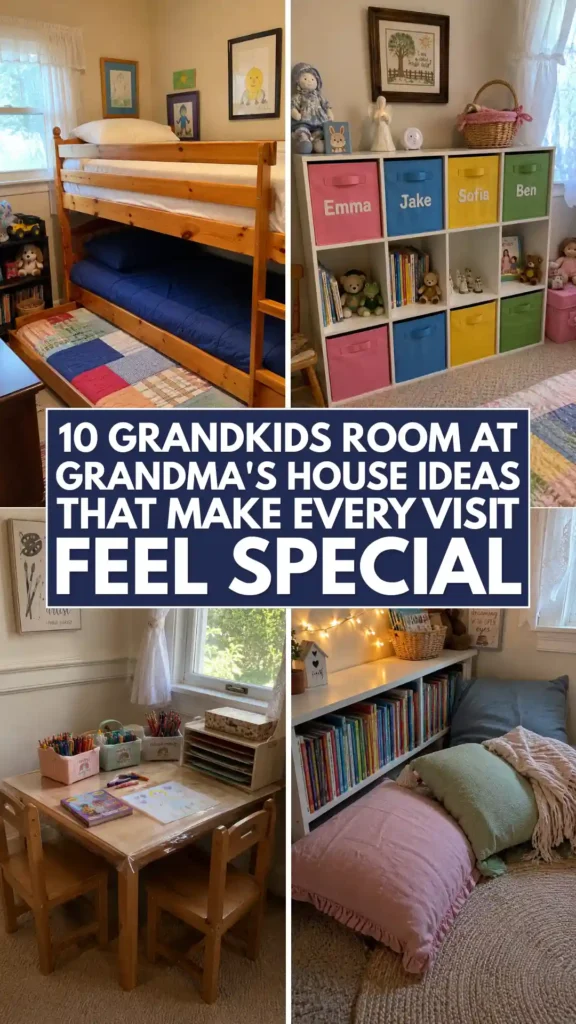
What makes a grandkids room different from a regular children’s bedroom is that it needs to work for multiple children at different ages and stages simultaneously. The two year old and the fourteen year old need to be able to coexist in the same space with different sleeping arrangements, different storage needs, and different ideas about what is fun. The room also needs to accommodate occasional use rather than daily living, which means smart storage for toys and books that get pulled out during visits and packed away when the house is quiet again.
The other thing that makes these rooms so special when done well is the personal touch. A room with each grandchild’s name somewhere in it, photos of them on the walls, their specific favorite colors or characters incorporated into the design – those details communicate something that no amount of practical planning can replace. They say you are expected here, you belong here, and this space was made with you specifically in mind.
1. Bunk Bed With Trundle Setup
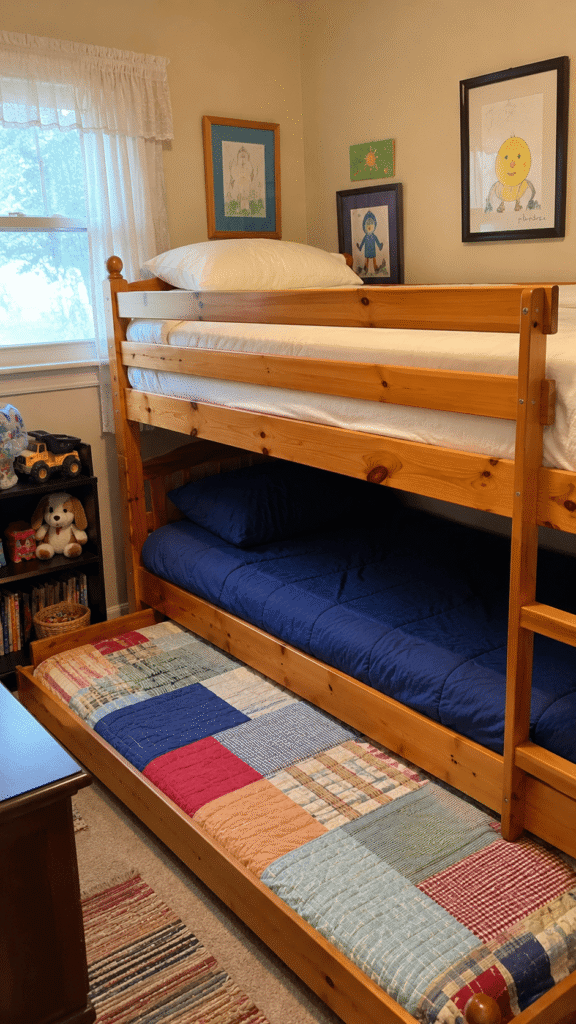
A bunk bed with a trundle that pulls out from underneath is honestly one of the best investments a grandmother can make for a grandkids room because it solves the sleeping-for-multiple-children problem in a single piece of furniture that takes up the footprint of one regular bed. Two children sleep in the bunk and a third sleeps on the trundle when it is pulled out, which means three grandchildren can sleep comfortably in what would otherwise be a one-bed room. The bunk bed also becomes the architectural feature of the room that children find genuinely exciting and even the older grandchildren usually have a preference for the top bunk.
What It Is: A bunk bed with a pull-out trundle drawer underneath providing sleeping space for three grandchildren in the footprint of a single bed, becoming the focal piece of the grandkids room.
Supplies and Budget: Twin over twin bunk bed with trundle – IKEA MYDAL or similar ($299–500), three twin mattresses ($80–200 each), bedding sets in coordinating colors ($30–60 each). Total: $569–$1100
Quick How-To: Choose a bunk bed with sturdy construction and safety rails on the top bunk. Assemble per instructions and anchor to wall. Dress each bed in a different color or pattern so children can claim their own. Add a small reading light to each level. Keep trundle pushed in when not in use and pulled out only for sleepovers.
DIY Tip: Put the youngest or lightest sleeper on the trundle rather than the top bunk regardless of who wants which spot – the trundle is closest to the ground and the safest option for the smallest child, and framing it as the special cozy spot rather than the less desirable position makes the youngest feel chosen rather than assigned to the bottom.
2. Named Cubbies and Personal Storage Spots
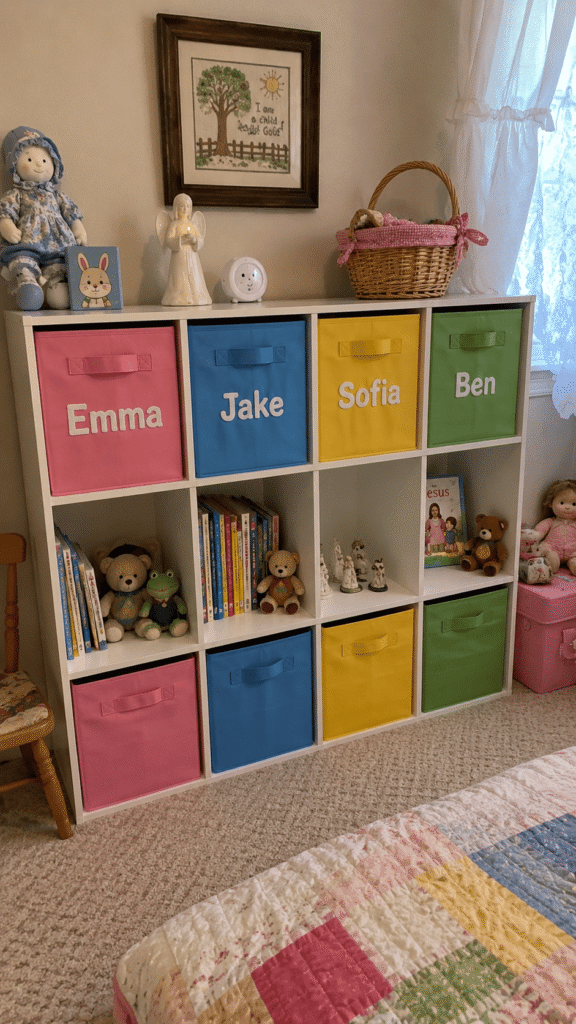
Giving each grandchild their own named cubby or storage spot in the grandkids room is one of those small gestures that means an enormous amount to children. When a child arrives and sees their name on a specific cubby, basket, or shelf section they immediately feel claimed by the space and responsible for it in a way that a generic shared room does not create. It also solves the practical problem of children’s belongings getting mixed up during visits. Each grandchild’s special toys, books, and belongings can stay in their cubby between visits so they always know exactly where their things are.
What It Is: Individual labeled storage cubbies, baskets, or shelf sections assigned to each grandchild by name using painted labels, name signs, or personalized baskets, creating personal ownership within a shared room.
Supplies and Budget: Cube storage unit IKEA KALLAX ($55–109), fabric storage bins one per grandchild ($8–15 each), name labels or wooden name signs ($5–15 per name), label maker or paint ($10–15). Total: $88–$199 depending on number of grandchildren
Quick How-To: Install a cube storage unit in the room. Assign one or two cubes per grandchild depending on number of children. Label each section clearly with the child’s name using painted wooden letters, printed labels, or custom name signs. Add a fabric bin in each child’s favorite color inside their cube. Let each child decorate or personalize their own section during a visit.
DIY Tip: Let each grandchild choose the color of their own fabric storage bin rather than choosing for them – this tiny act of ownership and participation makes the space feel genuinely theirs rather than something decided for them, and children remember and talk about the color they chose in a way that shows how much that small decision meant.
3. Reading Nook Corner With Cozy Cushions
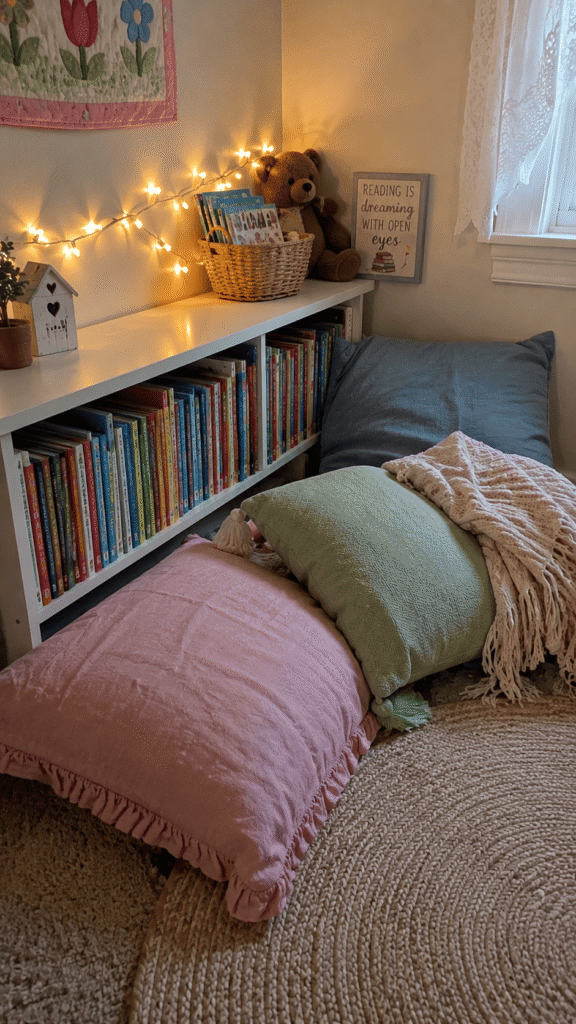
A reading nook tucked into a corner of the grandkids room becomes one of those spots that children gravitate to immediately and spend hours in during visits. Something about an enclosed cozy space that is sized for them and filled with books and soft cushions speaks directly to what children want from a space – their own world within a world. It does not need to be elaborate. A corner with a low bookshelf, a cushioned window seat or floor cushions, a string of fairy lights, and a basket of books is genuinely all it takes to create a spot children will choose over screens repeatedly.
What It Is: A cozy corner reading space created in the grandkids room using low bookshelves, floor cushions or a cushioned window seat, soft lighting, and a selection of books for varied ages.
Supplies and Budget: Low bookshelf ($40–80), floor cushions or bean bag ($25–60), throw pillows ($10–20 each), small string lights ($10–15), books ($0–40 from thrift stores or library sales). Total: $85–$215
Quick How-To: Choose a corner or alcove for the nook. Place a low bookshelf along one wall stocked with books appropriate for the age range of grandchildren. Add large floor cushions or a bean bag in front. Hang a simple string of fairy lights above to create warm ambient light. Add a small basket for current favorite books. Keep the space visually separate from the rest of the room with a small rug.
DIY Tip: Stock the bookshelf with books across a wide age range rather than targeting just the youngest or oldest grandchild – having picture books alongside chapter books means every child finds something immediately, and you will often catch older children rereading childhood favorites they find on the shelf which is genuinely one of the most heartwarming things to witness.
4. Gallery Wall of Grandchildren’s Photos and Art
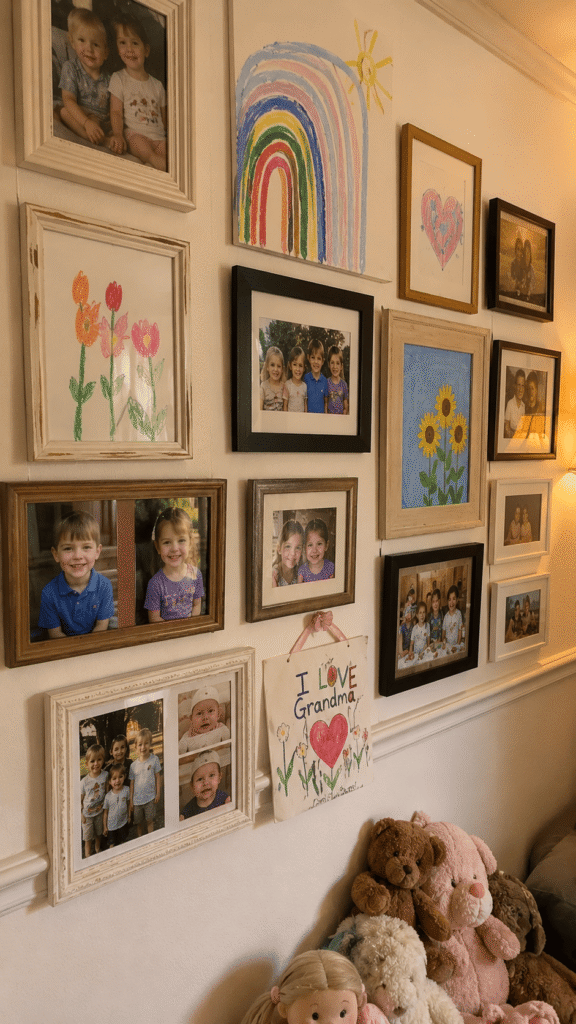
A wall in the grandkids room dedicated to photos of the grandchildren and their own artwork is the single most emotionally impactful thing you can do in that space. Children who walk into a room and see their own face on the wall, their own drawing in a frame, their own name and photo displayed with care feel profoundly loved and seen in a way that no toy or decoration can replicate. It also creates a beautiful visual record of the grandchildren growing up over the years as photos get updated and new artwork gets added with each visit.
What It Is: A gallery wall featuring framed photos of grandchildren, their original artwork, and personal memorabilia displayed together as a dedicated tribute wall in the grandkids room.
Supplies and Budget: Assorted frames in varied sizes – thrifted or matching ($20–50), photo printing from phone ($15–25 at drugstore or home), children’s artwork framed ($0 artwork, just framing cost), picture hanging strips ($8–12). Total: $43–$87
Quick How-To: Print favorite photos of grandchildren at various sizes. Collect several pieces of the grandchildren’s own artwork from previous visits. Choose frames – matching for a tidy look or varied for a more collected feel. Arrange everything on the floor before hanging to plan composition. Hang largest pieces first then fill in around them. Update with new photos and artwork regularly.
DIY Tip: Frame the grandchildren’s own artwork alongside the photos rather than just hanging drawings with tape – a child’s drawing put in an actual frame and displayed on a wall communicates that their work is real art worthy of proper display, and the pride children feel when they see their own framed artwork on grandma’s wall is something they carry with them long after the visit ends.
5. Toy Storage That Actually Works for Multiple Ages
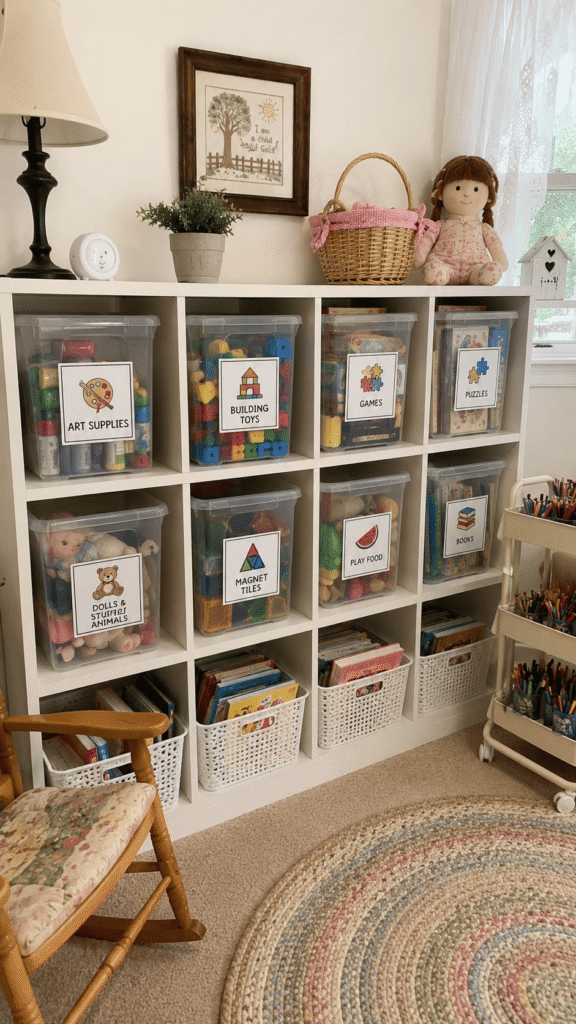
Toy storage in a grandkids room that serves children ranging from toddlers to tweens requires thinking in categories rather than ages – art supplies work for everyone, building toys work across ages, simple games and puzzles span a wide range, and having designated zones for different types of play keeps the room functional rather than chaotic. Clear bins that children can see into without digging mean everyone can find what they want independently and the cleanup process is faster when everything has an obvious labeled home. The storage system is honestly what determines whether the room stays organized or devolves into chaos within the first hour of a visit.
What It Is: A multi-age toy storage system using labeled clear bins, open shelving, and activity zones organized by play type rather than age to serve grandchildren of varied ages simultaneously.
Supplies and Budget: Clear storage bins in varied sizes ($5–15 each, need 8–12), open shelving unit ($40–80), printed or painted category labels ($8–15), small rolling cart for art supplies ($25–40). Total: $113–$215
Quick How-To: Categorize toys by activity type – art, building, games, dress-up, puzzles. Assign a clear bin to each category. Label bins with words and pictures for pre-readers. Place most frequently used categories at accessible heights. Put toddler toys in lower bins and games with small pieces higher to prevent access by youngest children. Add a rolling cart specifically for art supplies that can be pulled out when needed.
DIY Tip: Avoid organizing by age-specific toy sets and instead keep mixed categories because grandchildren visiting together naturally play across age lines – an eight year old and a four year old will both use the building blocks and the art supplies together, and organizing by activity type rather than age level means the storage system actually reflects how children genuinely play.
6. Themed Accent Wall That Kids Actually Love
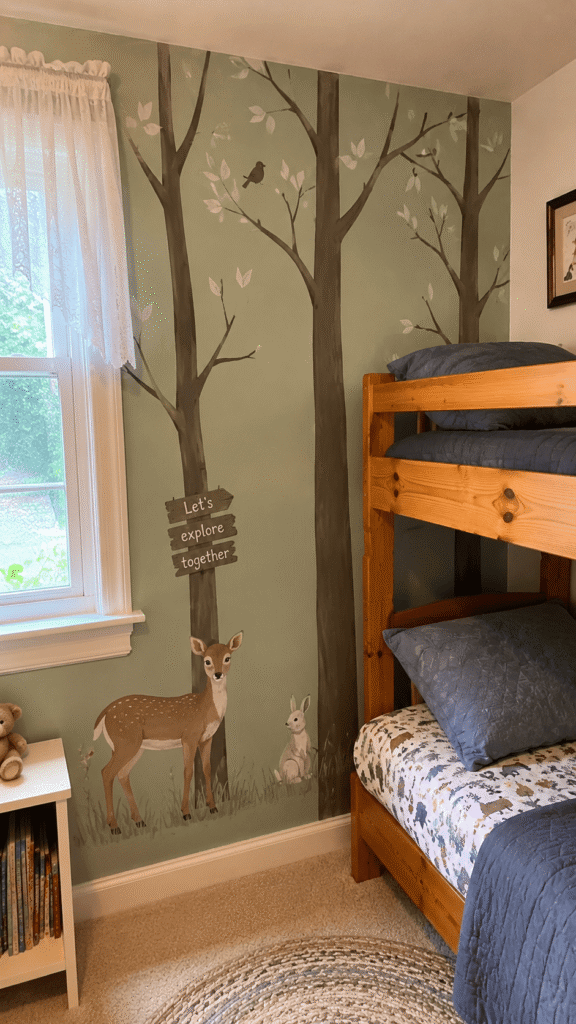
A single themed accent wall in the grandkids room creates a focal point that makes the room feel designed and intentional without requiring a full room makeover. The theme should be broad enough to work for multiple ages and genders rather than being too specific to one child’s current obsession which changes constantly anyway. Nature themes – woodland animals, an underwater scene, mountains and forests – tend to have the longest staying power and the widest appeal across ages and children. A painted mural, themed wallpaper on one wall, or even a large decal installation creates an immediate wow moment when grandchildren walk in.
What It Is: A single accent wall in the grandkids room featuring a painted mural, themed wallpaper, or large wall decals creating a visually engaging focal point that appeals to multiple ages of grandchildren.
Supplies and Budget: Peel and stick wallpaper for one wall ($45–90), or wall decal set ($25–50), or paint and brushes for simple mural ($20–35). Total: $20–$90 depending on approach
Quick How-To: Choose a theme broad enough for varied ages – woodland animals, under the sea, outer space, or a simple forest scene all work well. For peel and stick wallpaper measure the wall, order enough panels, and apply from top working down smoothing out bubbles. For a simple painted mural start with a base coat in sky or background color and add simple silhouette shapes in darker tones. Decals apply directly to a painted wall following included instructions.
DIY Tip: Paint a simple woodland or nature mural yourself using the silhouette technique rather than attempting detailed realistic painting – fill the lower half of the wall with simple tree trunk shapes and the upper half with branch silhouettes using only two or three colors, and the graphic simplicity of a silhouette mural actually looks more intentional and stylish than an overly detailed mural attempted without professional painting skill.
7. Craft and Activity Table Setup
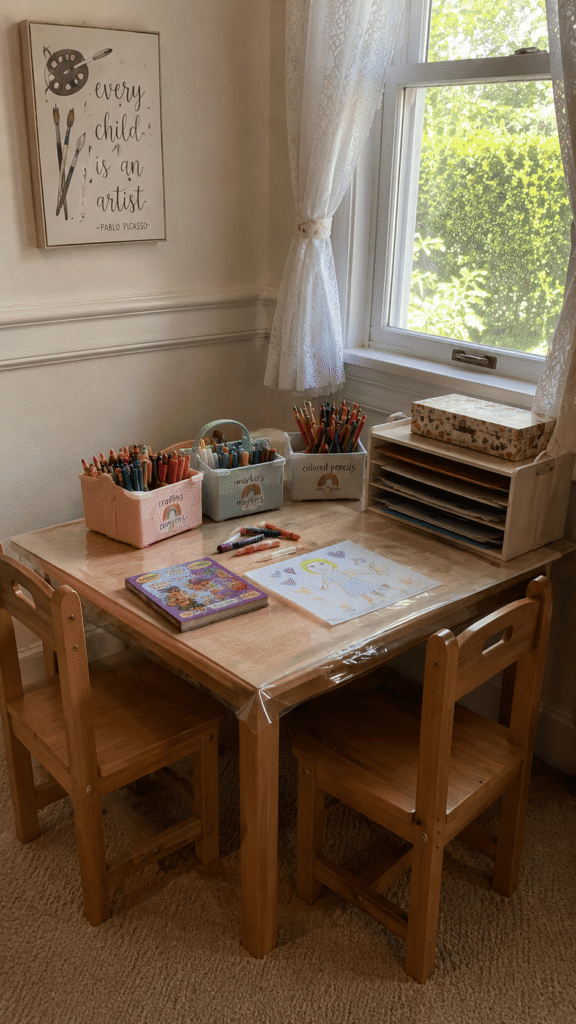
A low table dedicated to crafts and activities in the grandkids room gives children a space to create without taking over the kitchen table every time they want to make something, which is genuinely one of the most practical gifts a grandmother can give herself and her grandchildren simultaneously. The table becomes the activity center of the room – where art projects happen, where puzzles get spread out, where Play-Doh appears, where board games get played. A table at the right height for the youngest children with chairs that work for older ones too keeps everyone comfortable.
What It Is: A dedicated low table and chairs set up in the grandkids room as a craft and activity station, stocked with art supplies, games, and creative materials for independent play during visits.
Supplies and Budget: IKEA FLISAT or similar kids table ($60–100), chairs ($20–40 each, need 2–4), art supply organizer ($15–25), basic art supplies – crayons markers paper playdough ($20–35), plastic tablecloth for protection ($8–12). Total: $143–$272
Quick How-To: Position table near the window for natural light if possible. Place an art supply organizer on or near the table stocked with age-appropriate supplies. Layer a wipeable plastic tablecloth over the table surface for protection during messy projects. Add a small shelf or caddy beside the table for project storage. Keep a roll of butcher paper or large newsprint underneath for painting projects.
DIY Tip: Keep a dedicated set of old towels or paper towels in a basket right at the craft table rather than having to go to the kitchen every time something spills – having cleanup supplies immediately at hand means spills get dealt with instantly rather than spreading while someone goes to find a towel, which saves both the table surface and the carpet from the majority of craft disasters.
8. Glow in the Dark Stars and Night Sky Ceiling
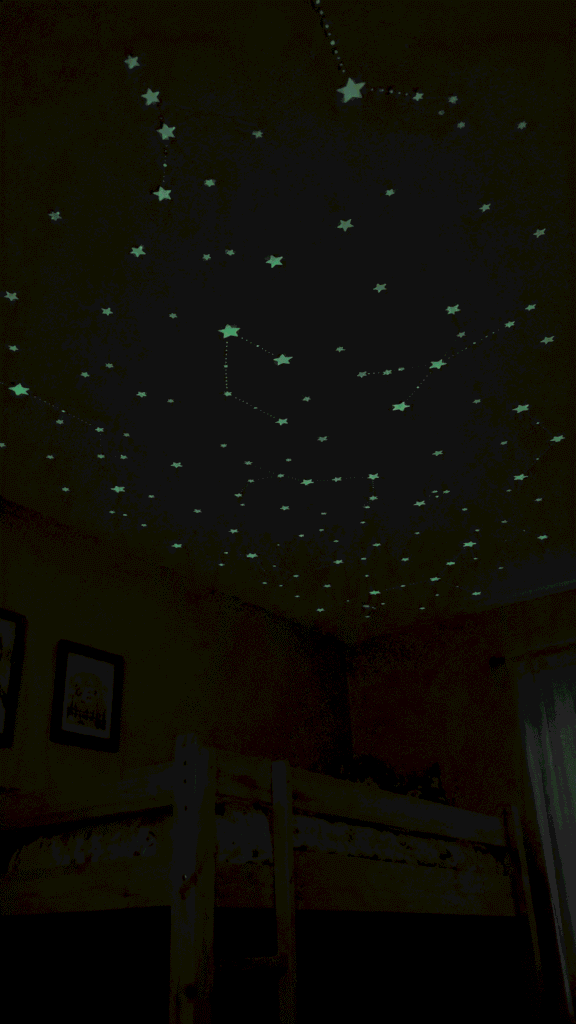
Glow in the dark stars on the bedroom ceiling is one of those additions that costs almost nothing but creates a genuinely magical bedtime experience that children talk about and remember. The ceiling looks completely normal during the day and then as the room gets dark the stars gradually appear and children lying in bed looking up feel like they are sleeping under a real night sky. Arranging the stars in actual constellation patterns adds an educational element that older children especially love discovering. This is the kind of special detail that grandchildren specifically associate with grandma’s house and nowhere else.
What It Is: Glow in the dark star stickers arranged on the bedroom ceiling in constellation patterns or a scattered galaxy design, creating a magical illuminated night sky effect visible after lights are turned off.
Supplies and Budget: Glow in the dark star stickers – larger sets ($8–20), star map or constellation guide for reference ($0 printed free online), small step ladder to reach ceiling ($0 if owned). Total: $8–$20
Quick How-To: Print a simple star map of major constellations for reference. Plan your ceiling layout starting with the most recognizable constellations – Big Dipper, Orion, Cassiopeia. Apply larger stars for brighter stars in constellations and smaller stars for background scatter. Charge the stars by turning on the ceiling light for an hour before bedtime. The stars glow most brightly for the first hour of darkness.
DIY Tip: Arrange at least some stars in actual recognizable constellation patterns rather than just scattering them randomly – children who can spot the Big Dipper or Orion on grandma’s ceiling have something genuinely interesting to look for and learn, and a grandmother who can point out the constellations at bedtime creates a memorable ritual that random scattered stars simply cannot provide.
9. Special Grandma Drawer of Surprises
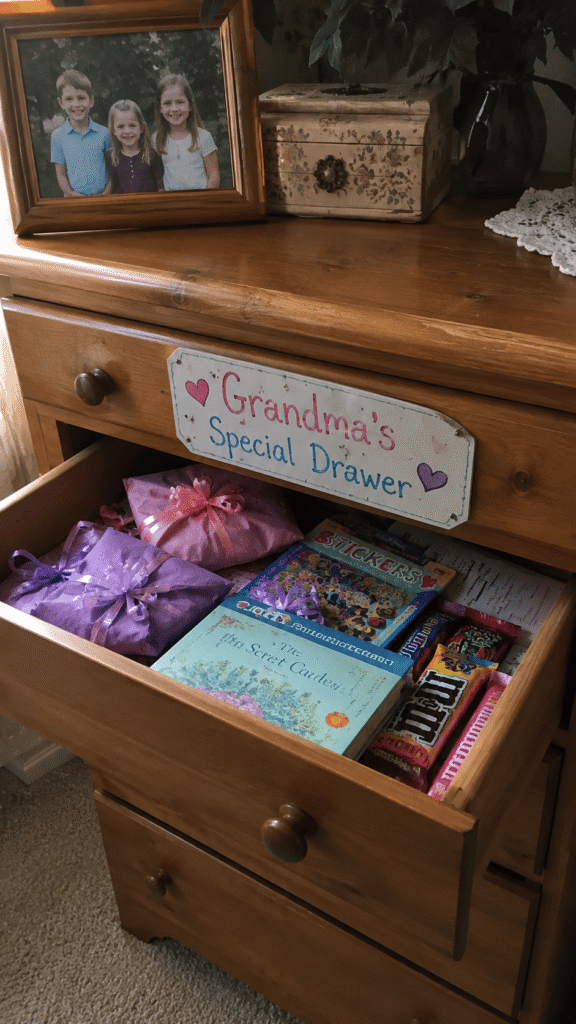
A drawer or box in the grandkids room designated as the special grandma drawer that always contains a small surprise for each grandchild when they arrive is one of those traditions that becomes legendary in a family. It does not need to contain expensive things – a new coloring book, a packet of stickers, a small puzzle, a bag of a favorite candy, a new pair of funny socks. The act of running to check the special drawer the moment they arrive creates a ritual of anticipation and the feeling that grandma thought about them specifically before they came.
What It Is: A dedicated drawer, box, or basket in the grandkids room that grandma stocks with small inexpensive surprises before each grandchild visit, creating an arrival tradition children look forward to and remember.
Supplies and Budget: Wooden box or small dresser drawer designated for surprises ($0 if repurposing existing, or $15–30 for a decorative box), surprise items per visit ($10–25 for small items for all grandchildren), labels or sign for the box ($3–8). Total: $13–$63
Quick How-To: Designate a specific drawer, box, or basket as the official surprise spot. Label it clearly – Special Grandma Drawer or Grandma’s Treasure Box works perfectly. Before each visit stock it with one small item per grandchild tailored to their current interests if possible. Create the ritual by telling grandchildren about the drawer so they know to check it when they arrive. Replenish before every visit without fail.
DIY Tip: Keep a simple running list on your phone of what you have put in the drawer previously so you do not repeat the same items too frequently – children notice and remember what they have received before and the delight of a surprise is significantly greater when it is genuinely new, while a repeated item lands flat and can accidentally communicate that you forgot what you already gave them.
10. Soft Rug and Floor Play Space

The floor space in a grandkids room matters as much as the sleeping and storage because children spend an enormous amount of time on the floor during play and a comfortable large soft rug creates an invitation to play that a hard floor or thin rug simply does not. A large plush rug defines the play area of the room, softens the space visually and acoustically, provides cushioning for floor play and for the inevitable tumbles of younger children, and makes the whole room feel warmer and more inviting. Choosing a rug with a design – a road map, a world map, a simple pattern in the room’s colors – adds play value beyond just comfort.
What It Is: A large soft area rug placed in the central floor space of the grandkids room defining the play area, providing comfort for floor play, and adding warmth and visual softness to the overall room.
Supplies and Budget: Large area rug 5×7 or 6×9 feet ($45–150 depending on material), rug pad to prevent slipping ($20–35), stain resistant treatment spray optional ($10–15). Total: $65–$200
Quick How-To: Measure floor space and choose a rug that leaves about 18 inches of floor visible around the perimeter – a rug that fills the entire floor looks cramped while one that floats in the center with visible floor border looks intentional. Add a rug pad underneath for grip and extra cushioning. Choose a pattern that has visual play value or neutral enough to last through changing preferences as grandchildren grow.
DIY Tip: Choose a rug with a low to medium pile rather than a high shag pile for a room where children play on the floor – high shag rugs trap small toy pieces, game components, and craft materials in the fibers constantly, are difficult to vacuum thoroughly, and become genuinely impossible to keep clean with active children versus a low pile rug that vacuums clean in seconds.