If your kitchen feels like it’s missing something, chances are it might just need a little extra workspace or storage. A kitchen island can completely change how your kitchen works and feels, but buying one from a furniture store can cost hundreds of dollars. The good news is that you really don’t need to spend that much. Some of the most beautiful kitchen islands out there were actually homemade, and that’s exactly what this article is all about.
DIY kitchen island ideas have been popping up all over Pinterest lately, and it’s easy to see why. People love them because they’re affordable, practical, and you can make one that actually fits your space perfectly. Whether you have a tiny apartment kitchen or a bigger open-concept layout, there’s a DIY kitchen island idea that can work for you.
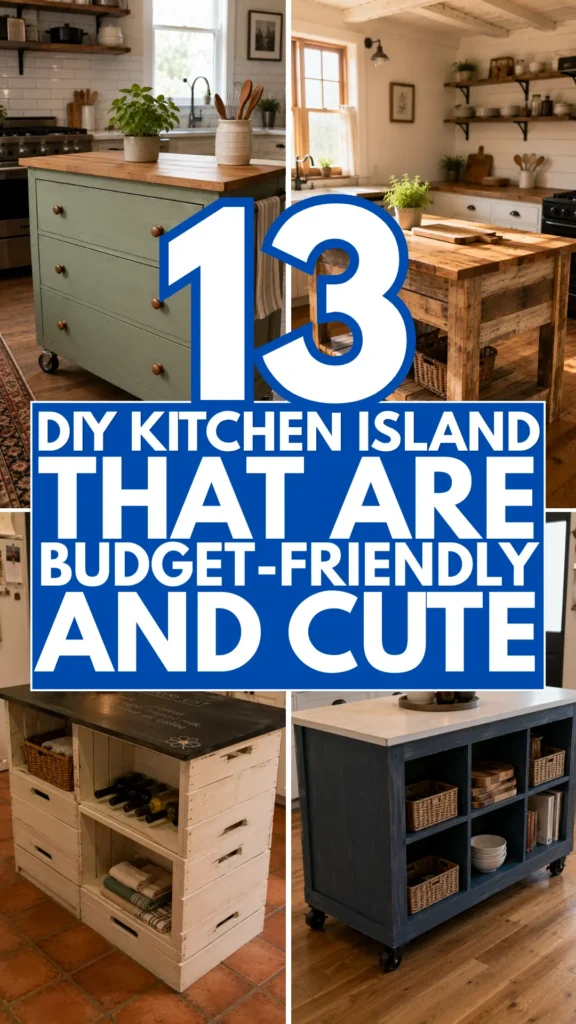
A lot of these projects use things like old dressers, wooden crates, stock cabinets from the hardware store, or even simple butcher block tops. You don’t need to be a carpenter or have a garage full of fancy tools. Many of these ideas are totally beginner-friendly and can be finished over a weekend.
What I love most about DIY kitchen islands is how personal they can feel. You get to choose the color, the finish, the hardware, and even how much storage it has. You can match your existing kitchen perfectly or give it a little personality boost with a bold color or a rustic wood top.
Whether you’re looking for extra counter space, more cabinet storage, a breakfast bar for your family, or just a cute focal point in your kitchen, these 13 DIY kitchen island ideas are going to give you so much inspiration. Grab your coffee and let’s get into it.
1. Old Dresser Turned Rolling Kitchen Island
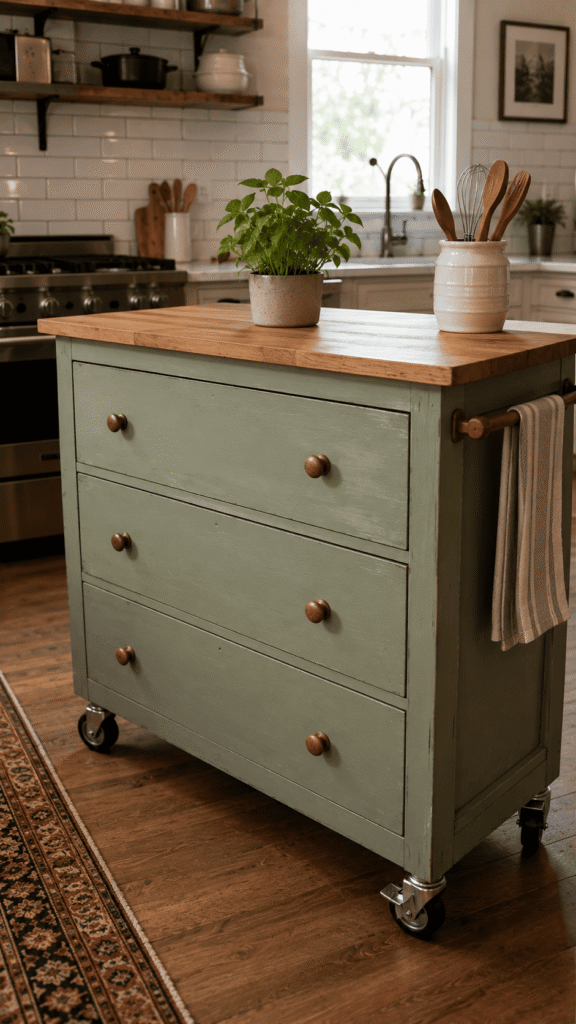
One of the most popular DIY kitchen island ideas on Pinterest is using an old dresser as your base. Find a solid wood dresser at a thrift store or garage sale, clean it up, and paint it in a color that matches your kitchen. Add heavy-duty locking casters to the bottom so it can roll around easily. Top it off with a butcher block or a piece of painted plywood sealed with polyurethane. The drawers give you amazing hidden storage for towels, utensils, and other kitchen things you want out of sight.
2. IKEA Cabinet Hack with a Shiplap Side Panel
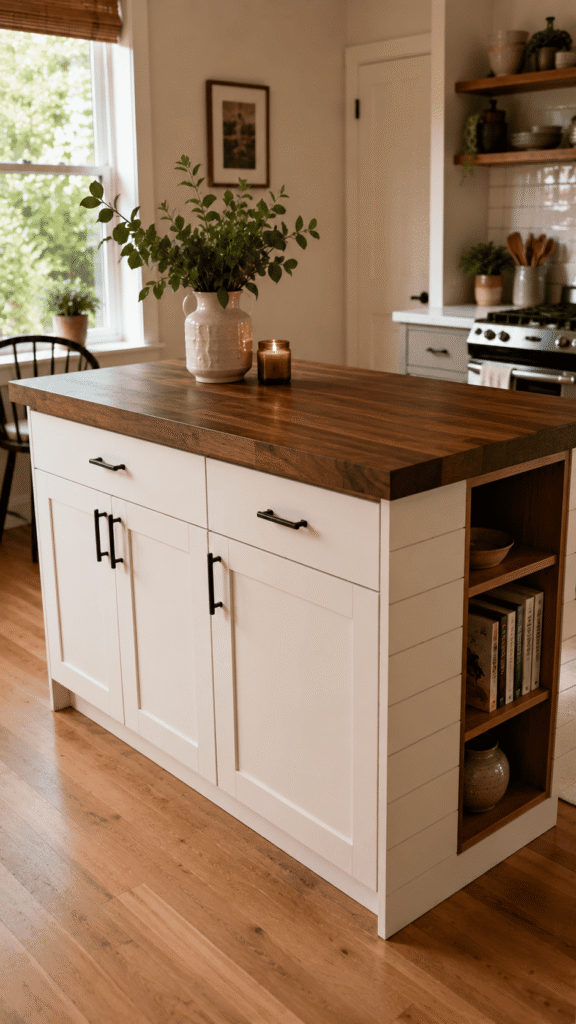
This one is a classic and it looks so good when it’s finished. Grab a couple of base cabinets from IKEA, connect them side by side, and add thin shiplap boards to the exposed sides for a farmhouse feel. Top the whole thing with a thick wood countertop stained in a warm walnut tone. Add some open shelving brackets on one end to display cookbooks or a small plant. Paint the cabinet doors in a creamy white or a deep navy depending on your kitchen style. It looks like something out of a magazine.
3. Wooden Crate Stacked Island with a Chalkboard Top
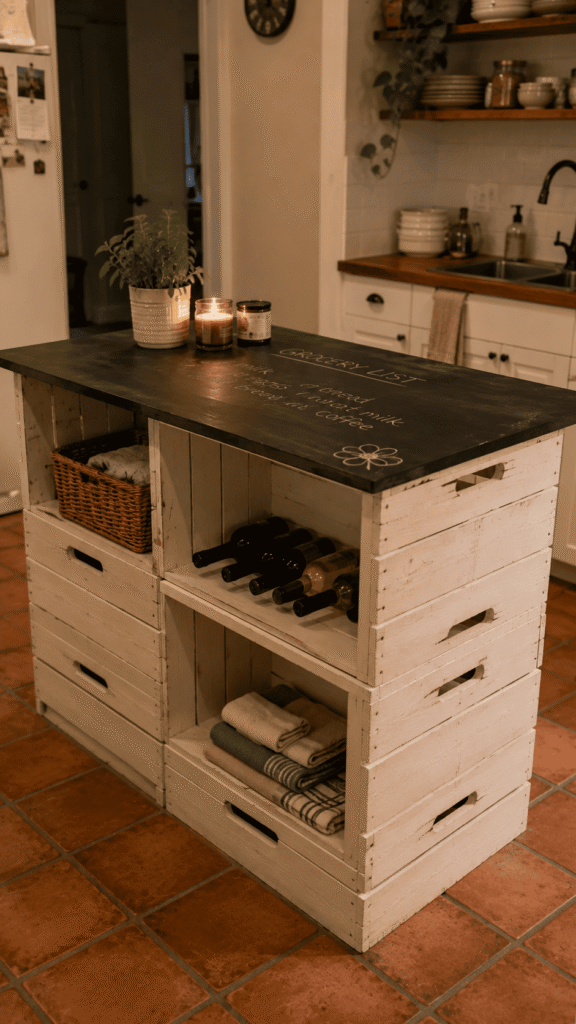
This is a super budget-friendly idea that works great in small kitchens. Stack wooden crates from the craft store or a hardware store in a brick-like pattern and secure them together with wood glue and screws. Sand everything smooth and paint or stain them in a matching color. Add a piece of chalkboard-painted plywood on top so you can write your grocery list or weekly meal plan right on the surface. The open crate shelves are perfect for storing wine bottles, produce baskets, or kitchen linens.
4. Stock Cabinet Island with a Marble Contact Paper Top
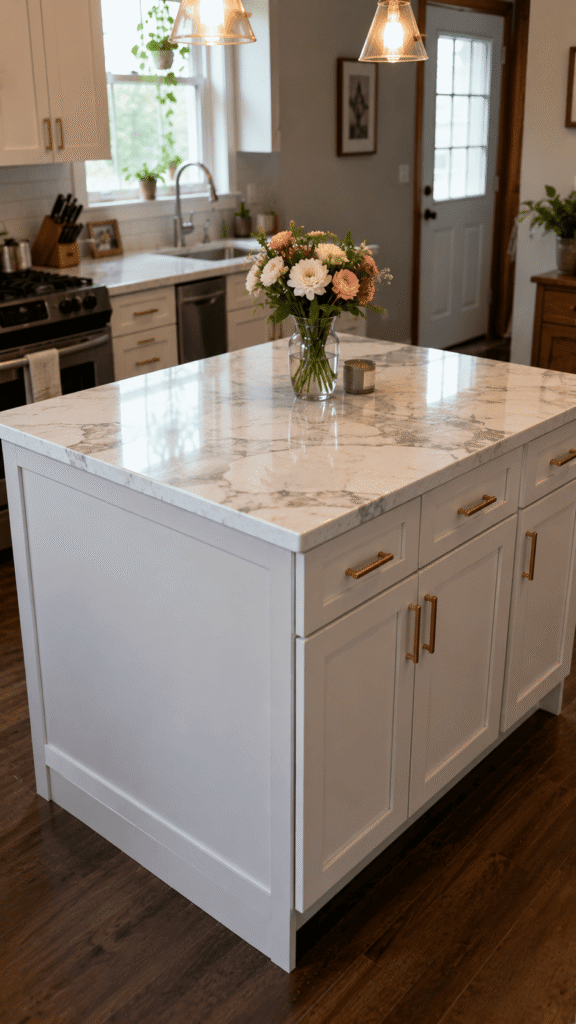
If you love the look of marble but not the price, this idea is for you. Buy a couple of stock kitchen base cabinets from your local home improvement store, assemble them, and paint them in a clean white or a soft black. Then cut marble-look contact paper to fit the top surface perfectly. Smooth it out carefully to avoid bubbles and trim the edges neatly. Finish the sides with thin wood trim strips painted to match. Add brass or gold pulls to the doors and drawers for a high-end look. Nobody will know it’s contact paper.
5. Butcher Block Top Island with Hairpin Legs
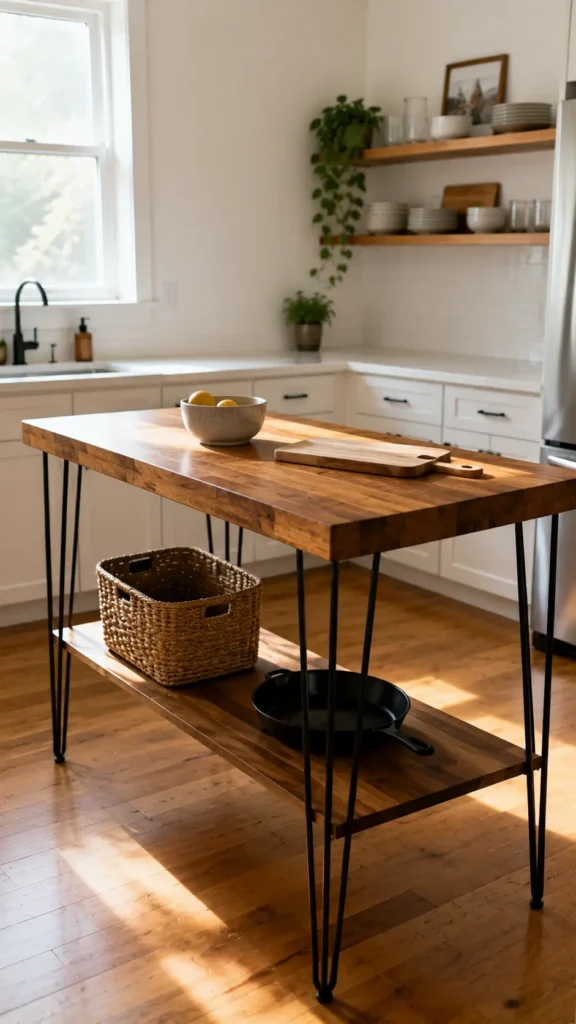
This one has such a clean and modern look. Buy a thick butcher block slab from a home improvement store and sand it down until smooth. Apply food-safe mineral oil to condition the wood and bring out that beautiful warm grain. Attach four metal hairpin legs to the bottom in a matte black finish. You can add a small lower shelf between the legs using another thin piece of wood stained to match. The whole thing sits nicely in the middle of a kitchen and gives you extra prep space plus a bit of open storage underneath.
6. Farmhouse Kitchen Island with a Bead Board Panel Side
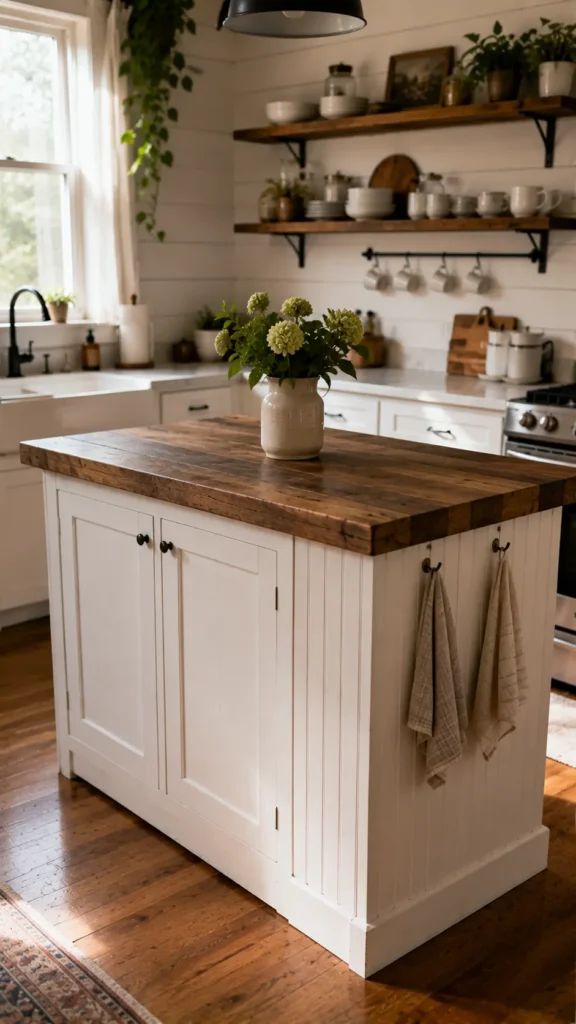
This idea gives your kitchen such a cozy farmhouse feel. Build a basic box frame from two-by-fours and plywood, then attach bead board panels to the sides for that classic cottage look. Paint everything in a warm antique white or a soft gray. Add a thick piece of reclaimed wood or pine on top, sanded smooth and sealed with a matte finish. Install some simple cabinet doors on the front using piano hinges. Add a couple of small hooks along one side for hanging dish towels or oven mitts. It’s practical and so pretty.
7. Repurposed Bookshelf Island with a Painted Wood Top
Grab an old solid wood bookshelf from a thrift store or a garage sale and lay it on its back so the shelves face up. This gives you a perfectly sized base with built-in storage cubby sections. Paint it in a color that matches your kitchen cabinets or go for a fun contrasting color like a dusty blue or a forest green. Cut a piece of plywood to fit the top, sand it smooth, and paint it in a bright white or stain it dark for contrast. Add casters to the bottom so you can roll it out of the way when needed.
8. Concrete Top Kitchen Island with Painted Wood Base

Concrete tops are so trendy right now and you can totally make one yourself using a concrete overlay product from the hardware store. Build or buy a simple wooden box base cabinet and paint it in a dark charcoal or a warm black. Mix up the concrete overlay following the package instructions and apply it over a plywood top using a trowel. Once dry, sand it lightly and seal it with a concrete sealer for a smooth matte finish. The combination of dark painted wood and a gray concrete top looks incredibly modern and stylish.
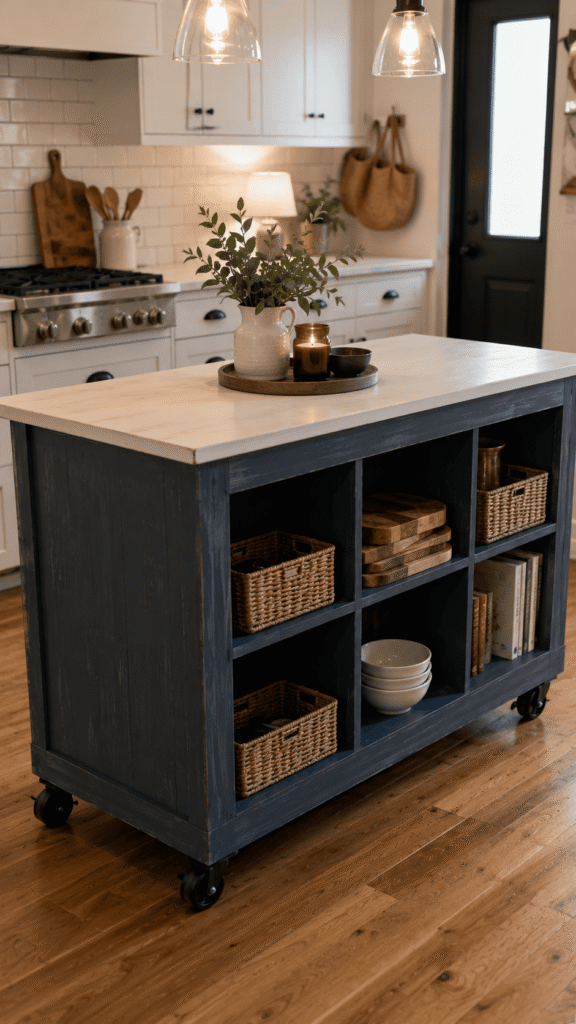
9. Two-Tone Painted Island with Shiplap and Open Shelving
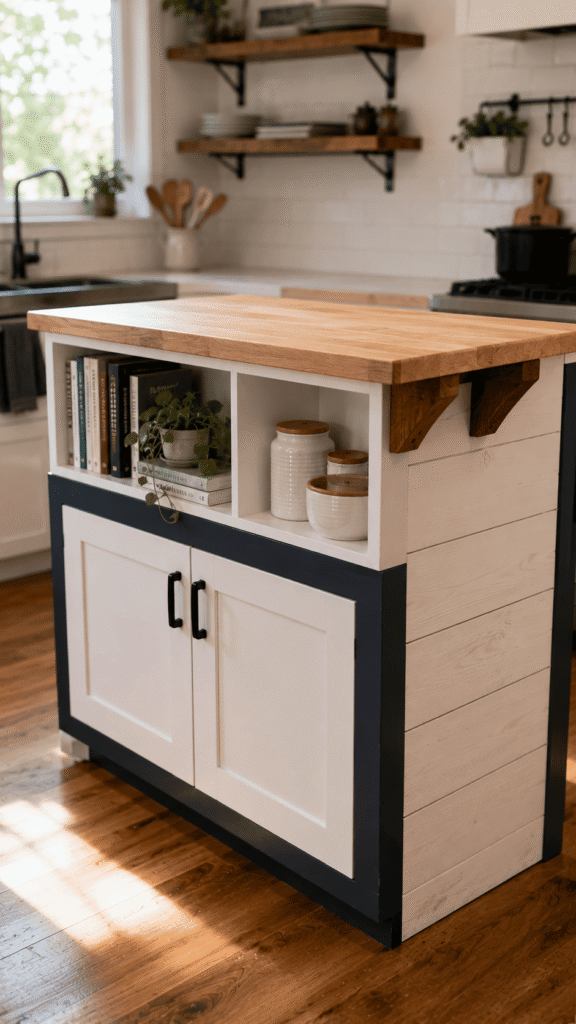
This design is so popular on Pinterest right now. Use a simple purchased or built cabinet base and paint the lower half in a deep color like navy, black, or forest green. Paint the upper portion or any open shelves in a clean white to create that two-tone effect. Add a section of horizontal shiplap to one exposed side for texture. Install one or two open shelves on the end using thick wood brackets stained in a natural walnut tone. Style those shelves with cookbooks, small plants, and a few pretty jars. It looks really polished.
10. Pallet Wood Kitchen Island with a Rustic Wood Top
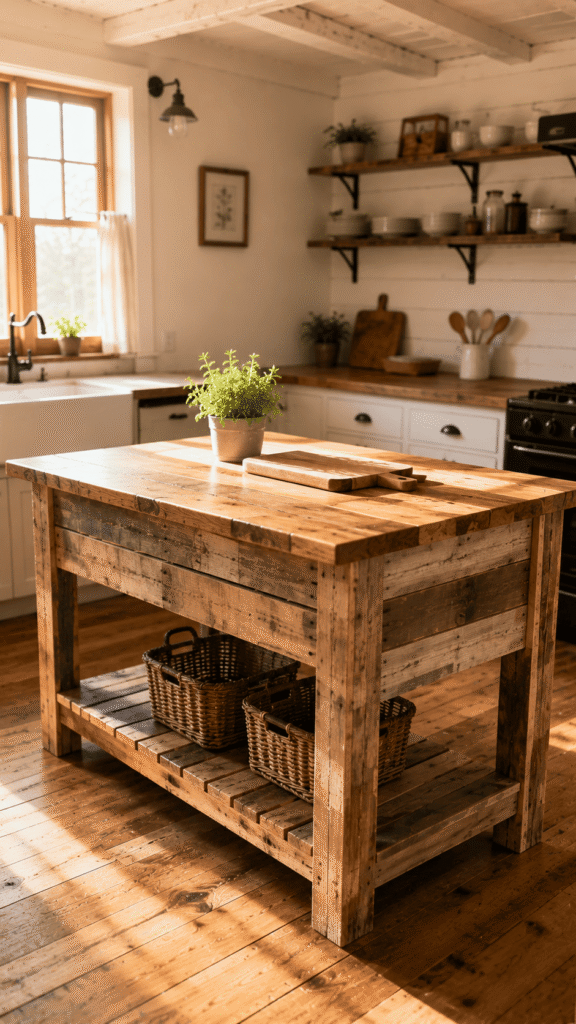
Pallet wood is free or very cheap and it makes the most gorgeous rustic kitchen island. Collect a few clean shipping pallets and break them down into individual boards. Build a simple rectangular frame and fill in the sides with the pallet boards, letting the natural variation in wood color create a beautiful weathered look. Sand everything well and seal with a clear matte sealant. Top it with a thick piece of pine stained in a honey or dark walnut finish. Add a lower shelf using more pallet boards for storing baskets or kitchen supplies.
11. Portable Bar Cart Styled as a Mini Kitchen Island
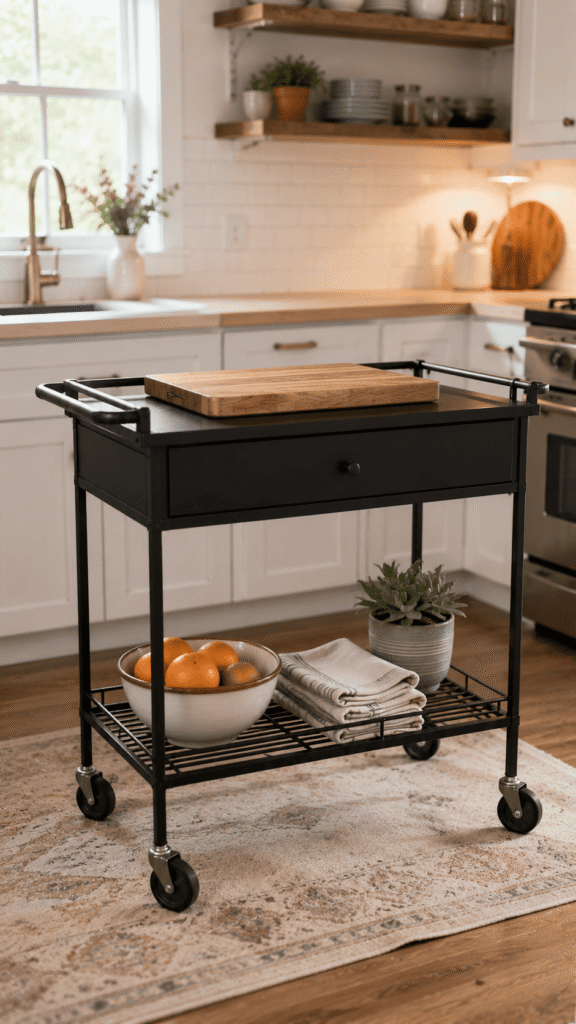
If you’re in a rental or just want something small and flexible, a bar cart makeover is the perfect solution. Find a metal or wood bar cart at a thrift store or a discount home store. Sand off any rust or old paint and give it a fresh coat of spray paint in matte black, warm gold, or a classic white. Add a small wood cutting board on the top shelf as a work surface. Use the lower shelves for storing a fruit bowl, kitchen towels, or small appliances. It rolls easily and adds so much function without taking up much space.
12. Beadboard Cabinet Island with Seeded Glass Door Panels
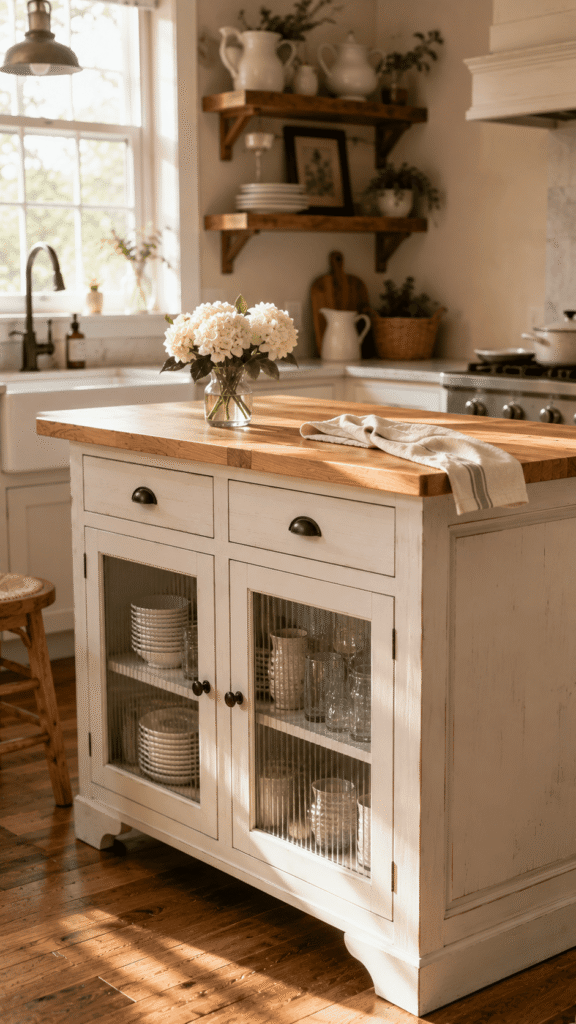
This one looks like it came straight out of a designer kitchen. Build or buy a basic cabinet base and replace the solid cabinet door panels with seeded glass or reeded glass inserts. Paint the whole cabinet in a warm antique white or a soft sage green. Add thick wood trim along the top edge and place a butcher block or white-painted plywood countertop on top. The glass doors let you show off your prettiest dishes, vintage mugs, or glass jars filled with dry pasta and grains. It’s functional and looks really elegant.
13. Freestanding Kitchen Island with a Breakfast Bar Overhang
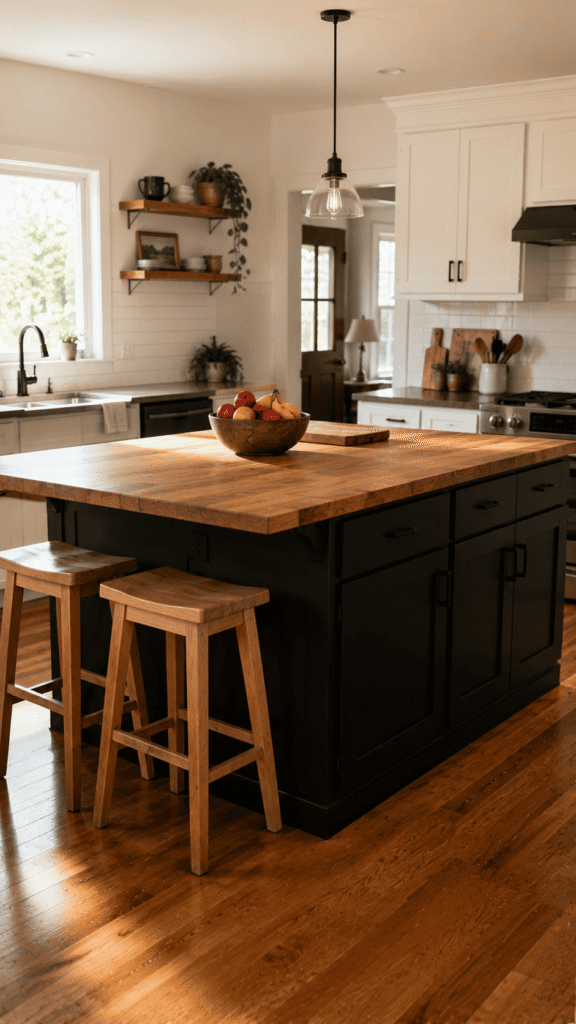
This is the ultimate DIY kitchen island if you have a little more space and want something that doubles as a casual dining spot. Build a sturdy cabinet base using plywood and two-by-fours, then extend the countertop about twelve inches on one side to create a breakfast bar overhang. Paint the base in a bold color like black or a warm terra cotta. Seal the countertop with a food-safe finish and add a few backless wooden stools underneath the overhang. It instantly becomes your family’s favorite spot for morning coffee, homework, and quick meals.
Conclusion
There you have it, 13 DIY kitchen island ideas that are actually doable and won’t cost you a fortune. From repurposed dressers and pallet wood builds to simple cabinet hacks and portable bar cart makeovers, there’s something on this list for every kitchen size and every skill level.
The best part about making your own kitchen island is that you get to design it around what you actually need. More storage, more counter space, a breakfast bar for the family, or just something that looks really good, you can build it yourself and feel so proud every time you use it.
Save this article to your Pinterest boards so you can come back to it whenever you’re ready to start your project. Pick the one that excites you most and just go for it. You’ve totally got this.